Busy Box Beats Baby’s Boredom

We would love to be a fly on the wall Christmas morning to see [Wilksyonreddit]’s kid tear the paper off of this adult-level busy box. Can you imagine the unbridled glee? It should certainly make the arduous six-month build worth the trouble. Here’s hoping the walls are sturdy, because we predict they will be bounced off of.

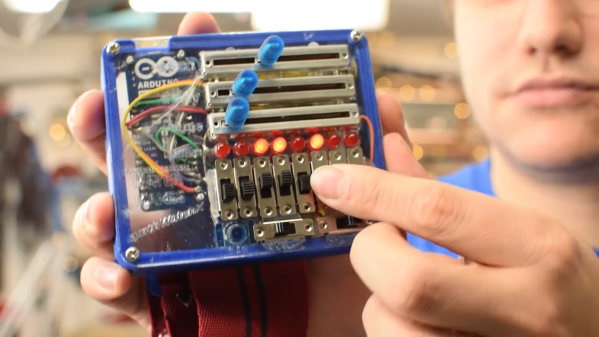
This gift that keeps on giving has an Arduino MEGA clone inside and a couple of shift registers to deal with all those buttons and switches. In addition to all the buttons, switches, and the number pad, there are two 3D-printed touch sensor pads that can detect little fingers up to four inches away. Although he’s already built a few games and activities for it, [Wilksy] posted this in r/duino looking for more ideas. There’s a lot to work with here on baby’s first nuclear missile launch console, both input- and output-wise. We humbly suggest 4D Simon, though we must admit to fantasizing about MIDI controllers.

Hidden inside this Christmas present is an Easter egg we think you’ll appreciate. Enter the right code, and the box becomes a treasure trove of Back to the Future sound effects and audio clips. Video’s after the break, McFly.

This box would make a great Kerbal Space Program controller, too, like this one.

Continue reading “Busy Box Beats Baby’s Boredom”

Sleek, Sophisticated Skittle Sorter

Sorting candy by color is a classic problem that has its roots in the contract riders of rock stars who were just trying to make sure that more important contractual obligations were not being overlooked by concert venues. Through the years, candy sorting has become a classic problem for hobbyists to solve in various ways. After a false start a few years back, [little french kev] was compelled to dust off those plans and make the most compact sorter possible.

This minimalist beauty uses an Arduino Nano and RGB sensor to assess the color. At the top, a small servo rotates an arm inside the hopper that both shakes the Skittles and sets them up single file before the sensor. Another small servo spins the tube rack around to catch the rainbow. There’s an RGB LED in the base that bathes the tube from below in light that matches the Skittles. Check out the series of gifs on [little french kev]’s personal project site that show how each part works, and then watch the build video after the break.

Did you know you can roll your own color sensor from an RGB LED and a photocell? If you don’t think candy is so dandy, you could always color-sort your LEGO.

Continue reading “Sleek, Sophisticated Skittle Sorter”

Old Christmas Tree Gets A New Spin

A couple of Christmases ago, [Nick] got tired of trying to evenly decorate his giant fake tree and built an MDF lazy Susan to make it easy as eggnog. But what’s the point of balanced decorations if one side of the tree will always face the wall? This year, [Nick] is giving himself the gift of a new project and motorizing the lazy Susan so the tree slowly rotates.

The saintly [Nick] decided to do this completely out of the junk box, except for all the WS2811 RGB LEDs on order that he hopes to synchronize with the tree’s movement. He started by designing a gear in OpenSCAD to fit the OD of the bearing, a task made much simpler thanks to the open-source gear libraries spinning around out there.

It was hard to get slow, smooth movement from the NEMA-23 he had on hand, but instead of giving up and buying a different motor, he designed a gear system to make it work. Our favorite part has to be the DIY slip ring [Nick] made from a phono connector to get around the problem of powering a rotating thing. This is a work in progress, so there are no videos just yet. You can watch [Nick]’s Twitter for updates.

[Nick] didn’t specify why he chose to use WS2811s, but they have gotten pretty cheap. Did you know you can drive them with VGA?

Via Adafruit’s CircuitPython newsletter

It’s About Time We Saw Another Infinity Mirror Clock

Have you made an infinity mirror yet? They’re pretty much a rite of passage project at this point. But unlike that DIY power supply, most of them serve no function beyond looking cool (not that there’s anything wrong with that). Might as well make it do something, right?

[How Do You – DIY] has a built a few mirrors because he likes experimenting with the effects of different reflective surfaces in various positions. This time, he’s built a clock from the ground up. Basic infinity mirror rules apply here, though he used semi-transparent reflective film on both sides for greater effect and put an adjustable warping bar in the back so the trail curves toward the center. The actual timekeeping is done by an Arduino Nano.

The RGB LEDs on his strip were a few millimeters too far apart for his liking, so he added a few dozen hours to the build by cutting it apart and painstakingly placing them all around the wood frame. Then he Dremeled a groove for each set of three wires that link the LEDs so that they sit flush. The final product is beautiful, and it’s a shame that this LED-holding frame is hidden away inside the equally well-crafted aluminium frame.

Don’t waste another minute — sweep past the break to check out the build video. If it’s a portable and functional conversation piece you want, make a set of infinity mirror coasters.

Oh, and did we mention that we’re running a clock contest? Hint, hint.

Continue reading “It’s About Time We Saw Another Infinity Mirror Clock”

Edge-Lit Ping Pong Paddle Lights Up The Fight

[George] and his coworkers like to blow off a little lunchtime steam on the company ping pong table. We might do the same, except it’d just be us versus the wall, and most of the exercise would consist of bending over to pick the ball up off the floor. When he found a scrap piece of acrylic out in their shop, [George] got the bright idea to make an edge-lit paddle featuring the company’s logo.

Not only does the paddle look cool, it works pretty well, too, even though it’s heavier and has smooth surfaces compared to a standard paddle. To begin, [George] found a regulation-size paddle outline and imported it into SolidWorks, then designed all the necessary cuts for the LEDs and other electronics. He also designed and printed ergonomic grips to protect the goods.

Continuing the stuff-on-hand theme, [George] used through-hole LEDs and dug into the abundance of battery clips and springs they have lying around for designing prototypes, instead of making it all fancy with SMT LEDs and a rechargeable battery pack. Slip on those sweatbands, because we’re serving up the build video after the break.

We see more ping pong balls than paddles around here, and that’s probably because they make great LED diffusers.

Continue reading “Edge-Lit Ping Pong Paddle Lights Up The Fight”

A Stunning Ray Gun Built From Junk

If ever there was a quintessential weapon of science fiction, it would have to be the ray gun. [lonesoulsurfer] built this one-of-a-kind stunner from his impressive collection of junk. It’s centered around a vintage Bakelite soldering gun, a vacuum tube, and a portable stove burner, all of which contribute to the fantastic mid-century look.

Inside is a slightly modified version of a ray gun sound effects circuit from MAKE: that squeezes square waves from a lo-fi synth builder’s favorite IC, the 40106 hex inverting Schmitt trigger. [lonesoulsurfer] was able to reuse the soldering gun’s trigger to start the pew-pew-pew, and he can adjust the death ray’s output with potentiometers. The gun is powered by an old cell phone battery and a combo Li-ion charger/step-up module from the world’s largest virtual auction house. Blast past the break to watch the build video.

If one little green LED isn’t enough for you, maybe you’d prefer this light painting gun.

Continue reading “A Stunning Ray Gun Built From Junk”

Programmable Wrist Synth Pushes The Envelope

Synths are a ton of fun no matter how good or bad they sound. Really, there are no bad-sounding ones, it’s just that some are more annoying to listen than others to if you’re not the one making the beep boops. [Clem] had built a tiny LDR-based synth into a watch case a few years back and took it to many a Maker Faire, where it delighted and annoyed until it ultimately broke.

Naturally, it was time to make a new version that’s more capable. Whereas the first one was Atari-punk-console-meets-light-Theremin, this one has a bunch of inputs and can be programmed on the fly to record and play back bendable tones. It’s driven by an Arduino MKR, and the inputs are managed by an impressively squash bug-wired shift register. [Clem] used beefy switches this time in the hopes that this one will last longer. We think the slide pots are a great touch, as are the candy-colored knobs printed in PMMA.

Our favorite part is that [Clem] took advantage of the random states the microcontroller pins are in when it’s first powered on. If you don’t want to program any notes, you can use the ones generated at boot and just play around with those. Be sure to check out the build video after the break.

We’ve seen our share of synths, but few as delicious-looking as KELPIE from this year’s Hackaday Prize.

Continue reading “Programmable Wrist Synth Pushes The Envelope”