Join us on Wednesday, April 3rd at noon Pacific for the 6502 Hacking Hack Chat with Anders Nielsen!
Back in the early days of the personal computing revolution, you could have any chip you wanted…as long as it was 8-bits. We’ve come a long way since then, and while nobody seriously hopes for a wholesale return to the time when a Commodore 64 or Apple II was the home computing power play, there’s still a lot to be said for the seat-of-the-pants feeling of the day. Our engineering forebears had their work cut out for them, and building the home PC revolution from the ground up with microprocessors that by today’s standards were laughably limited is something worth celebrating.
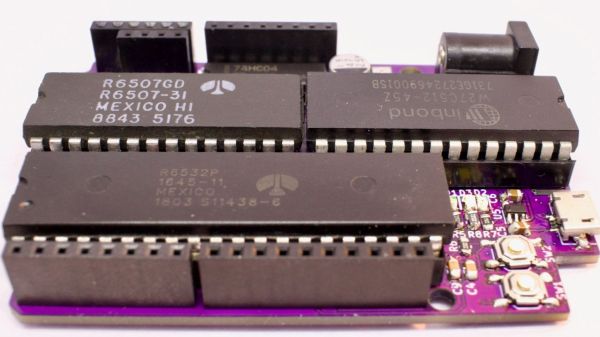
 Every retrocomputing enthusiast has their own favorite chip, and for Anders, it’s obviously the 6502 — enough to give birth to his 65uino project, which put the storied microprocessor at the heart of an Arduino pin-compatible microcontroller. It’s a neat project that seems to have caught a lot of people’s imaginations and opened up a world of hardware and software hacks that modern hardware just doesn’t need.
Getting closer to the silicon is the goal of retrocomputing, and Anders is making it easy to get involved. And we’re lucky enough to have him stop by the Hack Chat to talk all about teaching the 6502 some 21st-century tricks. Stop by and join in the discussion, and maybe you’ll catch the 8-bit bug too.
Our Hack Chats are live community events in the Hackaday.io Hack Chat group messaging. This week we’ll be sitting down on Wednesday, April 3 at 12:00 PM Pacific time. If time zones have you tied up, we have a handy time zone converter.