PID Controlled Glue Gun

Internals of a glue gun controlled with a PID controller

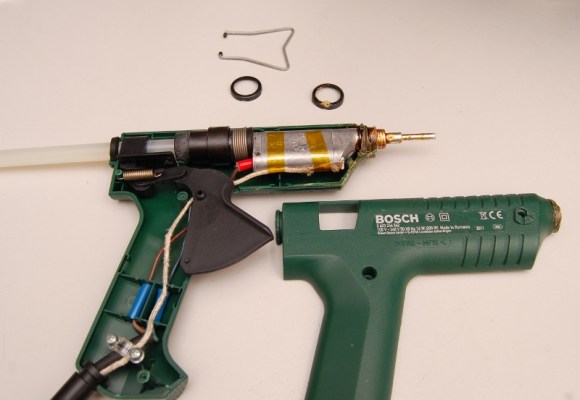
Hot glue falls into the same category of duct tape and zip ties as a versatile material for fixing anything that needs to be stuck together. [Ed]’s Bosch glue gun served him well, but after a couple of years the temperature regulation stopped working. Rather than buying a new one, he decided to rip it apart.

With the old temperature regulation circuit cooked, [Ed] looked around for something better on eBay. He came across a cheap PID temperature controller, and the Frankengluegun was born.

A thermocouple, affixed with some kapton tape and thermal paste, was used to measure the temperature of the barrel. Power for the glue gun was routed through the PID controller, which uses PWM to accurately controller the temperature. All the wiring could even be routed through the original cord grips for a clean build.

Quality glue guns with accurate temperature control are quite pricey. This solution can be added on to a glue gun for less than $30, and the final product looks just as good.

Sprite Graphics Accelerator On An FPGA

A demo running on a FPGA sprite accelerator

Graphics accelerators move operations to hardware, where they can be executed much faster. This is what allows your Raspberry Pi to display high definition video decently. [Andy]’s latest build is a 2D sprite engine, featuring hardware accelerated graphics on an FPGA.

In the simplest mode, the sprite engine just passes commands through to the LCD. This allows for basic control. The fun part sprite mode, which allows for sprites to be loaded onto the FPGA. At that point, you can show, hide, and move the sprite. By overlapping many sprites, you something like the demo shown above.

The FPGA is from Xilinx, and uses their Block RAM IP to store the state of the sprites. The actual sprite data is contained on a 128 Mb external flash chip, since they require significant space.

The game logic runs on a STM32 Cortex M4 microcontroller which communicates with the FPGA and orders the sprites around. The FPGA then deals with generating frames and sending them to the LCD screen, freeing up the microcontroller.

If you’re wondering about the LCD itself, it’s 3.2″, 640 x 360, and taken from a Ericsson U5 Vivaz cellphone. [Andy] has a detailed writeup on reverse engineering it. After the break, he gives us a video overview of the whole system.

Continue reading “Sprite Graphics Accelerator On An FPGA”

Circuit Printer Doubles As A Pick And Place

Squink PCB printer and Pick and Place

Prototyping circuits is still a pain. The typical process is to order your PCBs, await their arrival, hand assemble a board, and start testing. It’s time consuming, and typically takes at least a week to go from design to prototype.

The folks at BotFactory are working on fixing that with the Squink (Kickstarter warning). This device not only prints PCBs, but also functions as a pick and place. Rather than using solder, the device uses conductive glue to affix components to the substrate.

This process also allows for a wide range of substrates. Traditional FR4 works, but glass and flexible substrates can work too. They’re also working on using an insulating ink for multilayer boards.

While there are PCB printers out there, and the home etching process always works, building the board is only half the battle. Hand assembly using smaller components is slow, and is prone to mistakes. If this device is sufficiently accurate, it could let us easily prototype complex packages such as BGAs, which are usually a pain.

Of course it has its limitations. The minimum trace width is 10 mils, which is a bit large. Also at $2600, this is an expensive device to buy sight unseen. While it is a Kickstarter, it’d be nice to see an all in one device that can prototype circuits quickly and cheaply.

Gutenberg Clock Keeps Time By Reading Books

Gutenberg clock displaying text from a book

We’ve seen a wide variety of hacks that keep time, but [ch00f]’s latest build takes a new spin on counting the seconds. The Gutenberg Clock keeps time by reading books on a scrolling LED screen.

The content for the clock is sourced from the Project Gutenberg, which releases books with expired copyright for free. The library on the clock consists of around twenty thousand such books. Read at eighty words per minute, the clock won’t repeat a passage for the next thirty-three years.

While the clock doesn’t display time itself, it is synchronized to time. Two identical clocks should display the same text at the same time. To get the time, [ch00f] first tried hacking apart a cheap radio clock, which is synchronized to NIST’s 60 kHz broadcast. After reverse engineering the protocol with great success, stray RF energy from the display turned out to cause too much interference.

With the cheap solution out the window, [ch00f] built a custom breakout for an Adafruit GPS module and used it to get the time. This was his first RF board, but it worked out fine.

Books are loaded onto a FAT filesystem on an SD card, and [ChaN]’s FatFS is used to interpret the filesystem. A microcontroller then sends the text out at a constant rate to a serial port on the display which he hacked his way into.

The project is a neat mix of art and electronics. Stick around for a video overview after the break.

Continue reading “Gutenberg Clock Keeps Time By Reading Books”

Restarting 3D Prints

Image of a 3D print which was restarted using a different material

If a 3D printer is interrupted during a print, it will usually result in a junk part. Resuming the print can be very difficult. A group of researchers at MIT have built an add-on for 3D printers that uses a laser scanner to evaluate the state of the print, and allows the printer to restart.

While this will allow you to salvage some partially competed prints, the interesting application is switching between materials. In the image above, the lower piece was printed in ABS. The print was interrupted to change materials, and the top cube was printed in PLA. This allows for prints to mix materials and colors.

The add-on was tested with the Solidoodle 3D printer, and can be built for about $60. It requires a laser mounted to the print head, and a low-cost webcam for performing the measurements. While the group will not be continuing work on this project, they plan to open source their work so others can continue where they’ve left off.

After the break, we have a video of the printer performing a scan and resuming a print.

Continue reading “Restarting 3D Prints”

Building The NSA’s Tools

Fake ANT Catalog Entry for HackRF

Back in 2013, the NSA ANT Catalog was leaked. This document contained a list of devices that are available to the NSA to carry out surveillance.

[Michael Ossmann] took a look at this, and realized that a lot of their tools were similar to devices the open source hardware community had built. Based on that, he gave a talk on The NSA Playset at Toorcamp 2014. This covered how one might implement these devices using open hardware.

The above image is a parody of an ANT Catalog page, which shows [Michael]’s HackRF, an open source software defined radio. In the talk, [Michael] and [Dean Pierce] go over the ANT Catalog devices one by one, discussing the hardware that would be needed to build your own.

Some of these tools already have open source counterparts. The NIGHTSTAND WiFi exploitation tools is essentially a WiFi Pineapple. SPARROW II is more or less a device running Kismet attached to a drone, which we’ve seen before.

A video of the Toorcamp talk is available on [Michael]’s blog. There will also be a variety of talks on this subject at DEFCON next week, which we’re looking forward to. For further reading, Wikipedia has a great summary of the ANT Catalog.

Cold War Clock Is All Tubes

A clock built from tubes


Clocks are great projects to build. They serve a real purpose, and there’s a wide variety of ways to implement a unique timepiece. [Hank]’s Cold War Clock only uses parts and technologies that were available in 1959. It contains no semiconductors, but has an audible alarm and reasonable time accuracy.

Looking through the hand drafted schematics, you’ll find a number of Dekatron tubes. These vintage components are used as registers to store and count the time. [Hank] found some cheap Soviet Dekatrons, but had to machine his own sockets to connect them. These tubes do the counting, but the actual display consists of nixies.

A cost estimate puts this clock at $2130 in 1959, which equates to $17040 today. Clearly this would be outside the price range of most hobbyists. The actual build cost [Hank] around $1600.

There’s some intricate details in this build. The front panel has an authentic look to it, and the manual has instructions for “demolition of clock to prevent enemy use.” [Hank] calls it a “creative anachronism.” In a sense, it’s a reproduction of a product that never actually existed.

A video of this clock in action, including the Cold War era alarm, is after the break.

Continue reading “Cold War Clock Is All Tubes”