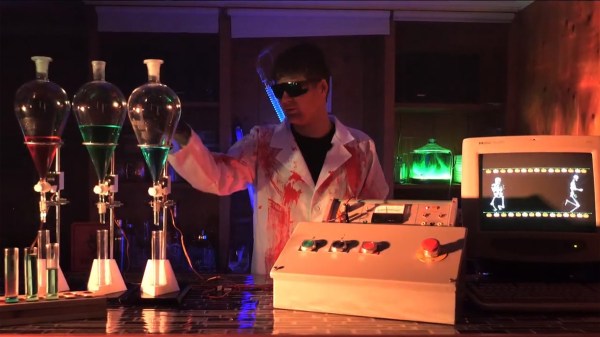
[Ben] at workbench with 3D-printed sea scooter

Watertight And Wireless In One Go: The DIY Sea Scooter

To every gadget, tool, or toy, you can reasonably think: ‘Sure I could buy this… but can I make it myself?’ And that’s where [Ben] decided he could, and got to work. On a sea scooter, to be exact.

This sea scooter was to be a fully waterproof, hermetically sealed 3D-printed underwater personal propulsion device, with the extreme constraint that the entire hull and mechanical interfaces are printed in one go. No post-printing holes for shafts, connectors, or seals. It also meant [Ben] needed to embed all electronics, motor, magnetic gearbox, custom battery pack, wireless charging, and non-contact magnetic control system inside the print during the actual print process.

As [Ben] explains, both Bluetooth and WiFi ranges are laughable once underwater. He elegantly solves this with a reed-switch-based magnetic control system. The non-contact magnetic drive avoids shaft penetrations entirely. Power comes from a custom 8S LiFePO₄ pack, charged wirelessly through the hull. Lastly, everything’s wrapped in epoxy to make it as watertight as a real submarine.

The whole trick of ‘print-in-place’ is that [Ben] pauses the builder mid-print, and drops in each subsystem like a secret ingredient. Continuing, he tweaks the printer’s Z-offset, and onwards it goes. It’s tense, high-stakes work; a 14-hour print where one nozzle crash means binning hundreds of dollars’ worth of embedded components.

Still, [Ben] took the chance, and delivered a cool, fully packed and fully working sea scooter. Comment below to discuss the possibilities of building one yourself.

Continue reading “Watertight And Wireless In One Go: The DIY Sea Scooter”

Screenshot of audio noise graph

Whispers From The Void, Transcribed With AI

‘Hearing voices’ doesn’t have to be worrisome, for instance when software-defined radio (SDR) happens to be your hobby. It can take quite some of your time and attention to pull voices from the ether and decode them. Therefore, [theckid] came up with a nifty solution: RadioTranscriptor. It’s a homebrew Python script that captures SDR audio and transcribes it using OpenAI’s Whisper model, running on your GPU if available. It’s lean and geeky, and helps you hear ‘the voice in the noise’ without actively listening to it yourself.

This tool goes beyond the basic listening and recording. RadioTranscriptor combines SDR, voice activity detection (VAD), and deep learning. It resamples 48kHz audio to 16kHz in real time. It keeps a rolling buffer, and only transcribes actual voice detected from the air. It continuously writes to a daily log, so you can comb through yesterday’s signal hauntings while new findings are being logged. It offers GPU support with CUDA, with fallback to CPU.

It sure has its quirks, too: ghost logs, duplicate words – but it’s dead useful and hackable to your liking. Want to change the model, tweak the threshold, add speaker detection: the code is here to fork and extend. And why not go the extra mile, and turn it into art?

Raspberry Pi Pico LED display sitting in window sill

An Ode To The Aesthetic Of Light In 1024 Pixels

Sometimes, brilliant perspectives need a bit of an introduction first, and this is clearly one. This video essay by [Cleggy] delivers what it promises: an ode to the aesthetic of light. But he goes further, materializing his way of viewing things into a beautiful physical build — and the full explanation of how to do it at home.

What’s outstanding here is not just the visual result, but the path to it. We’ve covered tons of different LED matrices, and while they’re all functional, their eventual purpose is left up to the builder, like coasters or earknobs. [Cleggy] provides both. He captured a vision in the streets and then built an LED matrix from scratch.

The matrix consists of 1024 hand-soldered diodes. They’re driven by a Raspberry Pi Pico and a symphony of square waves. It’s not exactly a WS2812 plug-and-play job. It’s engineered from the silicon up, with D-latches and demultiplexers orchestrating a mesmerizing grayscale visual.

Pulse-width modulation (PWM) is the secret ingredient of this hack. [Cleggy] dims each white pixel separately, by varying the duty cycle of its light signal. The grayscale video data, compressed into CSV files, is parsed line-by-line by the Pico, translating intensity values into shimmering time slices.

It transforms the way you see and perceive things. All that, with a 1000 LED monochrome display. Light shows are all highly personal, and each one is a little different. Some of them are really kid stuff.

Continue reading “An Ode To The Aesthetic Of Light In 1024 Pixels”

ATTiny85 as fan controller

An ATTiny GPU Fan Controller That Sticks

When your GPU fan goes rogue with an unholy screech, you either shell out for a new one or you go full hacker mode. Well, [ashafq] did the latter. The result is a delightfully nerdy fan controller powered by an ATTiny85 and governed by a DS18B20 temperature sensor. We all know a silent workstation is golden, and there’s no fun in throwing money at an off-the-shelf solution. [ashafq]’s custom build transforms a whiny Radeon RX 550 into a cool, quiet operator. Best of all: it’s built from bits likely already in your junk drawer.

To challenge himself a bit, [ashafq] rolled his own temperature-triggered PWM logic using 1-wire protocol on an ATtiny85, all without libraries or bloated firmware. The fan’s speed only ramps up when the GPU gets toasty, just like it should. It’s efficient and clever, and that makes it a fine hack. The entire system runs off a scavenged 12V fan. He could have used a 3D printer, but decided to stick onto the card with double-sided tape. McGyver would approve.

The results don’t lie: idle temps at 40 °C, load peaking at 60 °C. Quieter than stock, smarter than stock, and way cheaper too. The double-sided tape may not last, but that leaves room for improvement. In case you want to start on it yourself, read the full write-up and feel inspired to build your own. Hackaday.io is ready for the documentation of your take on it.

Modifying fans is a tradition around here. Does it always take a processor? Nope.

Closeup of WOPR interface on Raspberry Pi

Rebooting WarGames‘ WOPR With A Pi And Gemini

WarGames fans, rejoice: [Nick Bild] has rebooted WOPR for real. In his latest hack, the Falcon, he recreates the iconic AI from the 1983 film using a Raspberry Pi 400, a vintage SP0256-AL2 speech chip from General Instrument, and Google’s Gemini LLM. A build to bring us back to the Reagan-era.

Where most stop at visual homage, this one simulates true interaction. The Python script acts as dungeon master for Gemini 2.5 Flash, guiding it to roleplay as the WOPR computer. Keypress sounds click-clack in synchrony with every input. Gemini replies are filtered into allophones, through GI-Pi, [Nick]’s own Python library. The SP0256 then gives it an eerily authentic robotic voice, straight out of 1983.

[Nick] himself is no unfamiliar name to Hackaday. Back in 2020, he hosted a Hack Chat where he talked us through getting from ideas to prototype builds. He practices what he preaches, since he carried out projects like a breadboard 6502 computer, home-automation controlling AI sunglasses, and more silly inventions, like dazzle-proof glasses.

So… shall we play a game? If you’ve ever longed to chat with an 80s military AI about thermonuclear war or tic-tac-toe without doubting you end the world in a blink, start on this build.

Continue reading “Rebooting WarGames‘ WOPR With A Pi And Gemini”

a Coleco Adams console on a desk

Coleco Adam: A Commodore 64 Competitor, Almost

For a brief, buzzing moment in 1983, the Coleco Adam looked like it might out-64 the Commodore 64. Announced with lots of ambition, this 8-bit marvel promised a complete computing package: a keyboard, digital storage, printer, and all for under $600. An important fact was that it could morph your ColecoVision into a full-fledged CP/M-compatible computer. So far this sounds like a hacker’s dream: modular, upgradeable, and… misunderstood.

The reality was glorious chaos. The Adam used a daisy-wheel printer as a power supply (yes, really), cassettes that demagnetized themselves, and a launch delayed into oblivion. Yet beneath the comedy of errors lurked something quite tempting: a Z80-based system with MSX-like architecture and just enough off-the-shelf parts to make clone fantasies plausible. Developers could have ported MSX software in weeks. Had Coleco shipped stable units on time, the Adam might well have eaten the C64’s lunch – while inspiring a new class of hybrid machines.

Instead, it became a collector’s oddball. But for the rest of us, it is a retro relic that invites us to ponder – or even start building: what if modular computing had gone mainstream in 1983?

Close-up view of the Solaria Ultra Grand Complication watch

Time, Stars, And Tides, All On Your Wrist

When asked ‘what makes you tick?’ the engineers at Vacheron Constantin sure know what to answer – and fast, too. Less than a year after last year’s horological kettlebell, the 960g Berkley Grand Complication, a new invention had to be worked out. And so, they delivered. Vacheron Constantin’s Solaria Ultra Grand Complication is more than just the world’s most complicated wristwatch. It’s a fine bit of precision engineering, packed with 41 complications, 13 pending patents, and a real-time star tracker the size of a 2-Euro coin.

Yes, there’s a Westminster chime and a tourbillon, but the real novelty is a dual-sapphire sky chart that lets you track constellations using a split-second chronograph. Start the chrono at dusk, aim your arrow at the stars, and it’ll tell you when a chosen star will appear overhead that night.

Built by a single watchmaker over eight years, the 36mm-wide movement houses 1,521 parts and 204 jewels. Despite the mad complexity, the watch stays wearable at just 45mm wide and 15mm thick, smaller than your average Seamaster. This is a wonder of analog computational mechanics. Just before you think of getting it gifted for Christmas, think twice – rumors are it’ll be quite pricey.