Probably The Cheapest Lens You Will Ever Use

Photographic enthusiasts will invariably amass an extensive collection of lenses, and in their communities there are near-mythical and sought-after lenses that change hands for incredible prices. It’s probably the oldest photographic adage though, that the best camera in the world is the one in your hand when the scene presents itself, and probably one of the simplest cameras in the world remains the disposable film camera. Their tiny plastic lenses are not in the same league as the pricey ones, but can they be used by a more serious photographer? [Volzo] set out to find out.

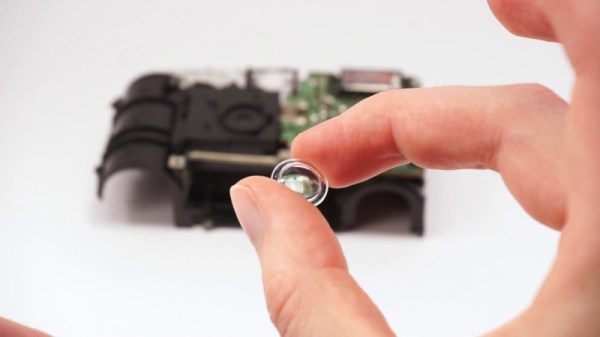
Disposable cameras aren’t the most environmentally friendly items, and he rightly points out that a cheap compact camera can deliver the same in a more sustainable package. There’s also the point to make that the flash capacitor if it has one can deliver a nasty shock, but once past that it’s easy to remove the lens itself.

A single element lens brings with it some significant distortion, and it’s a surprise to find that the focal plane of a disposable camera is curved to take account of that. His first 3D printed mount and adapter for a Sony mirrorless compact camera uses a small aperture to reduce the distortion effects from the edge of the lens but he’s not out of tricks yet. Using a pair of the lenses back-to-back he halves the focal length but further corrects the distortion and delivers a consequent wider angle. Take a look, in the video below.

The result is a usable lens for the toy-camera look on your digital camera, and since the files can all be found at the link above it’s something you can try too. If a disposable camera comes our way, we certainly will.

This isn’t the first disposable camera lens project we’ve brought you.

Continue reading “Probably The Cheapest Lens You Will Ever Use”

A Faulty Keyboard From A Single LED

When the chance arrived to buy a mechanical keyboard for not a lot, naturally, [Hales] jumped at it. Then it started having odd intermittent problems with some keys appearing stuck, which led to a teardown and some fault finding. The culprit was a white LED — but why this was the case is a fascinating story.

Stripping it down there didn’t seem to be an obvious culprit, but eventually, the trail led to a lack of diodes in the matrix. This keyboard had an extremely clever yet rather cursed design in which it used LEDs as both illumination and as a diode in the keyboard matrix circuit, and the faulty LED had a reverse breakdown condition that could be triggered under certain operational conditions.

More unexpectedly, it would sometimes hold on to its reverse breakdown state even after power off. Just when you think you understand a component’s properties, there’s always room for surprise. And we can safely say we’ve learned something about the design of cheaper keyboards in reading the account. It’s clear that when it comes to ‘boards, it’s best to take no chances.

A Dusty Boat Anchor Back From The Brink

Many of us will have found dusty forgotten pieces of electronics and nursed them back to health, but we were captivated by [Don]’s tale of electronic revival. Instead of perhaps a forgotten computer or television, his barn find was a Heathkit linear amplifier for radio amateurs. In that huge box underneath an impressive layer of grime were a pair of huge tubes, along with all the power supply components to give them the 2 kV they need. It should have been good for a kilowatt when new, can it be made to go on air again?

Perhaps understandably with such an old device, after cleaning away the dust of ages he replaced the power supply circuitry with new parts and PCBs. A linear amplifier is surprisingly simple, but because of the voltages and power concerned there’s a need to treat its power circuits with respect. On first power-up the filaments work and the rails come up, so when given some RF drive it comes alive. Coupled with a case restoration you’d never know how dreadful a state it had been in.

We like to see classic Heathkit devices here at Hackaday, though we’ve followed their more recent reappearance too.

2023 Cyberdeck Challenge: Reviving The First Notebook Computer

At first sight upon seeing [Don]’s HX2023 cyberdeck project one might be sad at the destruction of a retrocomputer, but in fact its classic Epson shell comes from a pile of spare parts left after restoring many other of the classic HX20 notebook computers to working order. The result stays true to the original but gives us so much more in the shape of a Raspberry Pi, and it’s worth cracking it open to see what components make this happen.

The first impression from the pictures is how tidy it all is, with the various USB-based boards contained on a large piece of perfboard spanning the whole case. As well as a USB hub and UPS board there’s an M.2 SSD interface and an audio board, and a DSI color TFT screen neatly fitted in place of the original monochrome item. Finally, there’s an Adafruit keyboard matrix interface board, allowing the use of the Epson’s original keys.

We like this conversion, because it manages to preserve a lot of what the original Epson had that made it great. We’re reminded of a cyberdeck inspired by the other great 8-bit notebook, the TRS-80 model 100.

There’s Always Room For Another Cycle Accurate PC Emulator

While many Hackaday readers will have their own pieces of classic hardware lovingly preserved, it still remains that most of us get our fix of retro goodness through emulation. And while there are emulators aplenty for almost every platform imaginable, the world of emulation is never complete. Thus we’re happy to encounter a new player in the form of MartyPC, a cycle-accurate 8088 PC emulator written in Rust.

It’s a project that started only in April 2022, but alongside such in-depth processor support it has the full range of PC and XT peripherals including CGA and VGA cards to the extent that it will run even the most hardware-demanding demos. Below the break you can see it running the fiendishly hardware-specific PC demo Area 5150 — thought to be the first time an emulator has managed this task.

If there’s a snag it’s that the releases are so far Windows-only, though it’s claimed that it should also compile on other major platforms. There’s also a WebAssembly version, though sadly the link to it doesn’t work. We look forward to this emulator maturing, because we’re sure it will become a PC standby. After all, not everyone managed to snag one of the recent batch of new hardware.

Continue reading “There’s Always Room For Another Cycle Accurate PC Emulator”

Ice Wrenchers, Wrencher Chocolates, And The Vaquform DT2

What do you do when you find some friends have bought a vacuum forming machine? Make novelty chocolates and ice cubes, of course! This was my response when I had the opportunity to play with a Vaquform DT2 all-in-one vacuum forming machine, so what follows is partly a short review of an exciting machine, and partly an account of my adventures in edible merchandise creation.

The vaquform machine, on a neutral white background
The Vaquform machine in all its glory.

Vacuum forming, the practice of drawing a sheet of heat-softened plastic film over a model to make a plastic shell copy of it, is nothing new in our community. It’s most often found in hackerspaces in the form of home made vacuum forming tables, and usually requires quite a bit of experimentation to get good results. The Vaquform machine I was lucky enough to be able to try is an all in one machine that puts the whole process into a compact desktop machine of similar size to a typical 3D printer. It’s a machine of two parts with a moveable carriage between them for the plastic sheet; a vacuum table on its base, and a heater unit suspended above it. The unique selling point is that it’s an all-in-one computer controlled unit that does as much as possible for you, it simply requires the user to place a sheet in the carriage and follow the instructions.

When I first saw the machine I didn’t really have anything to try it with, so of course I resorted to producing a Wrencher or two. Because what it makes are essentially moulds, it made sense to produce something Wrencher-shaped with them, and thus the chocolate and ice plan formed. The first mould was made with laser-cut Wrenchers in 2mm acrylic, stacked on two more layers of uncut acrylic to make a bar with an inset Wrencher on top, while the second one used a 3D-printed array of larger stand-alone Wrenchers with channels between them. Would my first attempt at vacuum forming make usable moulds or not? Only one way to find out. Continue reading “Ice Wrenchers, Wrencher Chocolates, And The Vaquform DT2”

Put More Power In Your Dental Hygiene Routine!

What do you do, when you move into a shared apartment and find only one socket is available among four electric toothbrushes? Revert to an old-style manual brush? If you’re [luisengineering], not a bit of it. He’s modified an electric toothbrush with the only sensible power plant, a three-horsepower twin cylinder four-stroke gasoline motor. You’ll need to turn on translated subtitles from the original German to watch it, but we hope you’ll agree it’s worth it.

After explaining the problem, the video below the break continues with the assembly of the motor, a model unit available through the usual online suppliers. This alone is interesting, for no doubt many of us have seen these motors for sale and retain some curiosity about them. We expected him to retain the electric drive for the toothbrush and use a generator, but instead, he hooks up the motor via a shaft directly to the input gear. With three horsepower behind the brush, this will surely shift that stubborn plaque! Astoundingly as you can see in the video below the break the contraption works, and both he and a friends perform their dental ablutions with it.

We like the blend of craziness and engineering embodied by this project, and we commend it to you on that basis. If you’re short of electric toothbrush modding ideas, how about an engraving tool?

Continue reading “Put More Power In Your Dental Hygiene Routine!”