There are some components which are used within our sphere so often as to become ubiquitous, referred to by their part number without the need for a hasty dig through a data sheet to remind oneself just what we are talking about. You can rattle a few of them off, the 555, the 741, the ESP8266, and so on.
In the world of LEDs, the part that most immediately springs to mind is the Worldsemi WS2812 addressable LED. This part consists of three LEDs in red, green, and blue, all in the same package with a serial interface allowing a chain of individually addressable multicolour lights to be created. We’ve seen them in all sorts of places, and if you don’t recognise the part number then perhaps you will by one of the names they’re sold under: Neopixel.
Yesterday we received an email from our piratical friends at Pimoroni, the British supplier of all forms of electronic goodies. Among their range they have a reasonable number of products containing WS2812s, and it was these products that had formed the subject of an unexpected cease-and-desist letter. APA Electronic are the manufacturer of the APA102 addressable LED (which you may know as the Dotstar), and their cease-and-desist asking for the products to be withdrawn from sale rests on their holding a patent for an addressable multicolour LED. We’d be very interested to hear whether any other suppliers of WS2812-based parts have received similar communications.
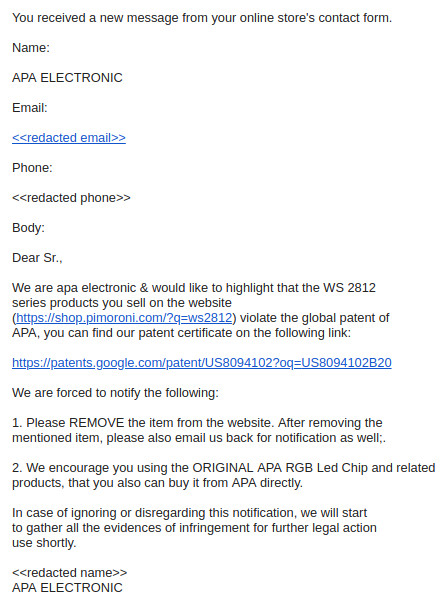
US patent number 8094102B2 is indeed a patent for a “Single full-color LED with driving mechanism”, which does look a lot like a WS2812. But as always, such things are not as cut-and-dried as they might first appear. The LED in the patent for example relies upon a clock line for its operation, while the Worldsemi part doesn’t. I am not a lawyer so I’d hesitate to call this a baseless and speculative move, but I suspect that there will be plenty over which the two semiconductor companies can duke it out in the courtroom.
It’s fair to say that a large part of the ethos of our movement shares something with that of the world of open-source, so news of legal manoeuvres such as this are never likely to go down well. We’re small fry in this context and our commercial influence on APA102 or WS2812 sales will be minimal, but inevitably APA’s standing in our eyes will be diminished. Companies such as Pimoroni are not the target but a piece of collateral damage in a battle between manufacturers.
Whether the patent has been violated or not can only be decided by the courts. It is not uncommon for patent holders to go after companies selling the “infringing” products in hopes that rather than risk a costly court battle, they simply adhere to the demands, in this case buying parts from APA and not from Worldsemi.
So, if you rely on addressable LEDs, watch out! There may be trouble ahead.
Header image: Tristan Robitaille [CC BY-SA 4.0].