To a radio amateur who received their licence decades ago there is a slightly surreal nature to today’s handheld radios. A handheld radio should cost a few hundred dollars, or such was the situation until the arrival of very cheap Chinese radios in the last few years.
The $20 Baofeng or similar dual-bander has become a staple of amateur radio. They’re so cheap, you just buy one because you can, you may rarely use it but for $20 it doesn’t matter. Most radio amateurs will have one lying around, and many newly licensed amateurs will make their first contacts on one. They’re not even the cheapest option either, if you don’t mind the absence of an LCD being limited to UHF only, then the going rate drops to about $10.
The Baofengs and their ilk are great radios for the price, but they’re not great radios. The transmitter side can radiate a few too many harmonics, and the receivers aren’t the narrowest bandwidth or the sharpest of hearing. Perhaps some competition in the market will cause an upping of the ante, and that looks to be coming from Xiaomi, the Chinese smartphone manufacturer. Their Mijia dual-band walkie-talkie product aims straight for the Baofeng’s jugular at only $35, and comes in a much sleeker and more contemporary package as you might expect from a company with a consumer mobile phone heritage. Many radio amateurs are not known for being dedicated followers of fashion, but for some operators the sleek casing of the Mijia will be a lot more convenient than the slightly more chunky Baofeng.
This class of radio offers more to the hardware hacker than just an off-the-shelf radio product, at only a few tens of dollars they become almost a throwaway development system for the radio hacker. We’ve seen interesting things done with the Baofengs, and we look forward to seeing inside the Xiaomi.
It is so often the case with a particular technological advance, that it will be invented almost simultaneously by more than one engineer or scientist. People seem to like a convenient tale of a single inventor, so one such person is remembered while the work of all the others who trod the same path is more obscure. Sometimes the name we are familiar with simply managed to reach a patent office first, maybe they were the inventor whose side won their war, or even they could have been a better self-publicist.
When there are close competitors for the crown of inventor then you might just have heard of them, after all they will often feature in the story that grows up around the invention. But what about someone whose work happened decades before the unrelated engineer who replicated it and who the world knows as the inventor? They are simply forgotten, waiting in an archive for someone to perhaps discover them and set the record straight.
[Oleg Losev] (Public domain)Meet [Oleg Losev]. He created the first practical light-emitting diodes and the first semiconductor amplifiers in 1920s Russia, and published his results. Yet the world has never heard of him and knows the work of unrelated American scientists in the period after the Second World War as the inventors of those technologies. His misfortune was to born in the wrong time and place, and to be the victim of some of the early twentieth century’s more turbulent history.
[Oleg Losev] was born in 1903, the son of a retired Russian Imperial Army officer. After the Russian Revolution he was denied the chance of a university education, so worked as a technician first at the Nizhny Novgorod Radio laboratory, and later at the Central Radio Laboratory in Leningrad. There despite his relatively lowly position he was able to pursue his research interest in semiconductors, and to make his discoveries.
There are many designs for little two-wheeled robots available to download for constructors with an interest in simple robotics. You might even think there are so many that there could not possibly be room for another, but that has not deterred [Rob Miles]. He’s created HullPixelBot, a platform for a mobile pixel as well as for simple robotic experimentation.
So what makes HullPixelBot more than just Yet Another Arduino Powered Robot? For a start, it’s extremely well designed, and has a budget of less than £10 ($12.50). But the real reason to take notice lies in the comprehensive software, which packs in a language interpreter and MQTT endpoint for talking to an Azure IoT hub. This is much more than a simple Arduino bot on which you must craft your own sketches, instead, it is a platform for which the Arduino bot is merely the carrier.
The project has had quite a while to mature since its initial release, and now has the option of a single pixel or a ring of pixels. The eventual aim is to use swarms of networked HullPixelBots to create large autonomous moving pixel displays, containing more than a hundred individual pixels.
There is an early video of some PixelBots in action which we’ve placed below the break, but it serves more as eye candy than anything else. If you have a spare ten quid, download and print yourself a chassis, install Arduino and motors, and have a go yourself!
We’ve seen many clocks here over the years. Some of them are conventional, some esoteric. So it’s not often that we see something novel in the world of timekeeping.
Strictly speaking, [Giulio Pons]’s clock project isn’t new at all. He’s taken a broken multimeter from the 1950s, and with the help of an Arduino Nano and an ESP8266 module, converted it into a clock that indicates the time on the multimeter’s moving-coil meter. He’s wired the multimeter’s front panel controls to the Arduino to operate the thing, and given it a speaker to play alarm sounds. A PIR motion detector activates the clock. In the hours of darkness, a photoresistor brings up a light. Time setting is automatic via the internet. [Giulio] previously experimented with an RTC module but found the network connection made changing time settings easier.
It’s by no means the perfect timepiece. For instance, [Giulio] found that driving the meter from a PWM pin gave different readings depending on the PSU load from other parts such as the light. But the clock does work, and has breathed new life into what might otherwise have remained a piece of junk.
How do you consume your music, these days? Aside from on the radio, that is. Do you play MP3 or other files on your phone and computer, or perhaps do you stream from an online service? If you’re really at the cutting edge though you’ll do none of those things, because you’ll be playing it on vinyl.
The legendary Technics SL1200 direct-drive turntable, as used by countless DJs. Photo by Dydric CC-BY-SA 2.5A few years ago reporting on a resurgence of sales of vinyl records was something you would never have expected to see, but consumer tastes are unpredictable. Our red-trousered and extravagantly bearded hipster friends have rediscovered the glories of the format, and as a result it’s popping up everywhere. For those of us who are old enough to have genuinely been into the format before it was cool again, the sight of Sergeant Pepper and Led Zeppelin II on 12″ at outrageous prices on a stand at the local supermarket is a source of amusement. It’s good to see your first love back in vogue again, but is it really the £20($25) per album kind of good?
With the turntable having disappeared as an integral part of the typical hi-fi setup the new vinyl enthusiast is faced with a poor choice of equipment. Often the best available without spending serious money at an audiophile store is a USB device with the cheapest possible manufacture, from which the playback will be mediocre at best. We’ve lost the body of collective knowledge about what makes a good turntable to almost thirty years of CDs and MP3s, so perhaps it’s time for a quick primer.
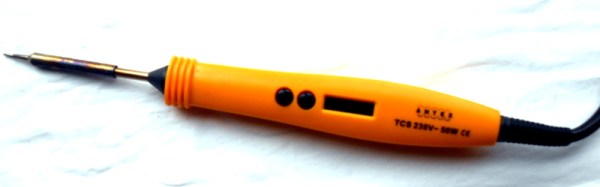
Sometime last summer, I suffered a very sad loss indeed. My soldering iron failed, and it was not just any soldering iron, but the Weller Magnastat temperature-controlled iron that had been my iron of choice since my student days. It was time to buy a replacement, and a whole world of soldering equipment lay before me. In the end I settled on a choice that might seem unexpected, I bought an Antex TCS 50W temperature controlled iron with a digital temperature controller and LCD display in its handle.
No room for a poor iron
When looking at a new iron it’s worth considering for a moment what requirements you might have. After all, while we’d all love to own a top-of-the range soldering station it’s sometimes necessary to target your purchase carefully for an acceptable blend of affordability, reliability, and performance. It’s possible to find temperature controlled irons for astoundingly low prices these days, thanks to the wonders of globalised manufacturing. But the irons themselves will not be of good quality, their bits will be difficult to replace, and sometimes they are better described as variable temperature rather than temperature controlled. If I was to escape a poor choice I’d have to set my sights a little higher.
Antex are a perennial in the world of British electronics, their signature yellow-handled irons have been around for decades. They aren’t priced at the top end of the market yet they have a pretty good reputation, but could their all-in-one temperature controlled iron be a good alternative to a unknown-name iron that came with a soldering-station-style controller? I parted with my £55 (about $68) before taxes, and waited for the delivery.
All-in-one, win or bin?
The iron I chose is the latest in a long line of their all-in-one temperature controlled irons, and so the blurb tells me, the first with digital control. Previous models had an analogue adjustment which if I recall correctly was achieved by means of a screw, while this one has an LCD display with up and down buttons on its handle.
I haven’t bothered with the supplied stand, as you can see.
In the box are the iron, a rather useless stand made from metal sheet, and an instruction leaflet. Fortunately my requirements included a decent stand, so I’d already ordered the more substantial companion product with a sponge. Out went the sponge and in went a bundle of brass turnings, but the stand itself is fine.
The iron has the usual Antex bit that fits as a sleeve over the cylindrical element. I bought a range of bits of different sizes, it’s never a bad thing to have choice. The handle is bigger than their standard irons as you might expect, but has a flattened and curved profile that’s easy on the hand. It’s noticeably lighter than the Magnastat, which along with its extra-flexible silicone cable makes it easier to use than its predecessor.
In use, the extra length of the handle doesn’t compromise soldering ability. In the time since purchase it has been used to construct multiple projects, and everything from the smaller surface-mount components upwards are taken in its stride. The 50 W element has plenty of power for soldering to PCB planes that suck away the heat, though you probably wouldn’t use it to solder heavy-gauge copper.
The temperature range of 200 to 450 Celcius is ample for my requirements, in fact once I’d set it to my normal 360 degrees I’ve never changed it. Time from power-on to full working temperature is about 45 seconds, which isn’t the fastest on the block, but then again since I turn it on when I sit down it’s not ever been an issue.
A match made in heaven
So, based on quite a few months of regular use, I’m happy with my iron. The question is though, was it the best choice? I think so, given that the competition at the price would almost certainly not come with such readily available support. There’s almost an instinctive distrust of all-in-one temperature-controlled irons that I haven’t found to be justified by the reality. An alternative might have been to build one of the clever designs that adds a temperature controller to a Weller tip, but given that this is an iron I sometimes use to earn a living I’d rather be working for cash than working on my iron. There are certainly cheaper irons and there are probably better irons, but for me this one hits the sweet spot between the two sets of being a good enough iron without being too expensive.
We’ve heard a lot about the Tesla Model S over the last few years, it’s a vehicle with a habit of being newsworthy. And as a fast luxury electric saloon car with a range of over 300 miles per charge depending on the model, its publicity is deserved, and that’s before we’ve even mentioned autonomous driving driver-assist. Even the best of the competing mass-produced electric cars of the moment look inferior beside it.
Tesla famously build their battery packs from standard 18650 lithium-ion cells, but it’s safe to say that the pack in the Model S has little in common with your laptop battery. Fortunately for those of a curious nature, [Jehu Garcia] has posted a video showing the folks at EV West tearing down a Model S pack from a scrap car, so we can follow them through its construction.
The most obvious thing about this pack is its sheer size, this is a large item that takes up most of the space under the car. We’re shown a previous generation Tesla pack for comparison, that is much smaller. Eye-watering performance and range come at a price, and we’re seeing it here in front of us.
The standard of construction appears to be very high indeed, which makes sense as this is not merely a performance part but a safety critical one. Owners of mobile phones beset by fires will testify to this, and the Tesla’s capacity for conflagration or electrical hazard is proportionately larger. The chassis and outer cover are held together by a huge array of bolts and Torx screws, and as they comment, each one is marked as having been tightened to a particular torque setting.
Under the cover is a second cover that is glued down, this needs to be carefully pried off to reveal the modules and their cells. The coolant is drained, and the modules disconnected. This last task is particularly hazardous, as the pack delivers hundreds of volts DC at a very low impedance. Then each of the sixteen packs can be carefully removed. The packs each contain 444 cells, the pack voltage is 24 V, and the energy stored is 5.3 kWh.
The video is below the break. We can’t help noticing some of the rather tasty automotive objects of desire in their lot.


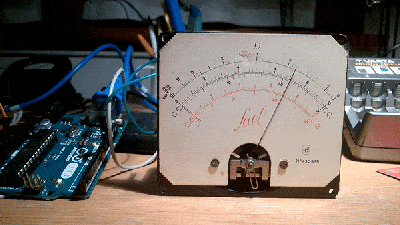 Strictly speaking, [Giulio Pons]’s clock project isn’t new at all. He’s taken a broken multimeter from the 1950s, and with the help of an Arduino Nano and an ESP8266 module,
![The legendary Technics SL1200 direct-drive turntable, as used by countless DJs. Dydric [CC BY-SA 2.5)], via Wikimedia Commons.](https://hackaday.com/wp-content/uploads/2017/02/640px-technics_sl-1200mk2-2.jpg)