A Smart Switch Board For The ESP8266

With a plethora of IoT projects and inexpensive commercial smart light fittings and mains switches appearing, you might be forgiven for thinking that another offering in this crowded marketplace would be superfluous. But there is always room for improvement in any field, and in this particular one [Xose Pérez] has done just that with his Espurna board.

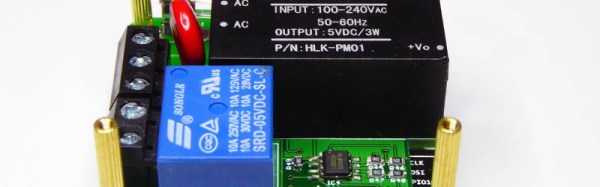
This board is a very well executed ESP8266 mains relay, with an on-board mains power supply and power monitoring. It was designed with his Espurna (“Spark” in Catalan) custom firmware in mind, which offers support for Alexa, Domoticz, Home Assistant and anything that supports MQTT or HTTP REST APIs.

Best of all, it’s a piece of open source hardware, so you can download everything you need from his GitHub repository to create your own. For the ultimate in convenience you can even order the PCB ready-made from OSH Park.

As a demonstration of the Espurna board in a real application, he’s produced a smart socket project neatly enclosed in a wall-wart style box with an inbuilt Euro style plug and socket.

We’ve featured [Xose]’s work several times before here at Hackaday, he’s something of an IoT wizard. Most recently there was his work with Alexa and the ESP8266, but before that was his MQTT LED array for his laundry monitor.

This Binary Keyboard Is For ASCII Purists

So, you’re a keyboard enthusiast. The ‘board that came from Dell, HP, or whoever made your computer is just not for you. You have an ancient IBM, a decal-free Das Keyboard, or another similarly esoteric text input device. Your typing can be heard three blocks away as the unmistakable clack of bent-spring switches reverberates around you, but you don’t care because you’re in the Zone.

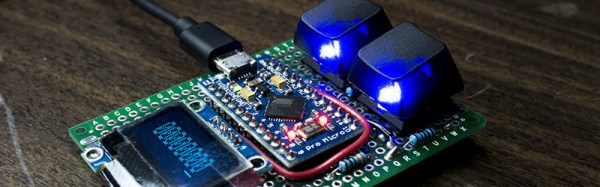
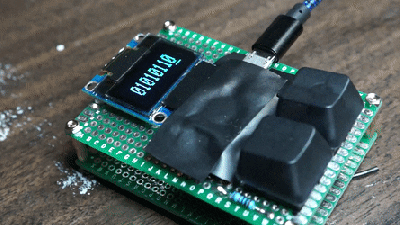
No keyboard can be as high-end as the one you already have, your position in the hierarchy of text entry is assured. But then along comes [Chris Johnston] with his project, and suddenly your desktop looks very cluttered. It’s a binary keypad with only a 0 key, a 1 key, and an OLED display. All input is as a series of binary bytes, so as a hardcore binary typist you’ll need to know your ASCII.

Behind the keys is an Arduino Pro Micro acting in USB HID mode, and running the code you can download from the GitHub link above. It’s a gloriously pointless input device, but we’re sure you’ll agree it has something of the 00110001 00110011 00110011 00110111 about it.

If you think you may have seen this before on Hackaday then you’re not quite right. We have had a binary keypad in the past, but that one had a return key and thus had three keys. This one’s a 2-key ‘board for binary purists.

[via /r/mechanicalkeyboards/]

Hackaday Prize Entry: Another Internet Button

It’s long been a staple of future-gazing, the idea that we will reach a moment at which all of life’s comforts can be summoned at the press of a button. Through the magic of technology, that is, without the army of human servants with which wealthy Victorians surrounded themselves to achieve the same aim.

Of course, to reach this button-pressing Nirvana, someone has to make the buttons. There are plenty of contenders for the prize of One Button To Rule Them All, the one we’ll probably have seen the most of is Amazon’s Dash. Today though we’re bringing you another possibility. [Hendra Kusumah]’s A.I.B. (Another IoT Button) is as its name suggests, a button connected to the Internet. More specifically it’s a button that connects to IFTTT and allows you to trigger your action from there.

Hardware wise, it couldn’t be simpler. A button, a Particle Photon, some wires, and a resistor. Then install the code on the board, and away you go. With a small code change, it also works with an ESP8266. That’s it, it couldn’t be simpler. You might ask where the fun in that lies, but you’d be missing the point. It’s the event that you trigger using the button that matters, so why make creating the button a chore?

We’ve shown you many IoT buttons, just a couple of posts are this ESP8266 button and a look at  the second-generation Amazon Dash.

The Complex Issue Of Hackspace Donations

More than one member of the Hackaday team has significant involvement in a hackspace, as member, director, or even founder. We talk about hackspaces quite rarely on these pages though, not because we don’t have anything to say on the matter but because even when we write in general terms our fellow members invariably think it’s all about them rather than the hackspace world at large.

For once I’m going to break the silence, and not only talk about hackspaces, but talk about my own hackspace in specific terms. Because, fellow Oxford Hackspace members, this isn’t about you personally though I’m using our home to illustrate a point. The topic is a thorny issue that must affect all spaces, that of donations of physical items. People want to help their hackspace, they have a pile of what they consider to be good stuff, and when they’re having a clear-out they make a donation. But, as we all know, “one man’s trash is another man’s treasure” and vice-versa. Continue reading “The Complex Issue Of Hackspace Donations”

Hackaday Prize Entry: Zappotron Super Sequencer

If you fancy a go at circuit bending, where do you start? Perhaps you find a discarded musical toy at a junk sale and have a poke around, maybe you find the timing circuit and pull it a little to produce a pitch bend. Add a few wires, see what interesting things you can do connecting point A to point B, that kind of thing.

Many of us have spent an entertaining afternoon playing in this way, though it’s probable few of us have achieved much of note. [Russell Kramer] however must have persevered to become a circuit bender par excellence, as his latest project is one of the most accomplished circuit bending projects we’ve seen.

Zappotron Super Sequencer is an analog sequencer. Except that sentence simply doesn’t convey what it really is, it’s an analog sequencer with four sound sources: two tape decks, a 4046 oscillator, and a circuit-bent spelling tutor toy, and its sequencer component is controlled with a Nintendo light gun and a CRT screen.

You might be thinking that you could do all that with relative ease on a modern single board computer, but what makes this project so special is that he’s achieved it using only logic chips and diode logic gates, not a microprocessor in sight save for the one in the spelling toy. The build log goes through all the circuitry in detail, and we have to tell you it’s a work of art that demonstrated his mastery of both analog circuitry and digital logic.

To cap it all off he’s mounted it in a gloriously retro console, complete with retro embossed labeling. This is a high-quality item that we’d suggest you take a while to read about in detail. He’s posted a video demonstration if you’d like to see it in action, we’ve posted it below the break.

Continue reading “Hackaday Prize Entry: Zappotron Super Sequencer”

Retro Teardown: Inside An 8-Track Stereo Player

If you are a connoisseur of analogue audio, it’s probable you might have a turntable and a stack of records at home somewhere. If you are of a certain age you may even have a cassette deck, though you’re more likely to have abandoned that format some time in the 1990s. If you are old enough to have been around in the 1960s or 1970s though, you may have owned another analogue audio format. One of several that you might have found in a well-equipped home of that period was the 8-track stereo cartridge, a self-contained tape cassette format that fit four stereo tracks onto a single quarter-inch tape loop as eight parallel tracks, four each of left and right. A triumph of marketing, really, it should more accurately have been called 4-track stereo.

An 8-track stereo cartridge. Government & Heritage Library, State Library of NC (CC BY 2.0).

8-track cartridges were developed from earlier tape cartridge formats, largely to satisfy the demands of the automotive industry for interchangeable in-car entertainment. Thus if you owned an 8-track player it was most likely to have been found in your car, but it was not uncommon to find them also incorporated into home hi-fi systems. Thus we come to our subject today. Our retrotechtacular series usually highlights a video showing a bygone technology, but today we’re going to get a little more hands-on.

Some time in the early 1990s, I acquired an 8-track player, a BSR McDonald unit manufactured in the UK and dating from the early 1970s. BSR were much more well-known for their turntables, so this is something of an oddity. Where I found it has disappeared into the mists of time, but it was probably at a radio rally or junk sale. I certainly didn’t buy it because I wanted it to play 8-track tapes, instead I wanted a talking point for my hi-fi, something quirky to set it apart from everyone else’s. So every incarnation of listening enjoyment chez List for the last quarter century has had an 8-track player nestling within it, even if it has never played a tape while in my ownership. Thus we have a unique opportunity for this retro teardown.

Continue reading “Retro Teardown: Inside An 8-Track Stereo Player”

A Huge Infra-Red Touch Board

We’re all used to touch pads on our laptops, and to touch screens. It’s an expectation now that a new device with a screen will be touch-enabled.

For very large surfaces though, touch is still something of an expensive luxury. If you’re a hardware hacker, unless you are lucky enough to score an exceptional cast-off, the occasional glimpse of a Microsoft PixelSense or an interactive whiteboard in a well-equipped educational establishment will be the best you’re likely to get.

[Adellar Irankunda] may have the answer for your large touch board needs if you aren’t well-heeled, he’s made one using the interesting approach of surrounding the touch area with an array of infra-red LEDs and photo transistors. By studying the illumination of the phototransistors by different LEDs in the array, he can calculate the position of anything such as a pointing finger that enters the space. It’s an old technique that you might have found on some of the earlier touch screen CRT monitors.

His hardware is built on twelve breadboards mounted in a square, upon which sit 144 LED/phototransistor pairs managed through a pile of 4051 CMOS multiplexers by a brace of Arduino Nanos. If you fancy one yourself he’s provided all the code, though the complex array of breadboards to assemble are probably not for the faint-hearted. You can see it in action in a video we’ve posted below the break.

Continue reading “A Huge Infra-Red Touch Board”