Simple MIDI Sample Player Runs On ESP32

[Jakub] is a musician, and found himself in need of a simple way to trigger samples via MIDI when on stage. So many commercial solutions exist, but most were overkill for the job or too messy and complicated to justify their use in a live environment. Thus, [Jakub] worked up Samplotron to do exactly the job needed with a minimum of fuss.

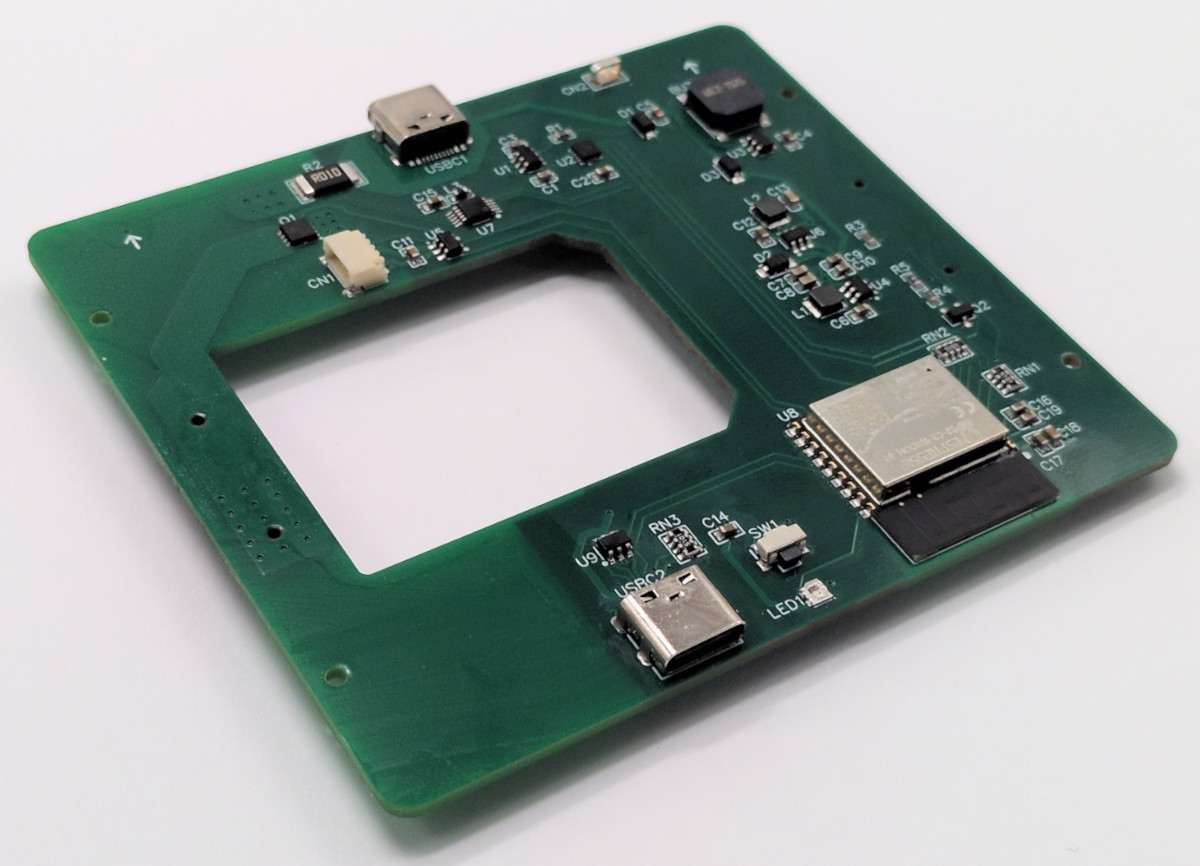
The project is based around the ESP32. It’s effectively a lightweight hardware sampler that can trigger sounds on command via MIDI. Sample data is loaded from an SD card, which also stores the device configuration. The Samplotron plays back mono 16-bit WAV files at 44,100 Hz, delivering audio via an ES8388 audio codec module connected via I2S. Two encoders are used to control the device, with a menu system presented via an SSD1309 OLED screen. Samples can be loaded and managed via this interface, and it allows tweaks to be made to volume levels and one-shot/loop playback as needed. MIDI input to the device is simply handled via the onboard UART functionality of the ESP32 itself.

It’s a neat little bit of music hardware that does exactly what [Jakub] needs and nothing more. We’ve featured similar builds before, like this neat RP2040 soundboard. If you’re building rad custom hardware for your own musical adventures, we’d love to know all about it. 

DIY Reflow Plate Runs On USB Power Delivery

If you’re working with surface mount components, you’re likely going to want a reflow plate at some point. [Vitaly] was in need of just such a tool, and thus whipped up a compact reflow plate that is conveniently powered via USB-C. 

This reflow rig is designed for smaller work, with a working area of 80 mm x 70 mm. There are two options for the heating element—either a metal core PCB-based heater, or a metal ceramic heater. The former is good for working with Sn42Bi58 solder paste at 138 C, according to [Vitaly], while the latter will happily handle Sn63Pb37 at 183 C if the dirty stuff is more your jam.

Running the show is an ESP32-C3-WROOM, which serves up a web-based control panel over Bluetooth for setting the heating profiles. Using Bluetooth over WiFi might seem like an odd choice at first, but it means you don’t have to add the hot plate to the local wireless network to access it, handy if you’re on the move. It’s also worth noting that you can’t run this off any old USB charger—you’ll need one compatible with USB Power Delivery (PD) that can deliver at least 100 watts.

If you’re needing to whip up small boards with regularity, a hotplate like this one can really come in handy. Files are on GitHub for those eager to build their own.

This isn’t the first time we’ve seen USB-C powering a small reflow plate. Of course, if you make your PCBs self heating, you can sidestep all that entirely.

Repurposing Old AMD APUs For AI Work

The BC250 is what AMD calls an APU, or Accelerated Processing Unit. It combines a GPU and CPU into a single unit, and was originally built to serve as the heart of certain Samsung rack mount servers. If you know where to find cheap surplus units of the BC250, you can put them to good use for AI work, as [akandr] demonstrates.

The first thing you’ll have to figure out is how to take an individual BC250 APU and get it up and running. It’s effectively a full system-on-chip, combining a Zen 2 CPU with a Cyan Skillfish RDNA 1.5 GPU. However, it was originally intended to run inside a rackmount server unit rather than a standalone machine. To get it going, you’ll need to hook it up with power and some kind of cooling solution.

From there, it’s a matter of software. [akandr] explains how to get AI workflows running on the BC250 using Ollama and Vulkan, while noting useful hacks to improve performance like disabling the GUI and tweaking the CPU governor. The hardware can be used with a wide range of different models depending on what you’re trying to achieve, it just takes some careful management of the APU’s resources to get the most out of it. Thankfully, that’s all in the guide on GitHub.

We’ve already seen these AMD APUs repurposed before for gaming use. Unfortunately the word is out already  about their capabilities, so prices have risen significantly in response to demand. Still, if you manage to score a BC250 and do something cool with it yourself, be sure to let us know on the tipsline!

Polyphonic Tunes On The Sharp PC-E500

If you’re a diehard fan of the chiptune scene, you’ve probably heard endless beautiful compositions on the Nintendo Game Boy, Commodore 64, and a few phat FM tracks from Segas of years later. What the scene is yet to see is a breakout artist ripping hot tracks on the Sharp PC-E500. If you wanted to, though, you’d probably find use in this 3-voice music driver for the ancient 1993 mini-PC. 

This comes to us from [gikonekos], who dug up the “PLAY3” code from the Japanese magazine “Pocket Computer Journal” published in November 1993. Over on GitHub, the original articles have been scanned, and the assembly source code for the PLAY3 driver has been reconstructed. There’s also documentation of how the driver actually works, along with verification against RAM dumps from actual Sharp PC-E500 hardware. The driver itself runs as a machine code extension to the BASIC interpreter on the machine. The “PLAY” command can then be used to specify a string of notes to play at a given tempo and octave. Polyphony is simulated using time-division sound generation, with output via the device’s rather pathetic single piezo buzzer.

It’s very cool to see this code preserved for the future. That said, don’t expect to see it on stage at the next Boston Bitdown or anything—as this example video shows, it’s not exactly the punchiest chiptune monster out there. We’ll probably stick to our luscious fake-bit creations for now, while Nintendo hardware will still remain the bedrock of the movement.

Continue reading “Polyphonic Tunes On The Sharp PC-E500”

Ternary RISC Processor Achieves Non-Binary Computing Via FPGA

You would be very hard pressed to find any sort of CPU or microcontroller in a commercial product that uses anything but binary to do its work. And yet, other options exist! Ternary computing involves using trits with three states instead of bits with two. It’s not popular, but there is now a design available for a ternary processor that you could potentially get your hands on.

The device in question is called the 5500FP, as outlined in a research paper from [Claudio Lorenzo La Rosa.] Very few ternary processors exist, and little effort has ever been made to fabricate such a device in real silicon. However, [Claudio] explains that it’s entirely possible to implement a ternary logic processor based on RISC principles by using modern FPGA hardware. The impetus to do so is because of the perceived benefits of ternary computing—notably, that with three states, each “trit” can store more information than regular old binary “bits.” Beyond that, the use of a “balanced ternary” system, based on logical values of -1, 0 , and 1, allows storing both negative and positive numbers without a wasted sign bit, and allows numbers to be negated trivially simply by inverting all trits together.

The research paper does a good job of outlining the basis of this method of computing, as well as the mode of operation of the 5500FP processor. For now, it’s a 24-trit device operating at a frequency of 20MHz, but the hope is that in future it would be possible to move to custom silicon to improve performance and capability. The hope is that further development of ternary computing hardware could lead to parts capable of higher information density and lower power consumption, both highly useful in this day and age where improvements to conventional processor designs are ever hard to find.

Head over to the Ternary Computing website if you’re intrigued by the Ways of Three and want to learn more. We perhaps don’t expect ternary computing to take over any time soon, given the Soviets didn’t get far with it in the 1950s. Still, the concept exists and is fun to contemplate if you like the mental challenge. Maybe you can even start a rumor that the next iPhone is using an all-ternary processor and spread it across a few tech blogs before the week is out. Let us know how you get on.

How I 3D Printed My Own Lego-Compatible Train Bridges

Lego train sets have been available for decades, now. The Danish manufacturer long ago realized the magic of combining its building block sets with motors and plastic rails to create real working railways for children and adults to enjoy. Over the years, Lego has innovated through several generations of trains, from classic metal-rail systems to the more modern IR and later Bluetooth-controlled versions. The only thing largely missing over all that time, though…? A bridge!

Yes, Lego has largely neglected to build any bridges for its mainstream train lineup. There are aftermarket solutions, and innovative hacks invented by the community, all with their own limitations and drawbacks. This glaring oversight, though, seemed like a perfect opportunity to me. It was time to fire up the 3D printer and churn out a fully-realized Lego rail bridge of my very own.

Bridges Are Hard

I’ve experimented with building Lego rail bridges before, using standard track and household objects like cardboard, books, and beer. Unfortunately, it can be very difficult to support the track evenly at the joints which occur every 150mm, and derailments are common. Credit: author

There’s actually a good reason Lego bridges aren’t a big thing in the company’s own product lineup, beyond a few obscure historical parts. This is probably because they aren’t very practical. Lego locomotives are not particularly strong haulers, nor do they have excellent grip on the rails, and this makes them very poor at climbing even mild grades. Any official Lego bridge would have to be very long with a shallow slope just to allow a train to climb high enough to clear a locomotive on a track below. This would end up being an expensive set that would probably prove unpopular with the casual Lego train builder, even if the diehard enthusiasts loved it. 

There are third-party options available out there. However, most rely on standard Lego track pieces and merely combine them with supports that hold them up at height. This can work in some cases, but it can be very difficult to do cool things like passing a Lego train under a bridge, for example. It can be hard to gain enough height, and the short length of Lego track pieces makes it hard to squeeze a locomotive between supports. Continue reading “How I 3D Printed My Own Lego-Compatible Train Bridges”

LEGO Machine Plays Tic-Tac-Toe Without Electronics

Tic-Tac-Toe is a relatively simple game, and one of the few which has effectively been solved for perfect play. The nature of the game made it possible for [Joost van Velzen] to create a LEGO machine that can play the game properly in an entirely mechanical fashion.

The build features no electronics to speak of. Instead, it uses 52 mechanical logic gates and 204 bits of mechanical memory to understand and process the game state and respond with appropriate moves in turn. There are some limitations to the build, however—the game state always begins with the machine taking the center square. Furthermore, the initial move must always be played on one of two squares—given the nature of the game though, this doesn’t really make a difference.

It’s also worth heading over to the Flickr page for the project just to appreciate the aesthetics of the build. It’s styled in the fashion of an 18th-century automaton or similar. It’s also been shared on LEGO Ideas where it’s raised quite a profile.

If you’ve ever wanted to think about computing in a mechanical sense, this build is a great example of how it can be done. We often see some fun LEGO machines around these parts, from massive parts sorters to somewhat-functional typewriters.

Continue reading “LEGO Machine Plays Tic-Tac-Toe Without Electronics”