If you live in the southeastern US, mark your calenders for next weekend—October 4th and 5th—and head out to the fourth annual Maker Faire Atlanta in downtown Decatur, GA. You can find a complete list of participants here.
I’ll be around all weekend to talk to makers about their projects and to hand out some Hackaday stickers. As [Brian] said with the HaD crew at the NY Faire, don’t be afraid to introduce yourself if you see me walking around or lurking at the Hackyard booth. See you there!
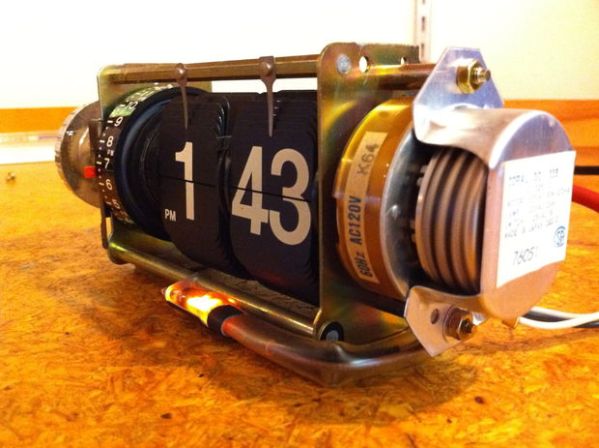
Some hacks are triumphs of cleverness, others…are just cool. [Super Cameraman’s] exposed retro flip clock tends toward the latter half of that spectrum—it may not be the most complex, but we’re relieved that for once there isn’t an Arduino crammed into the back of it.
You can buy pared down, exposed flip clocks at museums for an arm and a leg, or you can trudge through eBay and local thrift shops until you come across a cheapo clock radio. [Super Cameraman’s] clock cost him exactly $2, and is split into two sections: a clock side and a radio side. Prying off the knobs and popping open the case reveals all the shiny mechanisms and electronics, most of which he trashed. The radio and even the transformer were removed, leaving only the flip clock, which he re-wired directly to the plug—it seems these types of clocks run straight off 120VAC. Check out the video below.
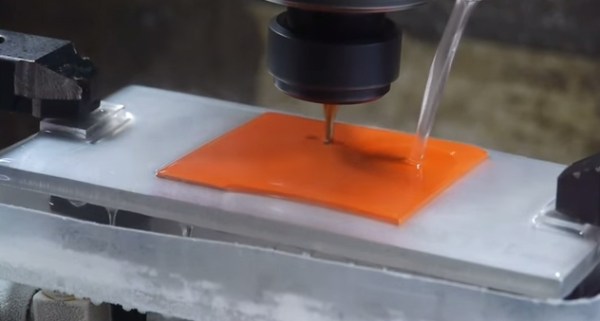
Fashioning a custom, one-off rubber part for your project isn’t usually an option, but [Ben Krasnow] has an alternative to injection molding and casting: machining frozen rubber.
As [Ben] points out, you can’t exactly pop a sheet of rubber on your mill and CNC the needed shape; the bit will push the material around rather than cut it. Freezing the rubber first, however, allows you to carve into the now-hardened material.
His initial setup consisted of a sheet of aluminum with water drizzled on top, a square of neoprene placed on the water, and a steady stream of -60 to -80C alcohol flowing directly onto the rubber. The water underneath freezes, holding the neoprene in place. This proved problematic as the ice-clamp gives way before the milling is complete. [Ben] later adds some bolts to clamp the pieces down, allowing the milling process finish as planned.
A small plastic tray sits underneath this assembly to capture the alcohol as it runs off, feeding it back with some tubing. [Ben] recommends against a submersible aquarium pump—his initial choice—because the pump stopped working after a few minutes immersed in the chilly alcohol. An external, magnetically-driven pump solved the problem although it does require manual priming.
Although [pinomelean’s] Lithium-ion battery guide sounds like the topic is a bit specific, you’ll find a number of rechargeable battery basics discussed at length. Don’t know what a C-rate is? Pfffft. Roll up those sleeves and let’s dive into some theory.
As if you needed a reminder, many lithium battery types are prone to outbursts if mishandled: a proper charging technique is essential. [pinomelean] provides a detailed breakdown of the typical stages involved in a charge cycle and offers some tips on the advantages to lower voltage thresholds before turning his attention to the practical side: designing your own charger circuit from scratch.
The circuit itself is based around a handful of LM324 op-amps, creating a current and voltage-limited power supply. Voltage limits to 4.2V, and current is adjustable: from 160mA to 1600mA. This charger may take a few hours to juice up your batteries, but it does so safely, and [pinomelean’s] step-by-step description of the device helps illustrate exactly how the process works.
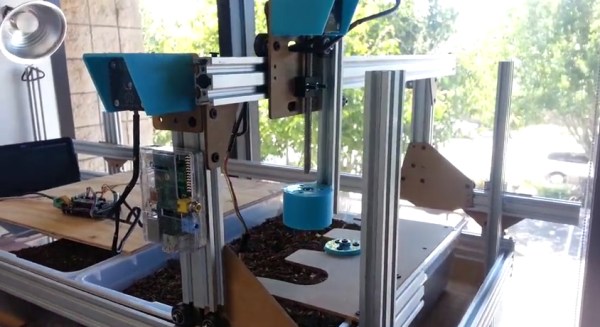
The FarmBot team has been pretty busy with their CNC Farming and Gathering machine. The idea is to automate the farming process with precise deployment of tools: plows, seed injection, watering, sensors, etc. An Arduino with an added RAMPS handles the movement, and a Raspi provides internet connectivity. Their prototype has already experienced four major iterations: the first revision addressed bigger issues such as frame/track stability and simplification of parts. Now they’re locking down the specifics on internet-of-things integration and coding for advanced movement functions.
The most recent upgrade provides a significant improvement by overhauling the implementation of the tools. Originally, the team envisioned a single, multi-function tool head design that carried everything around all the time. Problem is, the tool that’s in-use probably works best if it’s lower than the others, and piling them all onto one piece spells trouble. The solution? a universal tool mounting system, of course. You can see them testing their design in a video after the break.
If the FarmBot progress isn’t impressive enough—and admittedly we’d have called project lead [Rory Aronson] crazy for attempting to pull this off…but he did it—the FarmBot crew started and successfully funded an entire sub-project through Kickstarter.OpenFarm is an open-source database set to become the go-to wiki for all things farming and gardening. It’s the result of [Rory] encountering an overwhelming amount of generic, poorly written advice on plant growing, so he just crowdsourced a solution. You know, no sweat.
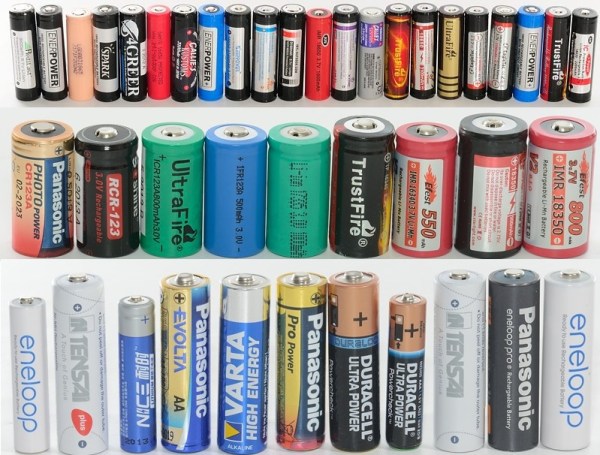
There are a number of resources scattered across the Internet that provide detailed breakdowns of common products, such as batteries, but we haven’t seen anything quite as impressive as this site. It’s an overwhelming presentation of data that addresses batteries of all types, including 18650’s (and others close in size), 26650’s, and more chargers than you can shake a LiPo at. It’s an amazing site with pictures of the product both assembled and disassembled, graphs for charge and discharge rates, comparisons for different chemistries, and even some thermal images to illustrate how the chargers deal with heat dissipation.
Computer animation is a task both delicate and tedious, requiring the manipulation of a computer model into a series of poses over time saved as keyframes, further refined by adjusting how the computer interpolates between each frame. You need a rig (a kind of digital skeleton) to accurately control that model, and researcher [Alec Jacobson] and his team have developed a hands-on alternative to pushing pixels around.
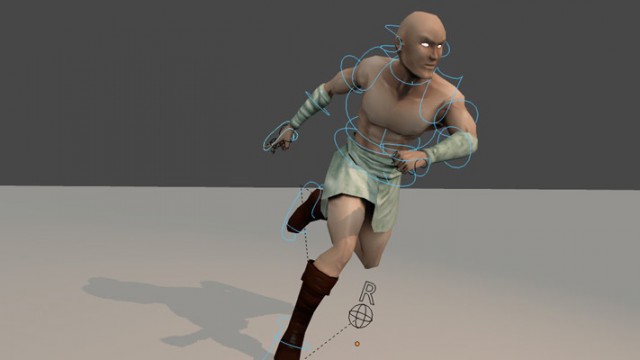
Control curves (the blue circles) allow for easier character manipulation.
The skeletal systems of computer animated characters consists of kinematic chains—joints that sprout from a root node out to the smallest extremity. Manipulating those joints usually requires the addition of easy-to-select control curves, which simplify the way joints rotate down the chain. Control curves do some behind-the-curtain math that allows the animator to move a character by grabbing a natural end-node, such as a hand or a foot. Lifting a character’s foot to place it on chair requires manipulating one control curve: grab foot control, move foot. Without these curves, an animator’s work is usually tripled: she has to first rotate the joint where the leg meets the hip, sticking the leg straight out, then rotate the knee back down, then rotate the ankle. A nightmare.
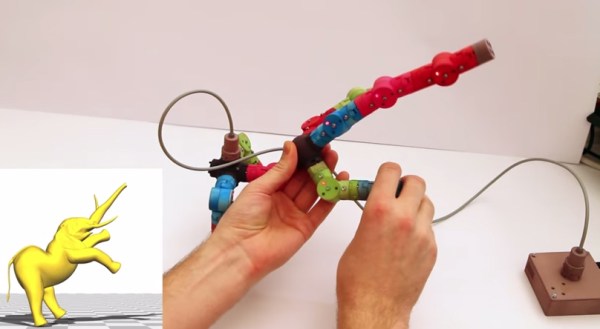
[Alec] and his team’s unique alternative is a system of interchangeable, 3D-printed mechanical pieces used to drive an on-screen character. The effect is that of digital puppetry, but with an eye toward precision. Their device consists of a central controller, joints, splitters, extensions, and endcaps. Joints connected to the controller appear in the 3D environment in real-time as they are assembled, and differences between the real-world rig and the model’s proportions can be adjusted in the software or through plastic extension pieces.
The plastic joints spin in all 3 directions (X,Y,Z), and record measurements via embedded Hall sensors and permanent magnets. Check out the accompanying article here (PDF) for specifics on the articulation device, then hang around after the break for a demonstration video.

 The project featured in this post is