Here Be Dragons, And VR…and Sheep.

dragonVR

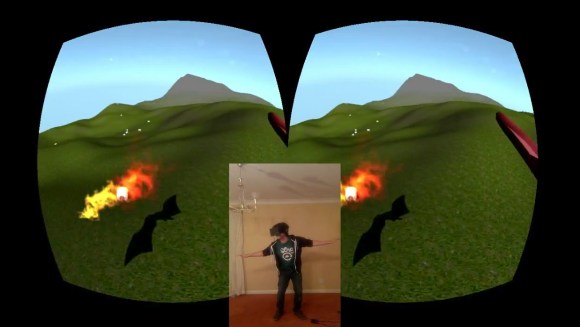
This may qualify less as a hack and more as clever combination of video game input devices, but we thought it was well worth showing off. [Jack] and his team built Dragon Eyes from scratch at the 2013 Dundee Dare Jam. If you’re unfamiliar with “Game Jams” and have any aspirations of working in the video game industry, we highly recommend that you find one and participate. With only 48 hours to design, code, build assets and test, many teams struggle to finish their entry. Dragon Eyes, however, uses the indie-favorite game engine Unity3D to smoothly coordinate its input devices, allowing players to experience dragon flight. The Kinect reads the player’s arm positions (including flapping) to direct the wings for travel, while the Oculus Rift performs its usual job as immersive VR headgear.

Combining a Kinect and a Rift isn’t particularly uncommon, but the function of the microphone is. By blowing into a headset microphone, players activate the dragon’s fire-breathing. How’s that for interactivity? You can see [Jack] roasting some sheep in a demonstration video below. If you have a Kinect and Rift lying around and want some first-person dragon action, [Jack] has kindly provided a download of the build in the project link above.

We’re looking forward to more implementations of the Rift; we haven’t seen many just yet. You can, however, check out a Rift used as an aerial camera on a drone.

Continue reading “Here Be Dragons, And VR…and Sheep.”

Bow Tie Kindly Suggests That You Back Off

personalSpaceBowtie

Everyone’s had their “personal space bubble” burst. You just wanted a friendly conversation, but now some overzealous blockhead is standing on your shoes and breathing in your face, making you guess what he had for lunch. Fortunately, [Grissini] has created this sylish bowtie solution. Stand too close (within 19 inches) and the LEDs come to life, flashing a warning that indicates a personal space violation. [Grissini’s] tie is 3D printed to accommodate most of the electronics, which snugly snap into place. The rest of the wiring appears to run through the neck strap and connect up to a battery pack hidden elsewhere. You can check out a brief description and demonstration in a video after the break.

We’ve seen this hack for the ladies: [Jeri’s] dress performs a similar function. We’re unsure, however, if these LEDs can deter your average socially-awkward space invader. What we’d really like to see is someone take these hacks to their logical conclusion and make a wearable out of the non-lethal dazzler clone…hopefully the victim would back up a step or two before they spewed.

If you’re lonely and want to encourage people to come closer, maybe this LED bow tie will help. Or, who knows, maybe it’s yet another way to scare people off.

Continue reading “Bow Tie Kindly Suggests That You Back Off”

The RPC: A Stand-alone MIDI Workstation

raspiMidiRPC

Not just another pretty enclosure, this shiny little red box is [Lauri’s] stand-alone MIDI workstation. The build uses an Arduino Mega 2560 to handle the MIDI inputs and outputs. It communicates via serial with a Raspberry Pi that acts as a sequencer and oversees all user interactions. The Pi’s SD card offers convenient storage for your work, though we wish it was easily ejectable from the front of the box and not trapped under the hood. [Lauri’s] RPC also squeezes in the necessary USB hub for the RasPi and an HDMI-to-VGA converter. As an all-in-one solution, this is a sleek little box that–once paired with some software for arpeggiators, chord harmonies, and scales–will be a handy MIDI sequencer with robust control ready to be conveniently mounted on your rack.

Now all you’ll need is something to plug in. Why not check out the custom MIDI recorder we featured last week, or the organ-to-MIDI keyboard conversion for inspiration.

[Thanks Teemu]

The BatBox: Portable Power, Polished And Professional. Plus Smoke!

batBox

About the size of a shoebox and stuffed with a compact battery/inverter combo, the BatBox packs a mean wallop at 480Wh. What else was [Bill Porter] supposed to do with his free time? He’s already mailed out electronic wedding invitations and built custom LED centerpieces for the reception. He and his wife [Mara] then made an appearance in a Sunday roundup tying the knot by soldering a circuit together. Surely the LED Tetris Tie would have been in the ceremony had it existed. This time, though, [Bill’s] scrounged up some leftover electronics to put a realistic spin on a Minecraft favorite: the BatBox.

A pair of 18V high energy density batteries connect up to a 12V regulator, stepping them down to drive a 110VAC inverter. The BatBox also supplies 5V USB and 12VDC output for portable devices. Unfortunately, [Bill]’s first inverter turned out to be a low-quality, voltage-spiking traitor; it managed to let the smoke out of his fish tank’s LED bar by roasting the power supply. Undeterred, [Bill] pressed on with a new, higher-quality inverter that sits on an acrylic shelf above the batteries. OpenBeam aluminum extrusion seals up the remainder of the enclosure, completing the BatBox with a frame that looks both appealing and durable.

An Elegant Timepiece From Paper And A Fistful Of Servos

papercraftClock

Segments rise from a sheer white surface to reveal the time in this papercraft digital / analog clock build by [Jacky Mok].

New York-based designer [Alvin Aronson] is responsible for the original, titled “D/A Clock,” which he built as a student at RISD using Corian instead of paper. [Aronson]’s design is also massive in comparison. It measures one meter wide by a half meter tall. Without access to either a 3D printer or to a laser cutter, [Jacky] instead reduces the scale of his interpretation and relies on cardstock as the primary construction material. His experience with papercraft typography leads to a design that anyone with an Exacto knife and a slice of patience should find manageable. [Jacky] ignores the Exacto option, however, and cuts his pieces with a tool we saw earlier this year: the Silhouette Portrait.

The clock’s electronics include an Arduino Uno, a servo motor controller, twenty-eight servos and an RTC breakout board that handles timekeeping. Each servo drives its own segment by sliding a paperclip forward or backward inside a small, hollow aluminum rod. Though we’re still holding out for a video of the finished papercraft build, you can watch a video of Aronson’s original clock after the break and see what inspired [Jacky’s] design.

Need another clock to envy? Last month’s build by [ebrithil] uses twenty-two servos to individually spin the segments. If you prefer that your clocks light up, [Aaron’s] o-scope transformation has you covered.

Continue reading “An Elegant Timepiece From Paper And A Fistful Of Servos”

DIY 23mph+ Electric Skateboard

What’s the best way to get around NYC? If you asked [papo2110], he would probably suggest you build your own high-speed, long-range electric skateboard. You can’t cruise through any online maker community without tripping over a dozen e-vehicle projects these days. Nearly 18 months ago, even before the popular Boosted Boards Kickstarter, [papo2110] started piecing together a deck. His boards use a brushless outrunner motor, an RC car ESC (complete with brakes), and a chain drive to power him around Central Park at a top speed of 23mph.

The most impressive feat for this project, however, is the tireless revision through iterative design. The deck gets both an aluminum and a carbon fiber upgrade. Meaty 8S Headway LiFePo4’s replace a smaller 6S configuration. Even lights are added. As the build progresses, the board is pushing 27mph: with only one motor. Grab your helmet and motion-sickness pills and strap in for some videos after the break.

If four wheels are one too many and you want even more dangerous speeds, check out the E-trike build from a few months ago.

Continue reading “DIY 23mph+ Electric Skateboard”

The Hubless Horseman

hublessHorseman

Of all the free parts up for grabs at a friend’s house, nobody wanted the scrap wheelchair wheels: including [Eric]. That is, of course, until he spontaneously decided to try something a bit crazy and take on a bizarre yet remarkably imaginative hubless wheel bike build.

After attaching the wheelchair’s rim and its affixed handrail to the rim on his bike, [Eric] mounted pairs of rollerblade wheels to a separate piece of metal that essentially act as bearings. As the build progresses, the bike is further refined. More rollerblade wheels, a giant sprocket, and a pile of machined aluminum pieces. The valve stem for the tire had to be relocated to allow the wheel to spin freely.

The finished product is a stunning bicycle, which [Eric] later revisited, updating the rollerblade wheels to precision-lathed plastic (specifically UHMWPE) rollers. Make sure you watch the video of the Hubless Horseman in action. If, for some reason, your only prior exposure to hubless wheels is the TRON light cycle or [Kirk’s] motorcycle from the Star Trek reboot, do yourself a favor and check out their inventor, Franco Sbarro.