Concrete Castle

Update: 3D Printed Concrete Castle Completed

After two years of dreaming, designing, and doing, [Andrey Rudenko] has finally finished 3D printing his concrete castle. We’re sure a few readers will race to the comments to criticize the use of “castle” as an acceptable descriptor, but they’d be missing the point. It’s been only three months since he was testing the thing out in his garage, and now there’s a beautiful, freestanding structure in his yard, custom-printed.

There are no action shots of the printer setup as it lays down fat beads of concrete, only close-ups of the nozzle, but the castle was printed on-site outdoors. It wasn’t, however, printed in one piece. [Andrey] churned out the turrets separately and attached them later. He won’t be doing that again, though, because moving them in place was quite the burden. On his webpage, [Andrey] shares some insight in a wrap-up of the construction process. After much experimentation, he settled on a layer height of 10mm with a 30mm width for best results. He also discovered that he could print much more than his original estimation of 50cm of vertical height a day (fearing the lower layers would buckle).

With the castle a success, [Andrey] plans to expand his website to include a “posting wall for new ideas and findings.” We’re not sure whether that statement suggests that he would provide open-source access to everything or just feature updates of his future projects.
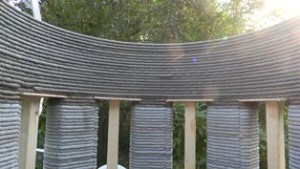
Wooden supports for concrete bridging.
[Andrey] used wooden supports to print concrete bridges.
We hope the former. You can check out its current format as the Architecture Forum, where he explains some of the construction capabilities and tricks used to build the castle.

His next project, a full-scale livable structure, will attempt to print 24/7 (weather permitting) rather than the stop-start routine used for the castle, which turned out to be the culprit behind imperfections in the print. He’ll have to hurry, though. [Andrey] lives in Minnesota, and the climate will soon cause construction to take a 6-month hiatus until warm weather returns. Be sure to check out his website for more photos and a retrospective on the castle project, as well as contact information—[Andrey] is reaching out to interested parties with the appropriate skills (and investors) who may want to help with the new project.

[via 3ders.org]

[Thanks Brian]

Hydropower Washing Machine

Hydropower From A Washing Mashine

Living off the grid is an appealing goal for many in the hacker community, perhaps because it can fulfill the need to create, to establish independence, to prepare for the apocalypse, or some combination of all those things. [Buddhanz1] has been living off the grid for awhile now by harnessing power from a nearby stream with an old washing-machine-turned-generator.

He started with a Fisher & Paykel smart drive, which he stripped down to the middle housing, retaining the plastic tub, the stator, the rotor, the shaft, and the bearings. After a quick spot check to ensure the relative quality of the stator and the rotor, [Buddhanz1] removed the stator and rewired it. Unchanged, the stator would output 0-400V unloaded at 3-4 amps max, which isn’t a particularly useful range for charging batteries. By rewiring the stator (demonstration video here) he lowered the voltage while increasing the current.

The key to this build is the inclusion of a pelton wheel—which we’ve seen before in a similar build. [Buddhanz1] channeled the water flow directly into the pelton wheel to spin the shaft inside the tub. After adding some silicon sealant and an access/repair hatch, [Buddhanz1] painted the outside to protect the assembly from the sun, and fitted a DC rectifier that converts the electricity for the batteries. With the water pressure at about 45psi, the generator is capable of ~29V/21A: just over 600W. With a larger water jet, the rig can reach 900W. Stick around for the video after the break.

Continue reading “Hydropower From A Washing Mashine”

Exoskeleton Lift

Homemade Superhero: [James’] DIY Exoskeleton

We’re not just a bunch of monkeys with typewriters here at Hackaday; we don our hacker hat whenever our schedules allow. Or, in the case of Hackaday’s own [James Hobson]—aka [The Hacksmith]—he dons this slick exoskeleton prototype instead,turning himself into a superhero. Inspired by the exoskeleton from the film Elysium, this project puts [James] one step closer to the greater goal of creating an Iron Man-style suit.

For now, though, the exoskeleton is impressive enough on its own. The build is a combination of custom-cut perforated steel tubing and pneumatic cylinders, attached to a back braces of sorts. In the demonstration video, [James] stares down 170 pounds of cinder block affixed to a barbell, and although he’s no lightweight, you can tell immediately from his reaction how much assistance the exoskeleton provides as [James] curls the makeshift weights over and over. And that’s only at half pressure. [James] thinks he could break the 300 pound mark of lifting if he didn’t break his legs first.

There’s plenty of behind-the-scenes footage of the build process to be had, so make sure you stick around after the jump for a sizable helping of videos, and check out [The Hacksmith’s] website for more of his projects.

Continue reading “Homemade Superhero: [James’] DIY Exoskeleton”

Beach Buddy Is A Boombox, Phone Charger, And Sunburn Warner

The Beach Buddy

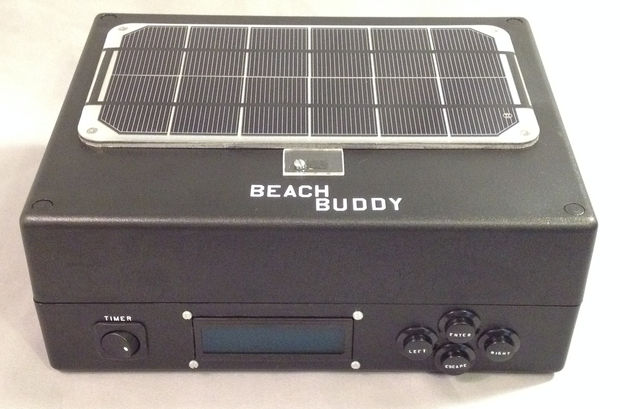
When you venture out onto the beach for a day in the sun, you’re probably not preoccupied with remembering the specifics about your sunscreen’s SPF rating—if you even remembered to apply any. [starwisher] suffered a nasty sunburn after baking in the sunlight beyond her sunscreen’s limits. To prevent future suffering, she developed The Beach Buddy: a portable stereo and phone charger with a handy sunburn calculator to warn you the next time the sun is turning you into barbecue.

After telling the Beach Buddy your skin type and your sunscreen’s SPF rating, a UV sensor takes a reading and an Arduino does a quick calculation that determines how long until you should reapply your sunscreen. Who wants to lug around a boring warning box, though?

[starwisher] went to the trouble of crafting a truly useful all-in-one device by modifying this stereo and this charger to fit together in a sleek custom acrylic enclosure. There’s a switch to activate each function—timer, charger, stereo—a slot on the side to house your phone, and an LCD with some accompanying buttons for setting up the UV timer. You can check out a demo of all the Beach Buddy’s features in a video below.

Continue reading “Beach Buddy Is A Boombox, Phone Charger, And Sunburn Warner”

[Fran] on setting and regulating pocket watches

Retro Time Tech: [Fran] And Pocket Watches

Whether you own a pocket watch, want to own one, or just plain think they’re cool, [Fran’s] video on setting and regulating pocket watches provides a comprehensive overview on these beautiful works of mechanical art. After addressing the advantages and disadvantages between stem, lever, and key set watches, [Fran] cracks open her 1928 Illinois to reveal the internals and to demonstrate how to adjust the regulator.

Though she doesn’t dive into a full teardown, there’s plenty of identification and explanation of parts along the way. To slow her watch down a tad, [Fran] needed to turn a very tiny set screw about a quarter of a turn counterclockwise, slowing down the period: an adjustment that requires a fine jewelers screwdriver, a delicate touch, and a lot of patience. Results aren’t immediately discernible, either. It takes a day or two to observe whether the watch now keeps accurate time.

Stick around for the video after the jump, which also includes an in-depth look at a 1904 Elgin watch, its regulator and other key components.

Continue reading “Retro Time Tech: [Fran] And Pocket Watches”

Electric Longboard Roundup

ev longboards everywhere!

Everybody and their grandmother is longboarding electric-style these days: here are some of the most recent developments in the world of kickless cruising.

First up, [comsa42] has punched up an excellent step-by-step visual guide for first-time EV hopefuls, detailing the basics of a battery-powered longboard setup and thoroughly explaining the particulars behind component choices. His build is relatively straightforward: combine a board with a low(ish) kV outrunner motor, some LiPo batteries, an ESC (Electronic Speed Controller), a transmitter/receiver, and a few custom parts for gearing and mounting. This build should be commended not only for its simplicity but also for its frugality: [comsa42] estimates a final cost of around only $300, which is a staggering difference from commercial alternatives such as the Boosted Board and newcomer Marbel.

[comsa42’s] other significant contribution is a low-key and low-cost cover to house the electronics. He simply fiberglassed a small enclosure to protect the expensive internals, then mounted and painted it to blend seamlessly with the rest of the deck. You can find loads of other useful goodies in his guide, including CAD files for the motor mounts and for the wheel assembly.

But wait, there’s more! Stick around after the jump for a few other builds that ditch traditional wheels in favor of a smoother alternative. There’s also a smattering of videos, including comsa42’s] guide overview and some excellent cruising footage of the other board builds doing what they do best.

Continue reading “Electric Longboard Roundup”

Infinity Mirror Clock: There’s A Time Joke There Somewhere

Infinity Mirror Clock

We don’t think we’ve seen an Infinity Mirror Clock before, but we love this new twist on an old favorite. Different colors distinguish between seconds, minutes and hours, and an additional IR sensor detects when someone is directly in front of the clock and switches the LEDs off, allowing it to be used as a normal mirror. This build is the work of [Dushyant Ahuja], who is no stranger to hacking together clocks out of LEDs. You can tell how much progress he’s made with the mirror clock by taking a glance at his first project, which is an impressive creation held together by jumbles of wire and some glue.

[Dushyant] has stepped up his game for his new clock, attaching an LED strip along the inside of a circular frame to fashion the infinity mirror effect. The lights receive a signal from an attached homemade Arduino board, which is also connected to a real-time clock (RTC) module to keep time and to a Bluetooth module, which allows [Dushyant] to program the clock wirelessly rather than having to drag out some cords if the clock ever needs an adjustment.

Stick around after the jump for a quick demonstration video. The lights are dazzling to watch; [Dushyant] inserted a stainless steel plate at the center of the circle to reflect the outer rim of LEDs. After a quick rainbow effect, it looks like the mirror enters clock mode. See if you can figure out what time it is. For a more step-by-step overview of this project, swing by his Instructables page.

Continue reading “Infinity Mirror Clock: There’s A Time Joke There Somewhere”