When Project Enclosures Go Bad: A Message From The Trenches

A wall-mounted, electric car charging station doesn’t sound like it’d require the most exciting or complicated enclosure. This was pretty much the assumption [Mastro Gippo] and his team started out with when they decided to turn what came back from a product designer into a real enclosure for the ‘Prism’ charging hardware they had developed. As it turned out, the enclosure proved to be the most challenging part of the project.

The first thought was to make a cheap, simple prototype enclosure for integration testing. This led them through trying out FDM 3D printed enclosures, wooden enclosures, folded (glued) plastic enclosures, aluminium extruded enclosures, Zamac alloy enclosures, and finally the plastic injection molded enclosure they had been avoiding due to the high costs.
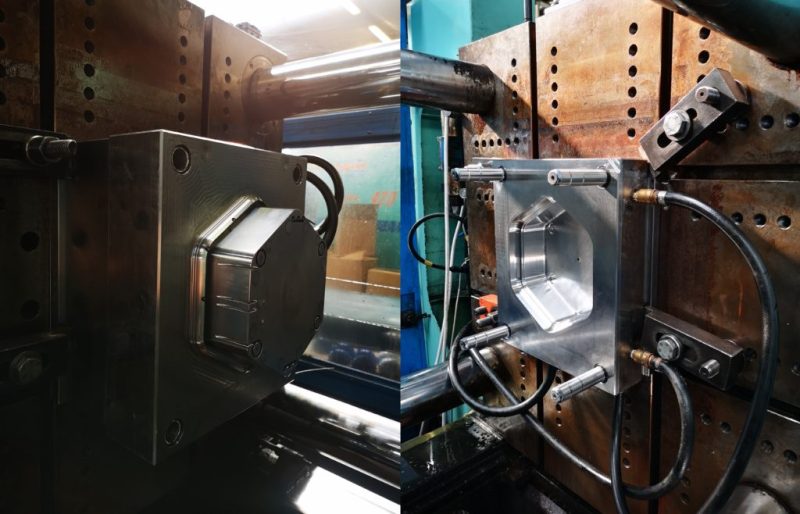
The injection mold used to produce the Prism enclosures with.

Even if it meant taking out a loan to cover the setup costs, the results really do speak for themselves with a well-integrated design and two really happy looking partners-in-business. It does make us wonder how projects lacking this kind of financial leeway can get professional-grade enclosures without breaking the proverbial bank.

FDM 3D printing is always getting better and with a lot of post-processing you can have one enclosure that looks great, but that doesn’t scale. Outsourcing it to a professional 3D printing company like Shapeways is better, but it’s still not injection-molding quality and if the product is successful you’ll eventually invert the cost/benefit you were shooting for in the first place. Where is the middle ground on great-looking enclosures? Please let us know your experiences and thoughts in the comments.


Automate Sorting Your Trash With Some Healthy Machine Learning

Sorting trash into the right categories is pretty much a daily bother. Who hasn’t stood there in front of the two, three, five or more bins (depending on your area and country), pondering which bin it should go into? [Alvaro Ferrán Cifuentes]’s SeparAItor project is a proof of concept robot that uses a robotic sorting tray and a camera setup that aims to identify and sort trash that is put into the sorting tray.

The hardware consists of a sorting tray mounted to the top of a Bluetooth-connected pan and tilt platform. The platform communicates with the rest of the system, which uses a camera and OpenCV to obtain the image data, and a Keras-based back-end which implements a deep learning neural network in Python.

Training of the system was performed by using self-made photos of the items that would need to be sorted as these would most closely match real-life conditions. After getting good enough recognition results, the system was put together, with a motion detection feature added to respond when a new item was tossed into the tray. The system will then attempt to identify the item, categorize it, and instruct the platform to rotate to the correct orientation before tilting and dropping it into the appropriate bin. See the embedded video after the break for the system in action.

Believe it or not, this isn’t the first trash-sorting robot to grace the pages of Hackaday. Potentially concepts like these, that rely on automation and machine vision, could one day be deployed on a large scale to help reduce how much recyclable material end up in landfills. Continue reading “Automate Sorting Your Trash With Some Healthy Machine Learning” →

Double 3: Your Instant Physical Presence Anywhere, No Matter Where You Are

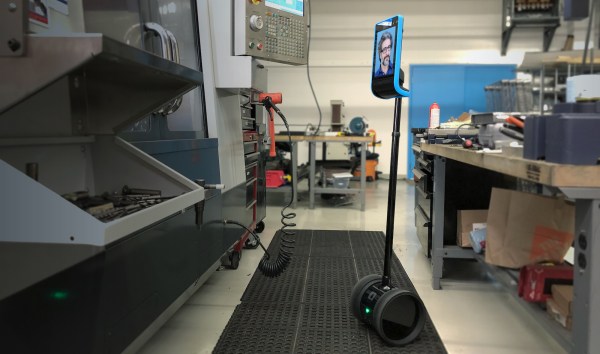
Telepresence is one of those futuristic buzzwords that’s popped up a few times over the decades; promising the ability to attend a meeting in New York City and another in Tokyo an hour later, all without having to leave the comfort of your home or office. This is the premise of Double Robotics’ Double 3, its most recent entry in this market segment, as the commercial counterpoint to more DIY offerings.

More than just a glorified tablet screen.

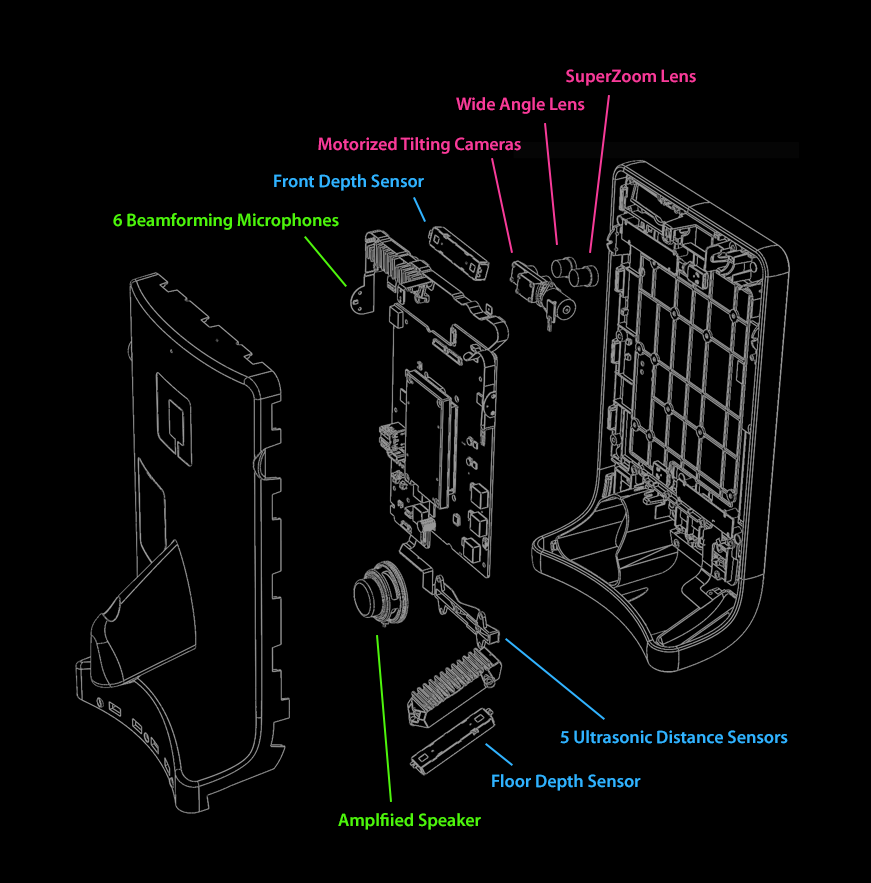
Looking like a tablet perched on top of a Segway, the built-in dual 13 megapixel cameras allow the controller to get a good look at their surroundings, while the 6 beamforming microphones should theoretically allow one to pick up any conversation in a meeting or on the work floor.

Battery life is limited to 4 hours, and it takes 2 hours to recharge the built-in battery. Fortunately one can just hop over to another, freshly charged Double 3 if the battery runs out. Assuming the $3,999 price tag doesn’t get in the way of building up a fleet of them, anyway.

Probably the most interesting aspect of the product is its self-driving feature, which has resulted in a whole range of sensors and cameras (Intel RealSense D430 stereo vision depth sensors) being installed. To handle the processing of this sensor data, the system is equipped with an NVidia Jetson TX2 ARM board, running Ubuntu Linux, which also renders the mixed-reality UI for the user with way points and other information.

Currently Double Robotics accepts sign-ups for the private beta of the Double 3 API, which would give developers access to the sensor data and various autonomous features of Double 3’s hardware. Co-founder of Double Robotics, [Marc DeVidts] stated to Hackaday that he is looking forward to seeing what people can build with it. Hopefully this time people will not simply take the thing for a joyride, like what happened with a predecessor of the Double 3.

Building A Robot Rover For Those Tough Indoor Missions

Making an outdoor rover is easy stuff, with lots of folk having them doing their roving activities on beaches and alien worlds. Clearly the new frontier is indoor environments, a frontier which is helpfully being conquered by [Andreas Hoelldorfer]’s Mantis Rover.

OK, we’re kidding. This project started out life as a base for [Andreas]’s exquisite 3D printable robotic arm, but it’s even capable of carrying people around, as the embedded video after the break makes abundantly clear. The most eye-catching feature of the Mantis Rover are its Mecanum wheels, which allow it to move in any direction, and is perfect for those tight spots where getting stuck would be really awkward.

The Mecanum wheels are 3D printed, making the motors and the associated controllers the more complicated part of this package. Plans for the wheels involve casting some kind of rubber, to make the wheels more gentle on the floors it has to drive on. The electronics include TMC 5160 motor drivers and an STM32F407VET6 MCU, as well as a W5500-equipped custom ‘Robot Shield’.

It seems that there are still a lot of tweaks underway to make the project even more interesting. Maybe it’s the perfect foundation for your next indoor roving sessions at the office or local hackerspace?

Continue reading “Building A Robot Rover For Those Tough Indoor Missions” →

A Handy Way To Cheaply Print A Robotic Arm

There’s something fascinating about humanoid robotic hands, if only because of how they are such close approximations of our own hands. One could almost picture them with tendons and skin covering them. Sadly, making your own is quite prohibitive because in addition to being complex bits of machinery, making one of these marvels of engineering is usually rather expensive.

[Gray Eldritch]’s Humanoid Robot Arm project seeks to fix both points, by providing a ready to print project. All it takes is about a kilogram of PLA filament, some TPU filament, five MG996r servos (or equivalent), an SG90 servo or similar, an Arduino Uno board and a few other bits and pieces. This should result in a robotic arm with hand as covered in the video of the Mark 3 version that is embedded after the break.

Continue reading “A Handy Way To Cheaply Print A Robotic Arm” →

Monitoring An Electric Fence With LoRaWAN

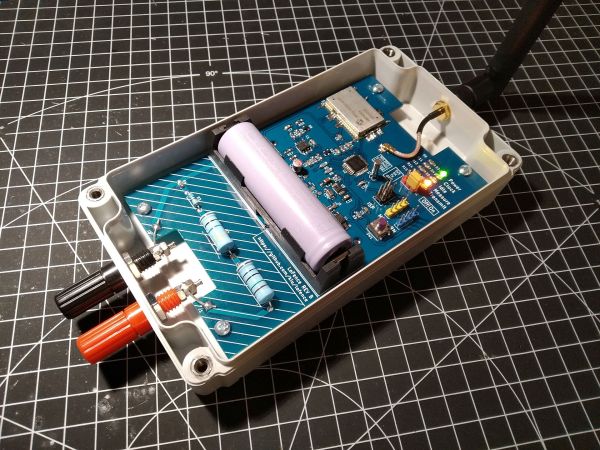
Making sure that an electric fence which is keeping one’s cattle and sheep from wandering off is still working properly seems like a fairly daunting task, especially when this fence is quite a distance from one’s home so checking up on it is time-consuming. After a friend of [kiu] got called a few times by the police because some of the sheep had pulled a prison break, the obvious technological solution was to IoT-enable the fence with LoFence.

This solution is nothing if not elegant in its simplicity. For phoning home with status data, the system uses the Microchip RN2483 IC, which handles pretty much all aspects of LoRaWAN, so that one merely has to send data to its serial interface to transmit. Because this system uses The Things Network (TTN) there are no service costs due to the low data rates. This was the easy part, aside from having to add a LoRaWAN gateway to boost the signal in the area with the electric fence.

With that side covered, the rest of the build features an AVR ATmega328p MCU, a resistor divider and op-amp (TLV9062) along with some passives. The resulting circuit measures voltage, essentially to detect whether the fence is still forming a full circuit. Hacking into the little box that energizes the fence might be a possible upgrade there, but at least it is a fairly uncomplicated way to measuring things. Electric fences do work best with a voltage on them, after all.

At the other end of the LoRaWAN network, the data is parsed and analyzed by a service so that it can be displayed on a Grafana dashboard, ensuring that a single glance suffices to see the current state of the fence and whether one has to dash out in the rain at 1 AM to fix it or not.

Fixing A Cheap UPS HAT For Your Raspberry Pi With A Tiny Daemon

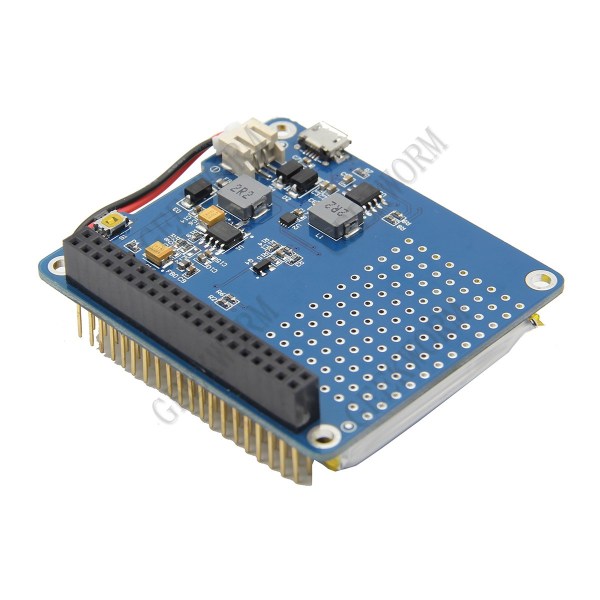
An uninterruptible power supply (UPS) isn’t something solely to have hooked up to your desktop PC. Your Raspberry Pi SBC might also benefit from it. Yet the available options aren’t too great, or are too expensive. This leads folk including [Joachim Baumann] to modify cheerfully cheap Chinese UPS HAT boards such as the Geekworm UPS HAT to fix its myriad of issues and missing features.

Inspired by a number of other hacks on this board which fixed things like needing to push a button on the UPS to boot the Raspberry Pi, [Joachim] set out to make a similar ATtiny-based solution that would address all issues, above all the fact that this Geekworm UPS does not detect when the connected SBC has turned off and will happily run the lithium battery pack dry. Finding a blog post by Simon who had reverse-engineered the board previously was immensely helpful. Continue reading “Fixing A Cheap UPS HAT For Your Raspberry Pi With A Tiny Daemon” →