[BaronVonSchnowzer] is spinning up some home automation and settled on an inexpensive ambient temperature sensor which is sold to augment the data a home weather station collects. He found that the RF protocol had been reverse engineered and will use this information to harvest data from a sensor in each room. In true hacker fashion, he rolled his own advances out to the Internet so that others may benefit. Specifically, he reverse engineered the checksum used by the Ambient F007TH.
He got onto this track after trying out the Arduino sketch written to receive the sensor’s RF communications. One peculiar part of the code turned out to be a filter for corrupt messages as the protocol’s checksum hadn’t yet been worked out. Figuring out how the checksum byte owrks wasn’t an easy process. The adventure led him to dump 13k samples into a spreadsheet to see if sorting similar sets of 5-byte message and 1-byte checksum would shed some light on the situation. The rest of the story is some impressive pattern matching that led to the final algorithm. Now [BaronVonSchnowzer] and anyone else using these modules can filter out corrupt data in the most efficient way possible.
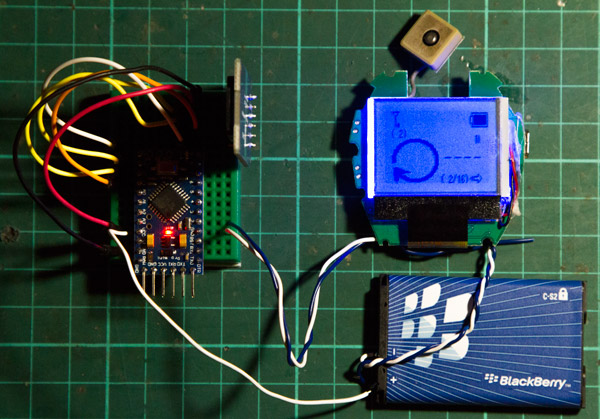
Twenty Euros will score you a small, self-contained GPS keychain. Crack that case open and you can have a lot more. [j3tstream] explored the guts of the thing and found that the NMEA data can be streamed out of the TX pin on the GPS chip.
First off, check out that miniscule GPS antenna module, crazy! But we digress. For testing purposes the asynchronous UART of the GPS was probed, proving that the data can be acquired. From there [j3tstream] moved to an Arduino Pro Mini with an SD card for data logging. The uC is powered from the GPS board but this will quickly exhaust the stock battery so [j3tstream] swapped it out for one from an old cellphone.
That little dot-matix LCD that comes with the unit also caught our eye. If you can hack a headless interface for the GPS that could be repurposed for your next project. May we suggest a wearable gaming project for it?
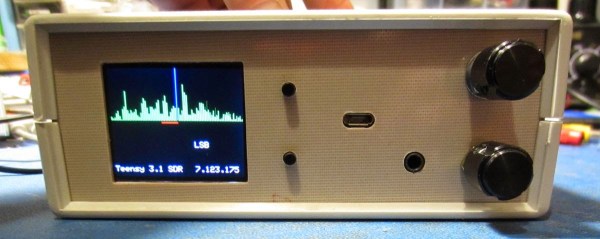
[Rich, VE3MKC] has made a lot of progress on his Software Defined Radio (SDR) which is based on a Teensy. His latest update shows off the hardware in an enclosure and a few new features.
When we looked at this in April of last year it was pretty much a proof-of-concept with components hanging loose from jumper wires. The new case mounts everything securely in a plastic Hammond enclosure with copper clad for the front and rear panels. The SoftRock SDR unit was yanked from its case and retrofitted with connectors to make it swappable for other units.
A little help goes a long way and [Rich] thanks his friend [Loftur, VE2LJX] for contributing numerous code improvements and feature additions which can be viewed in the repository. Check out the video below where these features are shown off.
In its present state the radio draws 80 mA at 12V in receive mode. It doesn’t transmit yet but we’ll keep our eyes open for another update on that. [Rich] plans to populate the input circuitry and write the transmit code next.
Fans of [Ben Heck] know that he has a soft spot for pinball machines and his projects that revolve around that topic tend to be pretty epic. This is a good example. At a trade show he saw an extra-wide format LCD screen which he thought would be perfect on a pinball build. He found out it’s a special module made for attaching to your car’s sun visor. The problem is that it only takes composite-in and he wanted higher quality video than that offers. The solution: reverse engineer the LCD protocol and implement it in an FPGA.
This project is a soup to nuts demonstration of replacing electronics drivers; the skill is certainly not limited to LCD modules. He starts by disassembling the hardware to find what look like differential signaling lines. With that in mind he hit the Internet looking for common video protocols which will help him figure out what he’s looking for. A four-channel oscilloscope sniffs the signal as the unit shows a blue screen with red words “NO SIGNAL”. That pattern is easy to spot since the pixels are mostly repeated except when red letters need to be displayed. Turns out the protocol is much like VGA with front porch, blanking, etc.
With copious notes about the timings [Ben] switches over to working with a Cyclone III FPGA to replace the screen’s stock controller. The product claims 800×234 resolution but when driving it using those parameters it doesn’t fill the entire screen. A bit more tweaking and he discovers the display actually has 1024×310 pixels. Bonus!
It’s going to take us a bit more study to figure out exactly how he boiled down the sniffed data to his single color-coded protocol sheet. But that’s half the fun! If you need a few more resources to understand how those signals work, check out one of our other favorite FPGA-LCD hacks.
Online parts search and ordering is a godsend compared to the paper-catalog days of yore. This is fact, there is no argument otherwise (despite [Dave Jones’] assertion that sourcing connectors is so much simpler if you have pages full of images). Just being able to search was a game changer. But how far do you think the concept has come since the transition online? [Chris Gammell] plans to spark a leap forward with Parts.io, an electronic component info delivery system that spans both manufacturers and distributors.
So what’s wrong with what we’re doing now? Nothing… unless you hate wasting time. Sourcing parts is time consuming. Certainly the parametric search on distributors’ sites like Mouser and Digikey have improved. Plus we’ve seen hacks that do things like automatically pull in stock data to a spreadsheet. But the real issue isn’t figuring out how to buy stuff, it’s figuring out what to use in a design. Surely there is opportunity for improvement.
Parts.io has its sights set on a better path to part discovery. Yes, this is parametric search but it will return data for all parts from all manufacturers. The distinction may not be completely obvious, but for example if you are searching on Element14 you’re only getting data on the parts that Element14 carries. Once you have drilled down to a reasonably manageable pool of components you get what you would expect: one-click datasheets and a roundup of pricing and availability from worldwide distributors. The presentation of the parts is grouped into families that differ in trailing parts designators, and I must say I am impressed at the interface’s ability to roll with you. It feels easier to find alternative parts after the drilldown where in my past searches I would have started completely over again.
The service started in private alpha in October but is now available for public use. You can search for a part without logging in, but a few features have been held back for those that sign up for a free account. Most notably this includes the ability to upload your BOM, add parts as favorites, and access their forums.
Is this a game changer? That’s for you to decide. You can give it a try yourself or watch [Chris’] feature walkthrough video found after the break.
We find this offering far more engaging. He has ditched the ultrasonic module seen in those experiments. The new rig drives the piezo element using a 27V source. After each ping is sent out, the microphone input is immediately captured to detect the return of the audible sound. [Jason] mentions that the TI Launchpad he’s using for the project is fast enough for these experiments but he may switch to a Teensy 3.1 in order to double the RAM and thereby increase the sample size he is able to record.
Of course this is intended for underwater ROVs so his next iteration will involve a DIY hydrophone. We can’t wait to see that one as the process of converting this test rig into one that works underwater evades us. If you have some tips on that topic please let us know in the comments.
LVBots, a club for robot building enthusiasts in Las Vegas, held an open house the week of CES. This was the only trip [Sophi] and I took away from the conference halls of The Strip and it was a blast! The group holds meetings twice a month in a space provided by Pololu — a well-known robotics and electronics manufacturer headquartered just south of McCarran International Airport.
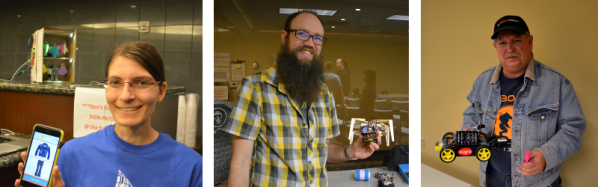
[Claire] demonstrating robotic closet demo and app
The mechanized racks of the automated closet
Line-following robot demonstration
Sumo robots about to rumble
Before the formal part of the gathering started there were several builds being shown off. [Claire] and [Brian] recently participated in an AT&T sponsored hackathon. Their creation is a robotic closet. The system involves moving racks of clothing which are tracked by a smartphone app. Interesting features discussed for the software include monitoring when each garment was last worn, last washed, and if it is appropriate for current weather conditions. Dig into the code in their repo.
In other parts of the room a pair of line-following robots did their thing, and a couple of sumo-bots competed to push each other out of the ring. A large group was gathered around the projector watching videos of robots of all types, brainstorming about the difficult parts, how they were overcome, and how these methods may be applied to their own build. I can attest that hanging with a group of people who are trying to cue up the most amazing robot demonstrations makes for amazing viewing!
As the organized part of the meeting began I was delighted to hear about a standing challenge from the LVbots group. The Tabletop challenge has multiple phases that serve to encourage builders to start modestly and then iterate to achieve new goals:
Phase 0: bring a robot to LVBots
Phase 1: travel back and forth without falling off
Phase 2: find an object and push it off
Phase 3: push object into a goal
[Nathan Bryant] and robot
[Joe Carson] and robot
[Nathan Bryant] was one of the two robot builders trying out the challenge on this night. He built this hexapod from balsa wood and three servo motors and was testing Phase 1. The bot includes a sensor dangling out in front of the robot to detect then the table surface is no long below. At that point it backs up a few steps, turns in place, and proceeds in the opposite direction. [Nathan] mentions that he worked out all the movements in a spreadsheet and that future firmware upgrades will dramatically increase the speed at which the bot moves. We love the audible cadence of the bot which is easily observed in the video above. At one point a leg dangles over the edge and it looks like [Nathan] pushed the bot back but I don’t remember him actually touching it so I’m calling this a trick of camera angle.
One phase further in the Tabletop Challenge is [Joe Carson]. He exhibited a wheeled robot he’s been working on that includes a gripper arm on the front. The robot looks around the table for a predefined color, in this case provided by a highlighting marker. When found the bot approaches, grips, and then proceeds to move the marker over the void where it is dropped out of existence; at least from the robot’s point of view.


![[Claire] demonstrating robotic closet demo and app](https://i0.wp.com/hackaday.com/wp-content/uploads/2015/01/dsc_0378.jpg?w=540&h=360&ssl=1 "DSC_0378")


![[Nathan Bryant] and robot](https://i0.wp.com/hackaday.com/wp-content/uploads/2015/01/dsc_03961.jpg?w=530&h=353&ssl=1 "DSC_0396")

![[Joe Carson] and robot](https://i0.wp.com/hackaday.com/wp-content/uploads/2015/01/dsc_0390.jpg?w=262&h=174&ssl=1 "DSC_0390")


