More Acetone-vapor Polishing Experiments

acetone-vapor-polishing-experiments

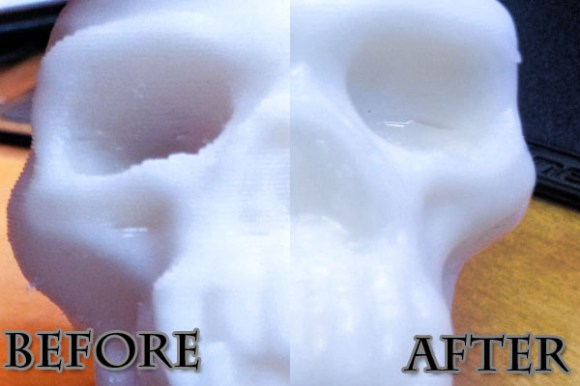
If you’re thinking of trying the acetone-vapor polishing process to smooth your 3D printed objects you simply must check out [Christopher’s] experiments with the process. He found out about the process from our feature a few days ago and decided to perform a series of experiments on different printed models.

The results were mixed. He performed the process in much the same way as the original offering. The skull seen above does a nice job of demonstrating what can be achieved with the process. There is a smooth glossy finish and [Christopher] thinks there is no loss of detail. But one of the three models he tested wasn’t really affected by the vapor. He thinks it became a bit shinier, but not nearly as much as the skull even after sending it through the process twice. We’d love to hear some discussion as to why.

There is about eight minutes of video to go along with the project post. You’ll find it after the jump.

Continue reading “More Acetone-vapor Polishing Experiments”

Building A Touchscreen XBMC Setup With The Raspberry Pi

rapsberry-pi-based-touchscreen-xbmc-tablet

[Andrei Istodorescu] has been hard at work building a 7″ touch-screen rig which runs XBMC. It may be upside-down, but the Raspberry Pi board which is front and center is still easily recognizable. There’s a lot of stuff connected to it in order to pull this off, and even more software configuration. But as you can see in the clip after the break he did get it working!

The screen is an eGalaxy 7″ touch sensitive module he picked up on eBay. It sounds like it was meant for a backup camera in the dashboard of a car. He compiled his own Linux kernel to add support for the screen. It uses HDMI for the video interface with the driver board, and the touchscreen connects to one of the USB ports. The rest of the setup involves compiling XBMC with touchscreen support and calibrating the screen to accurately sense input.

Continue reading “Building A Touchscreen XBMC Setup With The Raspberry Pi”

Hacking A PAL SNES To Output 50Hz Or 60Hz With A Single Switch

snes-pal-ntsc-mod

[Derecho] grabbed a PAL format Super Nintendo but wanted to make it play nicely with a 60 Hertz NTSC screen. His hack added a single switch to choose between 50 Hz and 60 Hz.

Take a look at the image above to see his alterations to the mainboard. The jumpers soldered to the two chips at the top are by far the trickiest part of the project. Each of the pins he soldered to needed to first be lifted from the PCB pad so that they no longer make contact with the etched traces. The technique he used involves heating the pin with an iron, then gently lifting it with a pin or a razor knife/blade. If you’ve got some experience populating SMD boards with a handheld iron this shouldn’t prove too difficult. The rest of the hack involves adding a 3-position switch (along with a 2k2 resistor) to choose between output modes based on what format game is being played.

Oreo-creme Hater Builds Rube Goldberg CNC Router To Remove The Stuf

oreo-separator

Look, we understand the need to find a project to occupy your time and interest. So we’re not going to ask the wrong question (why?) for this one. This guy hates the creme that connects the chocolate cookies to make an Oreo. So he built a complicated system to separate the cookies and remove the creme. Check out the video after the break for a hardware overview (where we catch a glimpse of an Arduino RBBB) and a complete demonstration.

Although the project is a marketing gimmick for the company, we really love the fun they had making the video and the device actually works! Drop a cookie in the chute and it will be lifted into position for cleaving with a hatchet (we’re unsure what the string mechanism on the hatchet is for). The two pieces are then grabbed by some servo-powered grippers and transferred to a CNC router bed where a Dremel tool removes the residual creme before dumping the cookies out into your hand.

Once again, marketers should take note of this style of advertising. Notice the two main features achieved here: including a product in something we’re genuinely interested in and not being annoying (we’re looking at you Head-On).

Continue reading “Oreo-creme Hater Builds Rube Goldberg CNC Router To Remove The Stuf”

Soluble Support Structure Can Be Used With Any Extruder-based 3D Printer

One of the issues with extruder-based 3D printing is that it can be very difficult to print objects that have voids in them. You simply must have something to deposit the soft material on until it has a chance to harden. [Matt] found a solution which should work for any extruder-based printer (with one caveat we’ll get to in a minute). He prints a support structure out of HIPS then later dissolves it using Limonene. The image on the left shows the object soaking for 24 hours. The final project is seen beside it.

The only real problem with this technique is that it requires a second extruder. Since printers build objects by layers, switching material in a single print head isn’t an option. HIPS stands for High-Impact Polystyrene. It extrudes at the same temperature as the ABS (235C) and adheres well to a heated bed kept at 115C. ABS will be unaffected by the hydrocarbon solvent Limonene, except for the residual smell of citrus.

Mexican Law Enforcement Seizes A Hacked Together Weed Cannon

marijuanna-cannon

Here’s an interesting hack. It’s a small pick-up truck with a Dope Cannon attached to it. Sure, it looks more like something you’d see in Syria, but this item was actually seized in Mexico where it was being used to fire 30 pound slugs of Marijuana over the border fence with the US. Usually when you fire artillery there isn’t someone on the target range trying to recover the projectile!

The device uses a PVC barrel to guide the pot-pellet as it’s propelled by compressed air. Hey, swap out the drugs for an energy drink and that sounds pretty familiar. Our qualifying entry for the 2012 Red Bull Creation Contest was an energy drink cannon which  used the same setup with a slightly smaller caliber. It makes us wonder if the drug cartel uses little parachutes like we did?

Doesn’t it arouse suspicion to drive something like this around town? You’d think they’d use a box truck or something similar to hide the giant gun.

[Photo Credit: AP via NY Daily News]

[via Reddit]

Revolving Camera Mount Helps To Capture 3D Video-game Assests

3d-image-capture

Here’s a camera rig that makes it a snap to produce photorealistic 3D models of an object. It was put together rather inexpensively by an indie game company called Skull Theatre. They published a couple of posts which show off how the rig was built and how it’s used to capture the models.

They’re using 123D, a software suite which is quite popular for digitizing items. The rig has a center table where an object is placed, and a movable jig which holds three different cameras (or one camera for three rotations). You can see the masking tape on the floor which marks the location for each shot. These positions are mapped out in the software so that it has an easy time putting them all together. The shaft which connects the jig to the base is adjustable to accommodate large or small items.

One thing that we found interesting is the team’s technique for dealing with reflections. They use a matte spray to make those surfaces less reflective. This helps 123D do its job but also allows them to map reflective surface more accurately using the game engine.