Wireless Pinball Controller For Tablet Gaming

wireless-pinball-controller

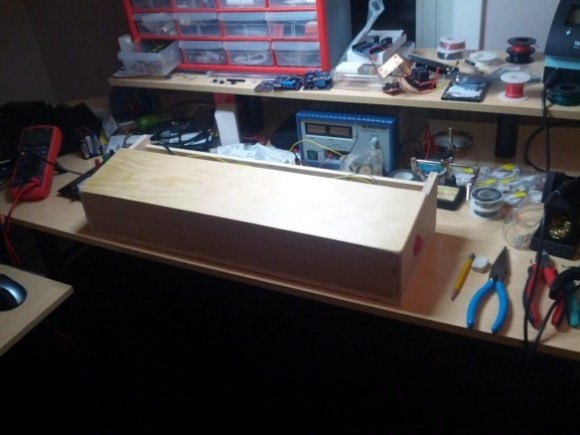
This wooden box is a wireless pinball controller and tablet stand. The idea is to set it on a workbench to give you some of the thrill of standing and playing the real thing. [Jeff] has been rather addicted to playing a pinball app on Android lately, and started the journey because he needed a way to give his thumbs some relief.

An Arduino monitors buttons on either side of this wooden controller. [Jeff] is new to working with hardware (he’s a Linux Kernel developer by trade) and was immediately struck with button debouncing issues. Rather than handle this in software (we’ve got a super-messy thread on that issue with our favorite at the bottom) he chose a hardware solution by building an SR latch out of two NAND gates.

With the inputs sorted out he added a BlueSMiRF board to the project which allowed him to connect a Nexus 7 tablet via Bluetooth. At this point he ran into some problems getting the device to respond to his control as if it were an external keyboard. His stop-gap solution was to switch to a Galaxy Tab 10.1 which wasn’t throwing cryptic errors. Hopefully he’ll fix this in the next iteration which will also include adding a plunger to launch the pinball, a part which just arrived in the mail as he was writing up this success.

We’ve embedded his quick demo video after the break.

Continue reading “Wireless Pinball Controller For Tablet Gaming”

A Longboard Speed And Distance Computer

longboard-speed-distance-comptuer

Why should cyclists have all of the fancy toys? Bicycle computers are very common these days but you won’t find similar hardware for skateboards and longboards. [KobraX22] isn’t taking it lying down. He built this speed and distance computer for his longboard. It doesn’t use very many components and should be easy to install.

The device monitors the rotation of one of the wheels by mounting a reflectance sensor on one of the trucks. It points toward the inside of a wheel which has a piece of black tape on it. Every time the tape passes it prevents the IR led from reflecting back at its paired receiver. This lets the Arduino count the revolutions, which are then paired with the wheel diameter to calculate speed as well as distance traveled. Of course the wheels wear down over time to so frequent riders will have to take new measurements at regular intervals.

[KobraX22] went with a QRB1114 sensor. It costs less than $2 and doesn’t require him to embed a magnet in the wheel like a hall effect sensor setup would have. It also shouldn’t interfere with any other fancy wheel hacks you’ve done, like adding a POV display.

[via Reddit]

Retrotechtacular: Donner 3500 Portable Analog Computer

What if we told you we had a computer you can take with you? What if it only weighed 28 pounds? This is a pretty hard sell when today you can get a 1.5 GHz quad-core processor packing computer to carry in your pocket which weighs less than 5 ounces. But back in the day the Donner 3500 was something to raise an eyebrow at, especially for tinkerers like us.

The machine was unveiled in 1959 as an analog computer. Instead of accepting programs via a terminal, or punch cards, it worked more like a breadboard. The top of the case features a grid of connectors (they look like banana plugs to us but we’re not sure). The kit came with components which the user could plug into the top to make the machine function (or compute) in different ways.

We’re skeptical as to how portable this actually was. It used vacuum tubes which are not fans of being jostled. Still, coming during the days when most computers were taking up entire buildings we guess the marketing claim holds up. If you’d like to see a bit more about the machine’s internals check out this forum post.

Building A Remote Control For A Cable Release Camera

wireless-shutter-for-mechanical-camera

A lot of the remote shutter and intervalometer hacks we see are simplified by the camera’s built-in Infrared or other shutter techniques. But this camera doesn’t have a simple way to electronically trigger the shutter. The Fuji x100 is a digital camera, but it uses a cable release mechanism. The box you see on top is [Andy’s] method of making a remote shutter release for it.

The solution for “remote” triggering is that black cable which physically attaches to the shutter button. Just depress the plunger at the opposite end and a picture will be snapped. This process is automated with the use of a hobby servo hidden inside the box. It’s driven by an Arduino which is also monitoring the receiver. You could use just about any remote thanks to the Arduino’s flexibility in interfacing with hardware (we would have gone with a Bluetooth module and our smartphone). [Andy] chose to use an RF remote and receiver for a different camera.

Hackerspace Intro: Workshop 88

hackerspace-intro-workshop-88

If you find yourself in the West suburbs of Chicago, IL with nothing to do you should head over to Workshop 88. [Andrew Morrison] shot some video at the last public meeting which includes a tour of the facilities. We’ve embedded it after the jump for your convenience.

The clip isn’t so much a tour as it is a POV experience. There’s no narrative and the people at the meeting seem to be oblivious that anyone’s recording video. This makes for a pretty interesting presentation, starting with a little rubbernecking at the projects being shown off at the meeting. From there we pass by a couple of members pulling a wire run through the ceiling of the machine shop. Next we see the electronics lab complete with a Makerbot and a very tidy component storage wall. [Andrew] makes a quick trip through the small music studio before heading back to the main room at the close of the segment.

Continue reading “Hackerspace Intro: Workshop 88”

High Contrast Laser Etching

high-contrast-laser-etching

The problem with laser etching dark materials is that the areas burnt away by the intense light don’t really stand out from the rest of the surface. [The 5th Fool] is taking a roundabout way of correcting this by topping his laser engravings with contrasting paint. The technique is still pretty simple and we think it looks great!

Basically he’s etching a layer of painter’s tape which becomes a stencil. But the surface it is masking also gets etched so the paint has an area below to the surface which it can fill in. We figure this will help with durability issues.

After etching the painters tape the design gets a few coatings of a high-contrast paint color and is left to dry. To remove the stencil, duct tape is applied to the entire area. This helps quite a bit in removing the tiny bits of tape from an intricate design.

VFD Tube Clock Built Using Protoboard And Free-formed PSU

[James Glanville] wrote in to show of his latest tube project. It’s a clock using six IV-3 VFD tubes. In addition to the tube displays the project prominently features a blue 3D printed case which hides away all the guts of the build including the Stellaris Launchpad which drives the clock.

Speaking of guts, you’ll want to look through a few of [James’] other posts on the project. His first write-up on this clock shows off the protoboard and point-to-point soldering that makes the tubes work. To help simplify things he went with a MAX6921 VFD driver chip. He mounted it dead-bug style on its own piece of protoboard and then soldered all of the necessary connections to the larger hunk hosting the tubes. There’s also an interesting post that details the switch mode power supply which ramps the USB 5V power all the way up to the 50V used to drive the displays.

If you like this you should check out the first VFD clock he built. We featured it a while back in a links post.