A red and blue Lytro camera with a serial port soldered onto one

Unlocking Hidden Features Of An Unusual Camera

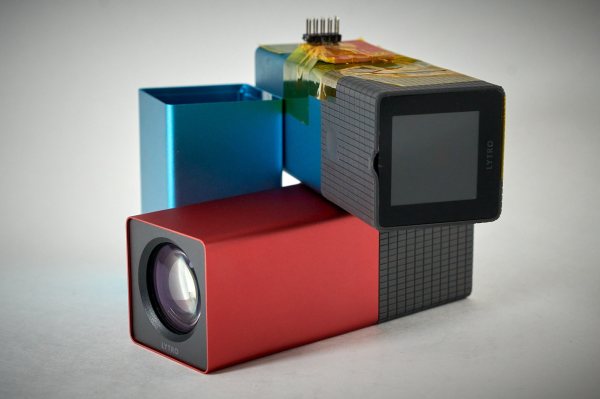
Back in 2012, technology websites were abuzz with news of the Lytro: a camera that was going to revolutionize photography thanks to its innovative light field technology. An array of microlenses in front of the sensor let it capture a 3D image of a scene from one point, allowing the user to extract depth information and to change the focus of an image even after capturing it.

The technology turned out to be a commercial failure however, and the company faded into obscurity. Lytro cameras can now be had for as little as $20 on the second-hand market, as [ea] found out when he started to investigate light field photography. They still work just as well as they ever did, but since the accompanying PC software is now definitely starting to show its age, [ea] decided to reverse-engineer the camera’s firmware so he could write his own application.

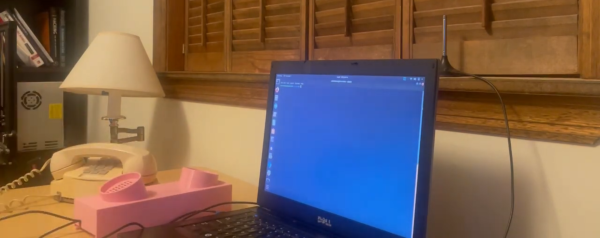
[ea] started by examining the camera’s hardware. The main CPU turned out to be a MIPS processor similar to those used in various cheap camera gadgets, next to what looked like an unpopulated socket for a serial port and a set of JTAG test points. The serial port was sending out a bootup sequence and a command prompt, but didn’t seem to respond to any inputs. Continue reading “Unlocking Hidden Features Of An Unusual Camera”

A handheld game console made from bare PCBs

Minimalist Homebrew Hardware Recreates Arcade Classics

Classic video games might look primitive by today’s standards, but the addictive gameplay of Breakout or Pac-Man remains fun no matter what decade you were born in. Keeping the relevant hardware running becomes harder as the years pile up however, so when [Michal Zalewski] decided to introduce his kids to classic video games, he didn’t dig up his old game consoles. Instead, he decided to recreate several games from scratch using the bare minimum amount of hardware needed.

The first project is a copy of Snake, the arcade classic that millennials will recognize from their Nokia phones. [Michal] made an initial version using an ATmega328P with an 8×8 LED matrix as a display, but quickly upgraded the hardware to a 16×16 display powered by an ATmega644, and added an LED seven-segment display to show the score. All parts are simply soldered onto a piece of prototyping board, with no need for any custom PCBs or enclosures.

Game #2 is a side-scrolling space shooter called Dino in Space. This game runs on an ATmega1284 and uses a 4×20 character text display, allowing simple graphics as well as an on-screen score counter. Similar hardware, although with a 128×64 graphic OLED screen, powered game #3, a Breakout/Arkanoid clone called Blockbuster 7000.

[Michal]’s blog post is filled with interesting tips for real-life game programming. For example, a true random number generator creates a rather odd-looking bunch of asteroids in space – tweaking the distribution to make it a bit more uniform greatly enhances the game’s playability. Source files for all games are available on [Michal]’s website, and include a description of the exact hardware setup needed for each game.

Recreating Snake on custom hardware is sort of a rite of passage for microcontroller hackers, as you can see inĀ  many impressive projects. Breakout-style games can also be implemented on various hardware platforms, including analog oscilloscopes.

Several people at a museum exhibit about magnetism

Hands-On Museum Exhibit Brings Electromagnetism To Life

Magnets, how do they work? Although the quantum mechanics behind ferromagnetism are by no means easy, a few simple experiments can give you a good grasp of how magnets attract and repel each other, and show how they interact with electric phenomena. [Niklas Roy] built an exhibit for the Technorama science museum in Switzerland that packs a bunch of such electromagnetic experiments in a single package, appropriately called the Visitors Magnet.

The exhibit consists of a big magnet-shaped enclosure that contains a variety of demonstrators that are all powered by magnets. They range from simple compasses to clever magnetic devices we find in the world around us: flip-dot displays for instance, on which you can toggle the pixels by passing a magnet over them. You can even visualize magnetic field lines by using magnetic viewing film, or turn varying fields into audio through a modified telephone receiver.

Another classic demonstrator of electromagnetism is a color CRT monitor, which here displays a video feed coming from a camera hanging directly overhead. Passing a magnet along the screen makes all kind of hypnotizing patterns and colors, amplified even more by the video feedback loop. [Niklas] also modified the picture tube with an additional coil, connected to a hand-cranked generator: this allows visitors to rotate the image on the screen by generating an AC current, neatly demonstrating the interaction between electricity and magnetism.

The Visitors Magnet is a treasure trove of big and small experiments, which might not all withstand years of use by museum guests. But that’s fine — [Niklas] designed the exhibit to be easy to maintain and repair, and expects the museum to replace worn-out experiments now and then to keep the experience fresh. He knows a thing or two about designing engaging museum exhibits, with a portfolio that includes vector image generators, graffiti robots and a huge mechanical contraption that plays musical instruments.

Continue reading “Hands-On Museum Exhibit Brings Electromagnetism To Life”

A thermostat unit and a replacement PCB for it

Custom Thermostat PCB Connects Boiler To Home Assistant

Thanks to Home Assistant, automating the various systems that run your home is easier than ever. But you still need to make a connection between those systems and your Home Assistant setup, which can be tricky if the manufacturer didn’t have this use case in mind. When [Simon] wanted to automate his home heating system, he discovered that most Home Assistant-enabled thermostats that he could find didn’t support his two separate heating zones connected to a single boiler. The easiest solution turned out to be to design his own.

The original heating system consisted of two control boxes that each had a 230 V mains connection coming in and a “request heat” control line going to the boiler. [Simon] considered replacing these with a simple off-the-shelf ESP8266 relay board and a 12 V power supply, but figured this would look messy and take up quite a bit of space. So he bought a neat DIN-rail mounted enclosure instead, and designed a custom PCB to fit inside it.

A Home Assistant screen showing two thermostatsThe PCB holds a Wemos D1 Mini connected to two relays that switch the two heating circuits. The D1 runs ESPhome and needs just a few lines of configuration to connect it to [Simon]’s home network. There’s no separate power supply — the 230 V line is connected directly to a 12 V DC power module mounted on the PCB, so the new system is plug-and-play compatible with the old.

Complete PCB design files are available on [Simon]’s website and GitHub page. There are several other ways to make custom thermostats for your home, with an Arduino for example. If you’re interested in repairing your own heating system, or want to optimize it even further, there’s a whole community out there to help you.

A NABU PC opened up and powered on

NABU PC Gets CPU Upgrade, Emulates A TRS-80

The NABU PC caused a bit of a buzz in the retrocomputing community a couple weeks back. After all, it doesn’t happen often that a huge batch of brand-new computers from the 1980s suddenly becomes available on eBay. Out of the box, the computer itself isn’t that useful: with no internal storage, or any application software whatsoever, it can really only serve as a bare-bones development platform. But since its hardware is quite similar to that of other contemporary home computers, emulating one of those shouldn’t be too difficult, which is exactly what [Ted Fried] did: he managed to turn his NABU into a TRS-80 clone by using his MCLZ8 CPU emulator.

The MCLZ8 is basically an 800 MHz Teensy CPU with an adapter board that allows it to be plugged into a Z80 socket. It emulates the Z80 CPU in real-time, but it also holds the TRS-80 ROM and performs real-time translation between peripherals. On the input side, it reads out the ASCII characters coming in from the NABU’s 8251A UART and stores them in the virtual TRS-80’s keyboard buffer. On the output side, it transfers the TRS-80’s video data to the NABU’s TMS9918 video chip.

The motherboard of a NABU PC with a Teensy-based CPU upgradeOne problem [Ted] ran into was a difference in screen resolution: the NABU has a 40×24 character display, while the TRS-80 generates a 64×16 character image. [Ted] solved the vertical difference by simply keeping the NABU logo on the screen at all times, and decided to just ignore the 24 characters that drop off the right side – it’s not a big issue for a typical BASIC program anyway.

The repurposed NABU might not be a perfect TRS-80 clone, but that’s not the point: it shows how easily the NABU’s hardware can be reprogrammed to do other things. For example, [Ted] has already started work on a new project that doesn’t emulate the Z80, but instead runs code directly on the Teensy’s ARM A9 processor. As you might imagine, this gives the NABU several orders of magnitude more processing power, although the practical use of this is limited because the CPU still has to wait for the NABU’s slow data bus and display chip. [Ted] explains the setup and runs a few impressive demos in the video embedded below.

[Ted]’s NABU experiments are a great example of the Teensy board’s flexibility: we’ve already seen how it can emulate a Z80 as well as an 8088. We’re also curious to see what others will develop with the NABU’s hardwareif they can still buy it, of course.

Continue reading “NABU PC Gets CPU Upgrade, Emulates A TRS-80”

A laptop with a desk phone and a 3D-printed acoustic coupler next to it

Acoustic Coupler Gets You Online Through Any Desk Phone

Up until the mid-1980s, connecting a computer to a phone line was tricky: many phone companies didn’t allow the connection of unlicensed equipment to their network, and even if they did, you might still find yourself blocked by a lack of standardized connectors. A simple workaround for all this was an acoustic coupler, a device that played your modem’s sounds directly into a phone’s receiver without any electrical connection. Modem speeds were slow anyway, so the limited bandwidth inherent in such a system was not much of a problem.

Nowadays it’s easier to find an internet connection than a phone line in many places, but if you’re stuck in an ancient hotel in the middle of nowhere you might just find [GusGorman]’s modern take on the acoustic coupler useful. The basic design is quite simple: it’s a 3D-printed box with two cups that fit a typical phone handset and a space to put a USB speaker and microphone. Thanks to minimodem it’s easy to set up a connection with any other computer equipped with a phone connection.

Continue reading “Acoustic Coupler Gets You Online Through Any Desk Phone”

A wall clock made from wires and electronic components

Form Follows Function In This Circuit Sculpture Clock

Electronic components are strictly functional objects: their appearance is determined by the function they’re meant to fulfil. But that doesn’t mean there’s no beauty in them. In fact, a whole discipline called circuit sculpture exists that aims to make beautiful shapes out of nothing more than electronic components and wires. Today we can show you [Maarten Tromp]’s latest work in this field: a wall-mounted clock that he’s christened the Clock Sculpture.

The clock’s main structure consists of two concentric rings made from galvanized steel wire, held together by twelve spokes. All components are soldered directly onto those two rings, with no additional mechanical support. Steel isn’t the greatest material for soldering to, but [Maarten] managed to make it work with a high-wattage soldering iron and a bit of plumbers’ flux.

The overall design is simple but clever: the outer ring holds 60 LEDs to indicate the minutes, with every fifth LED always illuminated dimly in order to provide a background reference in dark conditions. There are 24 LEDs on the inner ring to indicate the twelve hours as well as the “half-hours” in between. Without these, the dial would look a bit odd at 30 minutes past the hour.

Detail of a circuit sculpture clockA mains transformer, plus a single diode, a buffer capacitor and a 7805 regulator form a simple DC power supply, with its negative terminal connected to the steel frame. Time is kept by an ATtiny13A that counts mains frequency pulses. There’s no way to adjust the time: you’ll have to plug in the clock exactly at noon or midnight in order to synchronize it with the outside world. A crude method perhaps, but one that fits well with the clock’s bare-bones aesthetic.

The individual LEDs are driven by a set of twelve 74HC595 shift registers, all mounted dead-bug style between the two rings. Signals and power are carried between the chips by inconspicuous grey wires taken from old IDE cables; this gives the clock a clean, uncluttered appearance. [Maarten] has had the sculpture clock in his office for several months and while it apparently took some time to get used to, he claims it’s easy to read in bright and dark conditions.

Circuit sculpture has formed the basis for several stunning clock projects: this Tie Fighter-shaped clock for instance, or this insanely complex LED clock. Our 2020 Circuit Sculpture contest yielded many breathtaking designs, too.