Rocket Lab Plans Larger Neutron Rocket For 2024

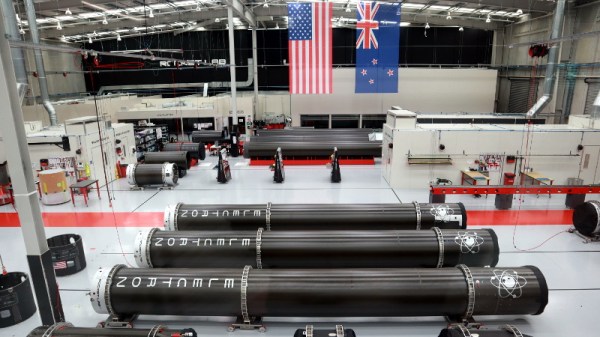
When Rocket Lab launched their first Electron booster in 2017, it was unlike anything that had ever flown before. The small commercially developed rocket was the first to use fully 3D printed main engines, and instead of pumping its propellants with traditional turbines, the vehicle used electric motors that jettisoned their depleted battery packs overboard during ascent to reduce weight. It even looked different than its peers, as rather than a metal fuselage, the Electron was built from a lightweight carbon composite which gave it a distinctive black color scheme.

Packing so many revolutionary technical advancements into a single vehicle was a risk, but Rocket Lab founder Peter Beck believed a technical shakeup was the only way to get ahead in an increasingly competitive market. While that first launch in 2017 didn’t make it to orbit, the next year, Rocket Lab could boast three successful flights. By the end of 2020, a total of fifteen Electron rockets had completed their missions, carrying payloads from both commercial customers and government agencies such as NASA, the United States Air Force, and DARPA.

Rocket Lab’s gambit paid off, and the company has greatly outpaced competitors such as Virgin Orbit, Astra, and Relativity. In fact Electron is now the second most active orbital booster in the United States, behind SpaceX’s Falcon 9. Considering their explosive growth, it’s only natural they’d want to maintain that momentum going forward. But even still, the recent announcement that the company will be developing a far larger rocket they call Neutron to fly by 2024 took many in the industry by surprise; especially since Peter Beck himself had previously said they would never build it.

Continue reading “Rocket Lab Plans Larger Neutron Rocket For 2024”

Reverse Engineering The Weather Channel’s Magic

For American readers of a certain age, Local on the 8s likely holds a special spot in your heart. The program, once a staple of The Weather Channel, would provide viewers with a text and eventually graphical depiction of their local forecast set to some of the greatest smooth jazz ever heard outside of an elevator. In the days before smartphones, or even regular Internet access for that matter, these broadcasts were a critical part of planning your day in the 1980s through to the early 2000s.

Up until recently the technical details behind these iconic weather reports were largely unknown, but thanks to the Herculean efforts of [techknight], the fascinating engineering that went into the WeatherSTAR 4000 machines that pumped out current conditions and Shakin’ The Shack from CATV distribution centers all over the US for decades is now being documented and preserved. The process of reversing the hardware and software has actually been going on for the last couple of years, but all those juicy details are now finally going to be available on the project’s Hackaday.IO page.

It all started around Christmas of 2018, when an eBay alert [techknight] had configured for the WeatherSTAR 4000 finally fired off. His offer was accepted, and soon he had the physical manifestation of Local on the 8s in his own hands. He’d reasoned that getting the Motorola MC68010 machine working would be like poking around in a retrocomputer, but it didn’t take long for him to realize he’d gotten himself into a much larger project than he could ever have imagined.

Continue reading “Reverse Engineering The Weather Channel’s Magic”

Rare Diode Threatens Coast Guard’s Arctic Ambitions

The United States Coast Guard heavy icebreaker Polar Star is literally a one-of-a-kind ship. After its sister Polar Sea was deactivated in 2010 it became the most powerful icebreaker in the fleet, and one of only two US icebreakers capable of operating in the treacherous polar regions. The vessel is critical to protecting America’s scientific and economic interests in the Arctic, but according to a recent article in Business Insider, the ship’s age and scarcity of spare parts is making an already difficult mission even harder.

In the article, Captain William Woityra specifically mentions that the ship’s diesel-electric propulsion system is running on borrowed time as the diodes used in its AC/DC rectifier are no longer manufactured. With none remaining in the Coast Guard’s inventory, the crew has had to turn to eBay to source as many spares as possible. But once their hoard runs out, Captain Woityra fears his ship will be dead in the water:

We’ve got a few dozen of these in a box on a shelf, when they’re gone, the ship will not be able to run anymore. It’s really kind of disconcerting … that this ship, and this operation, and the US’s icebreaking presence in the Arctic is reliant on a box of spare parts that … there are no more of.”

The 45 year old ship received a $60 million refit in 2013, but that was only expected to extend the hard-working vessel’s life by 8 to 10 years. There was a proposal for a far more thorough overhaul, one which potentially would have keep the Polar Star in service until nearly 2040; but with an estimated cost of $400 million, Congress decided to go with the more economical stop-gap refit.

Polar Security Cutter

This story comes just days after the Air Force announced it’s looking for a few good hackers to help reverse engineer components on its aging fleet of B-2 bombers. Much like the Polar Star’s vintage rectifier diodes, spare parts for the the stealthy aircraft are getting increasingly difficult to find.

While the Air Force has enough money in the budget to get replacements made, the Coast Guard will just have to hope their stock of diodes holds out a little while longer. Congress has already approved the Polar Security Cutter Program, a fleet of next-generation icebreakers designed to be comparable to newer Russian and Chinese vessels. The first of these ships could set sail by 2024, providing the Polar Star some much-needed backup.

[Thanks to Chuckz for the tip.]

Putting The Magic Smoke Back In A Cooked Scooter

When [Vitor Melon] found out there was a custom firmware (CFW) available for his Xiaomi Mijia M365 Pro electric scooter that would increase his top end speed, naturally he installed it. Who wouldn’t want a little more performance out their hardware? But while the new firmware got the scooter running even better than stock, he does have a cautionary tale for anyone who might decide to ride their Mijia a bit harder than the fine folks at Xiaomi may have intended.

Now to be clear, [Vitor] does not blame the CFW for the fact that he cooked the control board of his Mijia. At least, not technically. There was nothing necessarily wrong with the new code or the capabilities it unlocked, but when combined with his particular riding style, it simply pushed the system over the edge. The failure seems to have been triggered by his penchant for using the strongest possible regenerative breaking settings on the scooter combined with a considerably higher than expected velocity attained during a downhill run. Turns out that big 40 flashing on the display wasn’t his speed, but an error code indicating an overheat condition. Oops.

Results of the PCB repair.

After a long and embarrassing walk home with his scooter, complete with a passerby laughing at him, [Vitor] opened the case and quickly identified the problem. Not only had the some of the MOSFETs failed, but a trace on the PCB had been badly burned through. Judging by the discoloration elsewhere on the board, it looks like a few of its friends were about to join in the self-immolation protest as well.

After a brief consultation with his graybeard father, [Vitor] replaced the dead transistors with higher rated versions and then turned his attention to the damaged traces. A bit of wire and a generous helping of solder got the main rail back in one piece, and he touched up the areas where the PCB had blackened for good measure.

A quick test confirmed the relatively simple repairs got the scooter up and running, but how was he going to prevent it from happening again? Reinstalling the original firmware with its more conservative governor was clearly no longer an option after he’d tasted such dizzying speeds, so instead he needed to find out some way to keep the controller cooler. The answer ended up being to attach the MOSFETs to the controller’s aluminum enclosure using thermal pads. This allows them to dissipate far more heat, and should keep a similar failure from happening again. You might be wondering why the MOSFETs weren’t already mounted this way, but unfortunately only Xiaomi can explain that one.

With their rapidly rising popularity hackers have been coming up with more and more elaborate modifications for electric scooters, and thanks to their wide availability on the second hand market, it’s likely the best is still yet to come when it comes to these affordable vehicles.

Keep Cool With This Open Source AVR Fan Controller

We’ve all got projects kicking around that we haven’t had time to document for our own purposes, let alone expose to the blinding light of the Internet. There are only so many hours in a day, and let’s face it, building the thing is a lot more fun than taking pictures of it. It took [Matthew Millman] the better part of a decade to combine everything he’s learned over the years to finally document the definitive version of his open source intelligent fan controller, but looking at the final result, we’re glad he did.

At the heart of this board is an ATmega328P, but don’t call it an Arduino. [Matthew] makes it very clear that if you want to hack around with the code for this project, you’re going to need to not only have a programmer for said chip, but know your way around AVR-GCC. He’s provided pre-built binaries for those content to run with the default settings, but you’ve still got to get it flashed onto the chip yourself. The project is designed to use the common DS18B20 temperature sensor, and as an added bonus, the firmware can even check if yours is a bootleg (spoilers: there’s an excellent chance it is).

Arguably the most interesting feature of this fan controller is its command line interface. Just plug into the serial port on the board, open your terminal emulator, and you’ll have access to a concise set of functions for querying the sensors as well as setting temperature thresholds and RPM ranges for the fans. There’s even a built-in “help” function should you forget a command or the appropriate syntax.

Originally [Matthew] developed this project as a way to control multiple fans inside of a PC case, but naturally, things have changed quite a bit since those early days. While today there’s no shortage of fancy controllers that can handle throttling an array of fans based on the internal temperature of your rig, there’s still something to be said for rolling your own solution. More importantly, there’s certainly other potential uses for a fully open source programmable fan controller.

Raspberry Pi Hitches A Ride In A 1989 BMW Dashboard

It probably won’t surprise you to find out that a 1989 BMW 325i doesn’t have much in the way of electronic gadgetry onboard. In fact, what passes for an in-dash “computer” in this vintage Beemer is just a digital clock with a rudimentary calendar function. Not content to waste his precious dashboard space any longer, [Ryan Henderson] used his time in quarantine to replace the clock module with a Raspberry Pi.

Nestled in a custom laser-cut housing is a touch screen LCD module that connects directly to the GPIO header of a Pi Zero. Combined with some Python code, this provides a very slick multipurpose interface for pretty much anything [Ryan] wants. Right now he’s got it hooked up to a GPS receiver so he can figure out things like speed and acceleration, but the only real limit on what this little drop-in upgrade can do is how much code you want to sit down and write.

Thankfully, it sounds like [Ryan] has done a lot of the hard work for you. He’s put together a Python library that allows the user to easily draw analog gauges on the screen. The faces are parametrically sized, and even have custom minimum/maximum marks. Of course if you’d rather just throw some text and images on the screen, that’s accomplished easily enough with existing libraries such as PyGame.

[Ryan] says he’s also working on some code to better integrate the Pi into the vehicle’s systems by way of a Bluetooth OBD2 adapter. In the most basic application that would allow you to throw various bits of engine data up on the screen, but on more modern cars, you could potentially tap into the CAN bus and bend it to your will.

While the physical size and shape of this particular modification is clearly focused on this model and year of BMW, the general concepts could be applied to any car on the road. [Ryan] has recently started a GitHub repository for the project and hopes to connect with others who are interested in adding a little modern complexity convenience to their classic rides.

The reality is that cars become more dependent on their onboard computers with each passing year. Already we’re seeing Tesla owners struggle with cooked flash chips, and things are likely to get worse before they get any better. While undoubtedly there are some that would rather keep their daily driver as simplistic as possible, we’re encouraged by projects like this that at least let owners computerize their cars on their own terms.

NRF52 Weather Station Gives Forecast With Style

We’re no strangers to DIY environmental monitors around these parts, in fact, it seems like that’s one of the most common projects hackers take on when confronted with the power of a modern Internet-connected microcontroller. But among such projects, this miniature nRF52-based weather station built by [Andrew Lamchenko] is among the most polished we’ve seen.

Externally, this looks as though it could easily be a commercial product. The graphical interface on the ePaper display is very well designed, delivering plenty of data while still looking attractive enough to hang in the kitchen. The enclosure is 3D printed, but [Andrew] poured enough elbow grease into sanding and polishing the front that you might not realize it at first glance.

Internally it uses the popular BME280 sensor to detect temperature, humidity, and barometric pressure, though the custom PCB is also compatible with the similar SI7021 and HTU21D sensors if you want to switch things up.

That said, you really want the ability to measure pressure, as it allows the firmware to do its own basic weather forecasting. All the collected data is beamed out over Bluetooth Low Energy (BLE), where it can be collected by the open source MySensors IoT framework, but we imagine it wouldn’t take much work to integrate it into your home automation system of choice.

As excited as we might be about the prospect of repurposing things such as electronic shelf labels, we’re happy to see the prices for general purpose electronic paper screens finally dropping to the point where projects of this caliber are within the means of the hacker crowd.

Continue reading “NRF52 Weather Station Gives Forecast With Style”