Adopting An Orphaned Ultralight

Owning and flying your own small airplane offers a nearly unmatched level of freedom and autonomy. Traveling “as the crow flies” without having to deal with traffic on the ground immediately shrinks your world, and makes possible all sorts of trips and adventures. Unfortunately the crippling downsides of plane ownership (storage and maintenance costs, knowledge that you might die in a fiery crash, etc), keeps most of us planted squarely on terra firma.

But not [ITman496]. His dream of owning an ultralight has recently come true, and he’s decided to share his experience with the world. He’s got a long way to go before he slips the surly bonds of Earth, but there’s no better place to start than the beginning. In a recent blog post he documents the process of getting his new toy home, and details some of the work he plans on doing to get it airworthy.

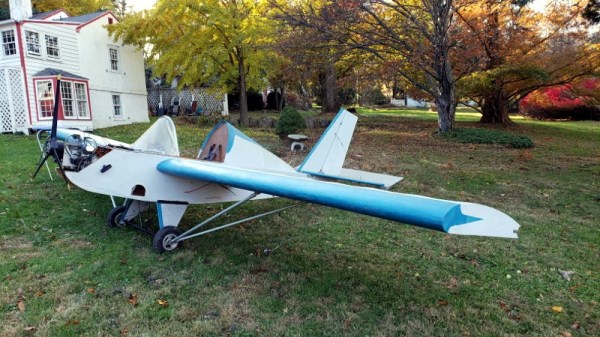
The plane in question is a Mini-MAX that [ITman496] has determined is not only older than he is, but has never flown. It was built by a retired aircraft mechanic who unfortunately had problems with his heart towards the end of assembly. He wisely decided that he should find a safer way to spend his free time than performing solo flights in an experimental aircraft, so he put the plane up for sale.

After a considerable adventure transporting the plane back home, [ITman496] found it was stored in such good condition that the engine started right up. But that doesn’t mean it’s ready for takeoff by any stretch of the imagination. For his own safety, he’s planning on tearing down the entire plane to make sure everything is in good shape and assembled correctly; so at least he’ll only have himself to blame if anything happens when he’s in the air.

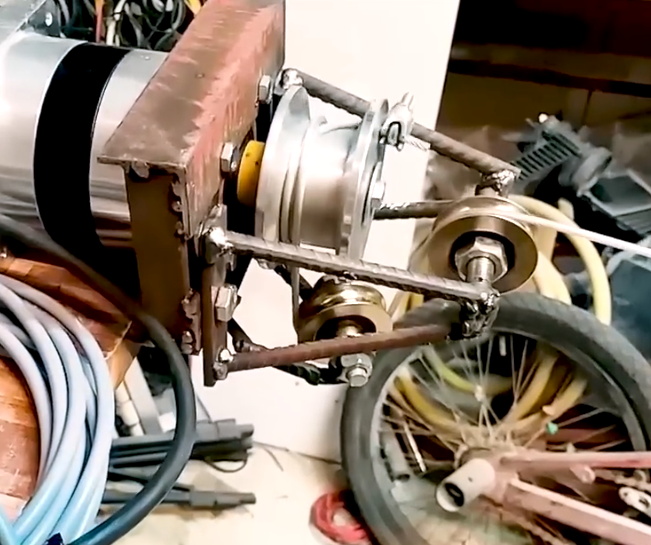
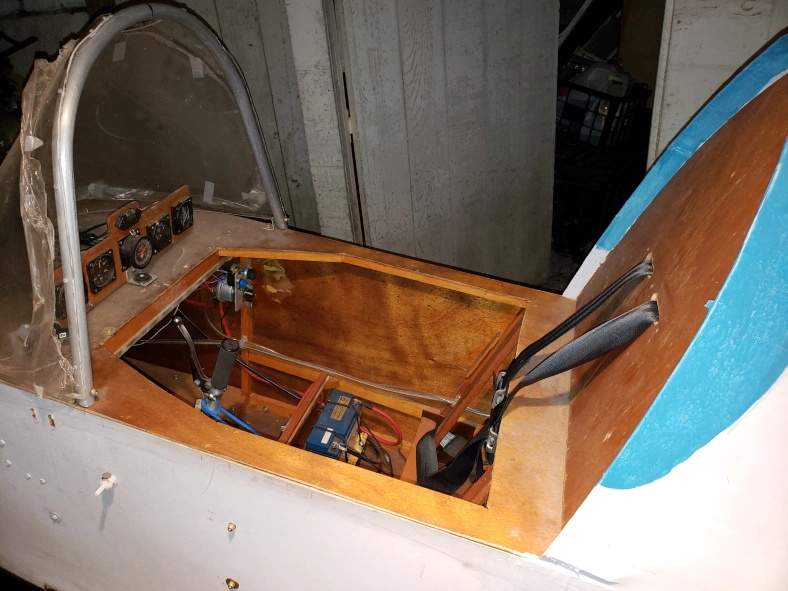
One the plane’s structure is sound, he’ll move on to some much needed engine modifications including a way to adjust the air-fuel mixture from inside the cockpit, improvements to the cooling system, and installation of a exhaust system that’s actually intended for the two-stroke engine he has. When that’s done, [ITman496] is going to move onto the real fun stuff: creating his own “glass cockpit”.

For Hackaday readers who don’t spend their time playing make believe in flight simulators, a “glass cockpit” is a general term for using digital displays rather than analog gauges in a vehicle. [ITman496] has already bought two daylight-readable 10.1″ IPS displays which he plans on driving over HDMI with the Raspberry Pi. No word on what his software setup and sensor array will look like, but we’re eager to hear more as the project progresses.

If you’re not lucky enough to find a mostly-complete kit plane nearby on Craigslist, you could always just make your own airplane out of sheets of foam.

Sniffing RFID Readers With A Piece Of Paper

We feature plenty of printed projects here on Hackaday, though they tend to be of the three dimensional type thanks to the proliferation of affordable 3D printers. But in this case, [Milosch Meriac] has managed to put together a printable design that’s not only a very cool hack, but is made up of a scant two dimensions. His creation, which could perhaps be considered something of an interactive circuit diagram, allows anyone with a paper printer and a few passive components to make a functional low-frequency RFID sniffer.

[Milosch] tells us the goal of the project is to lower the barrier for experimenting with the RFID technology that’s increasingly part of our everyday lives. Rather than having to use something expensive and complicated such as an oscilloscope, experimenters can simply plug their DIY RFID sniffer into their computer’s line-in jack and explore the produced waveform with open source tools.

To create a paper RFID sniffer, you start by printing the image out on a thick piece of paper, like card stock. You then apply foil tape where indicated to serve as traces in this makeshift PCB, and start soldering on the components as described in the text. [Milosch] says the assembly procedure is so simple even a kid can do it, and the total cost of each assembled sniffer is literally pennies; making this an excellent project for schools or really any large group.

If you want to play it safe the sniffer can be connected to a USB sound card rather than your machine’s primary sound hardware, and still come in dirt cheap. [Milosch] stops short of explaining the software side of things in this particular project, but any tool which can use input from the sound card as a makeshift oscilloscope should be a good start.

In the past we’ve seen [Milosch] perform low frequency RFID sniffing through the sound card with the powerful baudline tool, but if you want a little more capable hardware, we can point you in the right direction.

Xbox One X Gets Aluminum Laptop Makeover

While many a gamer was willing to brave hand-to-hand combat this Black Friday just to get a few bucks off of Microsoft’s premium-tier game console, [jomega] was already cutting his to pieces from the comfort of his own home. Not dissuaded by the system’s fairly high sticker price or relatively limited modding scene, he decided to transplant his Xbox One X into an incredibly slick laptop-style aluminum enclosure.

Turning a game console into a “laptop” is hardly new, Ben Heck has been doing it for over a decade now, but in general they tend to look pretty clunky. With a few exceptions, the builder’s goal is not so much to make the final result look sleek and professional, but simply to take their favorite games on the go. But from the start [jomega] wanted something that would not only allow him to take long walks in the park with Master Chief, but look gorgeous doing it.

One of his goals was to make the final device thinner than the original system, so the first step was to assemble virtual representations of the Xbox’s principal components in CAD to find the most efficient placement for everything. Long before the first pieces of aluminum were cut, [jomega] already knew where each part and screw was going to end up. The time he invested in planning out the build in CAD more than made up for itself when it came time to assemble the final product, and also means this design is highly reproducible should he decide to build another one on commission.

Even though the final system seems impossibly thin, no hardware or functionality had to be left out. Even the optical drive, which on the stock console is something of an afterthought to begin with in an era of digital downloads (rumor has it the next Xbox will drop optical discs entirely), has been retained. Special consideration did need to be given to cooling the 4K powerhouse though, and [jomega] warns that running the system with the case open or the fans off can have dangerous consequences.

Thanks to the Xbox One’s wireless capabilities (for both Internet connection and controllers), there’s a notable lack of ports on the case. This made the design a bit easier, as [jomega] really only needed to have a connector for the AC power cord in the back and a couple of holes for the system’s power, eject, and controller sync buttons. He did add in a USB port for convenience, but even that could be skipped to make things easier.

In the past we’ve seen some rather husky Xbox 360 laptop builds, and at least one attempt to build a more slimline version, but this latest entry in the long line of portable-ized Xboxen has set the bar very high.

Continue reading “Xbox One X Gets Aluminum Laptop Makeover”

Shushing Sonic Booms: NASA’s Supersonic X-Plane To Take Flight In 2021

The history of aviation is full of notable X-Planes, a number of which heralded in new generations of flight. The Bell X-1 became the first aircraft to break the speed of sound during level flight in 1947 with the legendary Charles “Chuck” Yeager at the controls. A few years later the X-2 would push man up to Mach 3, refining our understanding of supersonic flight. In the 1960’s, the North American built X-15 would not only take us to the edge of space, but set a world speed record which remains unbroken.

Compared to the heady post-war days when it seemed the sky was quite literally the limit, X-Planes in the modern era have become more utilitarian in nature. They are often proposed but never built, and if they do get built, the trend has been towards unmanned subscale vehicles due to their lower cost and risk. The few full-scale piloted X-Planes of the 21st century have largely been prototypes for new military fighter jets rather than scientific research aircraft.

But thanks to a commitment from NASA, the Lockheed Martin X-59 might finally break that trend and become another historic vehicle worthy of the X-Plane lineage. Construction has already begun on the X-59, and the program has recently passed a rigorous design and timeline overview by NASA officials which confirmed the agency’s intent to financially and logistically support the development of the aircraft through their Low Boom Flight Demonstrator initiative. If successful, the X-59 will not only help refine the technology for the next generation of commercial supersonic aircraft, but potentially help change the laws which have prevented such aircraft from operating over land in the United States since 1973.

Continue reading “Shushing Sonic Booms: NASA’s Supersonic X-Plane To Take Flight In 2021”

Put That DLP Printer To Use Making PCBs

Now that these DLP printers are cheaper and more widely available, we’re starting to see hackers poking around the edge of the envelope to see what else the machines are capable of. [Electronoobs] recently got his hands on a couple of these printers, and thought he would do some experiments with using them for PCB production.

Rather than extruding molten plastic, these printers use light to cure resin layer-by-layer. In theory if the printer is good enough to cure the light-activated resin for a high resolution print, it should be able to do much the same thing with photosensitive PCBs.

Unfortunately, getting an STL out of a PCB design program takes a few intermediary steps. In the video after the break, [Electronoobs] shows his workflow that takes his design from EasyADA and turning it into a three dimensional object the DLP printer will understand. He does this with Blender and it looks pretty straightforward, but in the past we’ve seen people do similar tricks with Inkscape if that’s more your style.

Once you’ve grafted another dimension onto your PCB design, you may need to scale it to the appropriate size. [Electronoobs] notes that his STL for a 60 mm wide PCB came out of Blender as less than 2 mm wide, so you might need to break out the dreaded mathematics to find the appropriate scale value. Once the dimensions look good, you can load this file up into the printer as you would any normal print.

On the printer side of things, [Electronoobs] manually laminates UV photoresist film onto some copper clad boards with an iron, but you could skip this step and buy pre-sensitized boards as well. In any event, you drop the board where the UV resin normally goes, press the print button, and wait about ten minutes. That should give it enough time to expose the board, and you then proceed with the normal washing and acid bath process that hackers have been doing since time immemorial.

As [Electronoobs] shows, the results are quite impressive. While this still won’t make it any easier for you to do double-sided PCBs in the home lab, it looks like a very compelling method for producing even SMD boards with relative ease. This isn’t the first time somebody has tried using a DLP printer to run off some PCBs, but now that the technology has matured a bit it looks like it’s finally becoming practical.

Continue reading “Put That DLP Printer To Use Making PCBs”

Energy Sipping Neodymium Sphere Keeps On Spinning

At this point we’re sure you are aware, but around these parts we don’t deduct points for projects which we can’t immediately see a practical application for. We don’t make it our business to say what is and isn’t worth your time as an individual hacker. If you got a kick out of it, great. Learned something? Even better. If you did both of those things and took the time to document it, well that’s precisely the business we’re in.

So when [Science Toolbar] sent in this project which documents the construction of an exceptionally energy efficient spinning neodymium sphere, we knew it was our kind of thing. In the documentation it’s referred to as a motor, though it doesn’t appear to have the torque to do any useful work. But still, if it can spin continuously off of the power provided by a calculator-style photovoltaic cell, it’s still a neat trick.

But how does it work? It starts by cracking open one of those little solar powered toys; the ones that wave or dance around as soon as any light hits the panel in their base. As [Science Toolbar] explains, inside these seemingly magical little gadgets is a capacitor and the classic black epoxy blob that contains an oscillator circuit. A charge is built up in the capacitor and dumped into a coil at roughly 1 Hz, which provides just enough of a push to get the mechanism going.

In the video after the break, [Science Toolbar] demonstrates how you can take those internals and pair it with a much larger coil. Rather than prompting a little sunflower or hula girl to do its thing, the coil in this version provides the motive force for getting the neodymium sphere spinning. To help things along, they’re even using a junk box zero friction magnetic bearing made up of a wood screw and a magnetized screwdriver tip.

It’s an interesting example of how a tiny charge can be built up over time, and with a nice enough enclosure this will make for a pretty cool desk toy. We’ve previously seen teardowns of similar toys, which revealed a surprising amount of complexity inside that little epoxy blob. No word on whether or not the version [Science Toolbar] cannibalized was quite so clever, however.

Continue reading “Energy Sipping Neodymium Sphere Keeps On Spinning”

Beautiful Moving Origami Light Made From Scrap

Whenever [MakerMan] hits our tip line with one of his creations, we know it’s going to be something special. His projects are almost exclusively built using scrap and salvaged components, and really serve as a reminder of what’s possible if you’re willing to open your mind a bit. Whether done out of thrift or necessity, he proves the old adage that one man’s trash is often another’s treasure.

We’ve come to expect mainly practical builds from [MakerMan], so the beautiful ceiling light which he refers to as a “Kinetic Chandelier”, is something of a change of pace. The computer controlled light is able to fold itself up like an umbrella while delivering a pleasing diffuse LED glow. He tells us it’s a prototype he’s building on commission for a client, and we’re going to go out on a limb and say he’s going to have a very satisfied customer with this one.

Like all of his builds, the Kinetic Chandelier is almost entirely built out of repurposed components. The support rods are rusty and bent when he found them, but after cutting them down to size and hitting them with a coat of spray paint you’d never suspect they weren’t purpose-made. The light’s “hub” is cut out of a chunk of steel with an angle grinder, and uses bits of bike chain for a flexible linkage.

Perhaps most impressive is his DIY capstan which is used to raise and lower the center of the light. [MakerMan] turns down an aluminum pulley on a lathe to fit the beefy gear motor, and then pairs that with a few idler pulleys held in place with bits of rebar welded together. It looks like something out of Mad Max, but it gets the job done.

Finally, he salvages the LED panels out of a couple of cheap work lights and welds up some more rebar to mount them to the capstan at the appropriate angle. This gives the light an impressive internal glow without a clear source when viewed from below, and really gives it an otherworldly appearance.

This isn’t the first time we’ve seen a hacker put together their own chandelier, or even the first time we’ve seen it done with scrap parts. But what [MakerMan] has put together here may well be the most objectively attractive one we’ve seen so far.

Continue reading “Beautiful Moving Origami Light Made From Scrap”