Milspec Teardown: AH-64A Apache Data Entry Panel

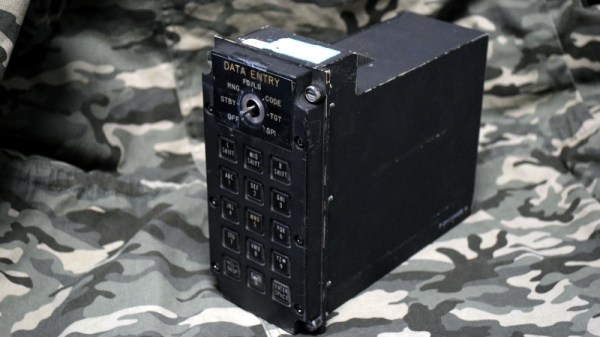
It’s time once again to see how those tax dollars are spent, this time in the form of a “Data Entry Keyboard” manufactured by Hughes Helicopters. This device was built circa 1986 or so, and was used in the AH-64A Apache. Specifically, this panel would have been located by the gunner’s left knee, and served as a general purpose input device for the Apache’s Fire Control System. Eventually the Apache was upgraded with a so-called “glass cockpit”; consolidating various vehicle functions into a handful of multi-purpose digital displays. As such, this particular device became obsolete and was pulled from the active Apache fleet.

The military vehicle aficionados out there may know that while the Apache is currently a product of Boeing, it was originally designed by Hughes Helicopter. In 1984, McDonnell Douglas purchased Hughes Helicopter and took over production of the Apache, and then McDonnell Douglas themselves were merged with Boeing in 1997.

So it’s somewhat interesting that this device bears the name of Hughes Helicopter, as of the time it was manufactured, they would have been known as McDonnell Douglas Helicopter Systems. Presumably they had to work through existing stock of components that already had Hughes branding on them, leaving some transitional examples such as this one.

But you didn’t come here for a history lesson on the American military-industrial complex, you want to know about the hardware itself. So let’s crack it open to see what we can learn about this piece of aviation history.

Continue reading “Milspec Teardown: AH-64A Apache Data Entry Panel”

Beat This Mario Block Like It Owes You Money

People trying to replicate their favorite items and gadgets from video games is nothing new, and with desktop 3D printing now at affordable prices, we’re seeing more of these types of projects than ever. At the risk of painting with too broad a stroke, most of these projects seem to revolve around weaponry; be it a mystic sword or a cobbled together plasma rifle, it seems most gamers want to hold the same piece of gear in the physical world that they do in the digital one.

But [Jonathan Whalen] walks a different path. When provided with the power to manifest physical objects, he decided to recreate the iconic “Question Block” from the Mario franchise. But not content to just have a big yellow cube sitting idly on his desk, he decided to make it functional. While you probably shouldn’t smash your head into the thing, if you give it a good knock it will launch gold coins into the air. Unfortunately you have to provide the gold coins yourself, at least until we get that whole alchemy thing figured out.

Printing the block itself is straightforward enough. It’s simply a 145 mm yellow cube, with indents on the side to accept the question mark printed in white and glued in. A neat enough piece of decoration perhaps, but not exactly a hack.

The real magic is on the inside. An Arduino Nano and a vibration sensor are used to detect when things start to get rough, which then sets the stepper motor into motion. Through an ingenious printed rack and pinion arrangement, a rubber band is pulled back and then released. When loaded with $1 US gold coins, all you need to do is jostle the cube around to cause a coin to shoot out of the top.

If this project has got you interested in the world of 3D printed props from the world of entertainment, don’t worry, we’ve got you covered.

Continue reading “Beat This Mario Block Like It Owes You Money”

Teardown: LED Bulb Yields Tiny UPS

Occasionally you run across a product that you just know is simply too good to be true. You might not know why, but you’ve got a hunch that what the bombastic phrasing on the package is telling you just doesn’t quite align with reality. That’s the feeling I got recently when I spotted the “LED intellibulb Battery Backup” bulb by Feit Electric. For around $12 USD at Home Depot, the box promises the purchaser will “Never be in the dark again”, and that the bulb will continue to work normally for up to 3.5 hours when the power is out. If I could repurpose that to make a tiny UPS for a microcontroller project of my own, it could be even more useful.

Now an LED light bulb with a battery in the base isn’t exactly rocket science, we can understand the product conceptually at a glance. But as they say, the devil is in the details. The box claims the bulb consumes 8.5 watts, but a battery with enough capacity to run such a load for 3.5 hours would be far too large to fit inside of a light bulb. Obviously there’s more to the story.

On the side of the box, in the smallest font used on the whole package, we get our clue. The bulb drops down to 200 lumens when in battery backup mode, or roughly as bright as a cheap LED flashlight. Now things are starting to come together. Without even opening the device, we can be fairly sure it will contain two separate arrays of LEDs: one low set for battery, and a brighter set to run when the bulb has AC power.

Still, I tend to be of the opinion that anything less than $20 or so is worth cracking open to see what makes it tick. Even if the product itself is underwhelming, there’s a chance the internal components could be useful or interesting. With that in mind, let’s see what’s inside a battery backup light bulb, and what we might be able to do with it.

Continue reading “Teardown: LED Bulb Yields Tiny UPS”

Spoofing Cell Networks With A USB To VGA Adapter

RTL-SDR brought cheap and ubiquitous Software Defined Radio (SDR) to the masses, opening up whole swaths of the RF spectrum which were simply unavailable to the average hacker previously. Because the RTL-SDR supported devices were designed as TV tuners, they had no capability to transmit. For the price they are still an absolutely fantastic deal, and deserve to be in any modern hacker’s toolkit, but sometimes you want to reach out and touch someone.

GSM network broadcast from a VGA adapter

Now you can. At OsmoDevCon [Steve Markgraf] released osmo-fl2k, a tool which allows transmit-only SDR through cheap USB 3.0 to VGA adapters based on the Fresco Logic FL2000 chip. Available through the usual overseas suppliers for as little has $5 USD, these devices can be used unmodified to transmit low-power FM, DAB, DVB-T, GSM, UMTS and GPS signals.

In a demonstration on the project page, one of these USB VGA adapters is used to broadcast a GSM cellular network which is picked up by the adjacent cell phones. Another example shows how it can be used to broadcast FM radio. A GitHub repository has been set up which includes more examples. The signals transmitted from the FL2000 chip are obviously quite weak, but the next step will logically be the hardware modifications necessary to boost transmission to more useful levels.

To say this is a big deal is something of an understatement. For a few bucks, you’ll be able to get a device to spoof cellular networks and GPS signals. This was possible before, of course, but took SDR hardware that was generally outside the budget of the casual experimenter. If you bought a HackRF or an Ettus Research rig, you were probably responsible enough not to get into trouble with it, but that’s not necessarily the case anymore. As exciting as this technology is, we would be wise to approach it with caution. In an increasingly automated world, GPS spoofing can have some pretty bad results.

Real-Time Polarimetric Imager From 1980s Tech

It’s easy to dismiss decades old electronics as effectively e-waste. With the rapid advancements and plummeting prices of modern technology, most old hardware is little more than a historical curiosity at this point. For example, why would anyone purchase something as esoteric as 1980-era video production equipment in 2018? A cheap burner phone could take better images, and if you’re looking to get video in your projects you’d be better off getting a webcam or a Raspberry Pi camera module.

But occasionally the old ways of doing things offer possibilities that modern methods don’t. This fascinating white paper from [David Prutchi] describes in intricate detail how a 1982 JVC KY-1900 professional video camera purchased for $50 on eBay was turned into a polarimetric imager. The end result isn’t perfect, but considering such a device would normally carry a ~$20,000 price tag, it’s good enough that anyone looking to explore the concept of polarized video should probably get ready to open eBay in a new tab.

Likely many readers are not familiar with polarimetric imagers, it’s not exactly the kind of thing they carry at Best Buy. Put simply, it’s a device that allows the user to visualize the polarization of light in a given scene. [David] is interested in the technology as, among other things, it can be used to detect man-made materials against a natural backdrop; offering a potential method for detecting mines and other hidden explosives. He presented a fascinating talk on the subject at the 2015 Hackaday SuperConference, and DOLpi, his attempt at building a low-cost polarimetric imager with the Raspberry Pi, got him a fifth place win in that year’s Hackaday Prize.

While he got good results with his Raspberry Pi solution, it took several seconds to generate a single frame of the image. To be practical, it needed to be much faster. [David] found his solution in an unlikely place, the design of 1980’s portable video cameras. These cameras made use of a dichroic beamsplitter to separate incoming light into red, blue, and green images; and in turn, each color image was fed into a dedicated sensor by way of mirrors. By replacing the beamsplitter assembly with a new 3D printed version that integrates polarization filters, each sensor now receives an image that corresponds to 0, 45, and 90 degrees polarization.

With the modification complete, the camera now generates real-time video that shows the angle of polarization as false color. [David] notes that the color reproduction and resolution is quite poor due to the nature of 30+ year old video technology, but that overall it’s a fair trade-off for running at 30 frames per second.

In another recent project, [David] found a way to hack optics onto a consumer-level thermal imaging camera. It’s becoming abundantly clear that he’s not a big fan of leaving hardware in an unmodified state.

Arduino Revives Junkyard Laser Cutter

Some people have all the luck. [MakerMan] writes in to gloat tell us about a recent trip to the junkyard where he scored a rather serious looking laser cutter. This is no desktop-sized K40 we’re talking about here; it weighs in at just under 800 pounds (350 Kg), and took a crane to deliver the beast to his house. But his luck only took him so far, as closer inspection of the machine revealed it was missing nearly all of its internal components. Still, he had the frame, working motors, and laser optics, which is a lot more than we’ve ever found in the garbage.

After a whirlwind session with his wire cutters, [MakerMan] stripped away most of the existing wiring and the original control board inside the electronics bay. Replacing the original controller is an Arduino Nano running Grbl, likely giving this revived laser cutter better compatibility with popular open source tools than it had originally. Even though the laser cutter was missing a significant amount of hardware, he did luck out that both the motor drivers were still there (and working) as well as the dual power supplies to run everything.

After a successful motion test, [MakerMan] then goes on to install a new 90W laser tube. Supporting the tube is a rigged up water cooling system using a plastic jug and a cheap bilge pump. He also added an air assist system, complete with side mounted compressor. This pushes air over the laser aperture, helping to keep smoke and debris away from the beam. Finally, a blower was installed in the bottom of the machine with flexible ducting leading outside to vent out the smoke and fumes that are produced when the laser is in operation.

This machine is a considerable upgrade from the previous laser [MakerMan] built, and as impressive as this rebuild is so far, we’re interested in seeing where it goes from here. If you ask us, this thing is begging for an embedded LaserWeb server.

Continue reading “Arduino Revives Junkyard Laser Cutter”

Browsing Modern Day BBS On The Epson PX-8 Laptop

As you read this, there are still people chatting away on Bulletin Board Systems all over the world. Running on newly written software and without the need to actually use a dial-up modem, these (slightly) more modern takes on the BBSs of yore can be compelling diversion for those who might want to decompress a bit from contemporary social networks.

[Blake Patterson] is one of these people, and he writes in to tell us about his recent experiments with using a particularly gorgeous example the Epson PX-8 “Geneva” laptop on modernized BBSs. The form factor of the device makes it a fairly convenient client for chatting, despite the somewhat unusual screen. Luckily, modern BBS software is able to cope with the PX-8’s 80 character by 8 line LCD display, it’s just a matter of getting the thing online.

The trick is tethering the PX-8 to a Linux machine as a serial terminal. [Blake] had to build a serial cable for the laptop, and then used a basic USB-to-serial converter to get it connected to a Raspberry Pi. Once you’ve logged in over serial, you can simply fire off a telnet command to connect to the BBS of your choice. In the video after the break, he demonstrates what it’s like browsing and chatting on a BBS using the PX-8. The screen certainly takes a bit of getting used to, but actually works fairly well given the nature of the BBS interface.

[Blake] recently gave us a look at a Wi-Fi “modem” for retro computers based on the ESP8266, if you’d rather cruise your favorite BBS without a dangling Pi.

Continue reading “Browsing Modern Day BBS On The Epson PX-8 Laptop”