Eating A QR Code May Save Your Life Someday

QR codes are easy to produce, resistant to damage, and can hold a considerable amount of data. But generally speaking, eating them has no practical purpose. Unfortunately the human digestive tract lacks the ability to interpret barcodes, 2D or otherwise. But thanks to the University of Copenhagen, that may soon change.

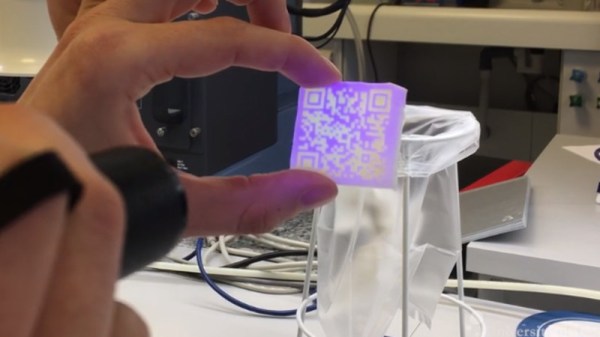
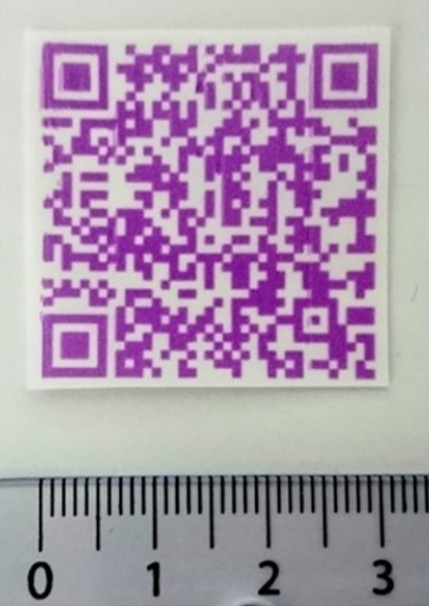
A new paper featured in the International Journal of Pharmaceutics details research being done to print QR codes with ink that contains medicine. The mixture of medicines in the ink can be tailored to each individual patient, and the QR code itself can contain information about who the drugs were mixed for. With a standard QR reader application on their smartphone, nurses and care givers can scan the medicine itself and know they are giving it to the right person; cutting down the risk of giving patients the wrong medication.

The process involves using a specialized inkjet printer to deposit the medicine-infused ink on a white edible substrate. In testing, the substrate held up to rough handling and harsh conditions while still keeping the QR code legible; an important test if this technology is to make the leap from research laboratory to real-world hospitals.

In the future the researchers hope the edible substrate can be produced and sent to medical centers, and that the medicinal ink itself will be printable on standard inkjet printers. If different medicines were loaded into the printer as different colors, it should even be possible to mix customized drug “cocktails” through software. Like many research projects it seems likely the real-world application of the technology won’t be as easy as the researchers hope, but it’s a fascinating take on the traditional method of dispersing medication.

QR codes have long been a favorite of the hacker community. From recovering data from partial codes to using them to tunnel TCP/IP, we’ve seen our fair share of QR hacks over the years.

[Thanks to Qes for the tip]

Continue reading “Eating A QR Code May Save Your Life Someday”

Printed Adapter Teaches An Old Ninja New Tricks

Do you like change for the sake of change? Are you incapable of leaving something in a known and working state, and would rather fiddle endlessly with it? Are you unconcerned about introducing arbitrary compatibility issues into your seemingly straight-forward product line? If you answered “Yes” to any of those questions, have we got the job for you! You can become a product engineer, and spend your days confounding customers who labor under the unrealistic expectation that a product they purchased in the past would still work with seemingly identical accessories offered by the same company a few years down the line. If interested please report to the recruitment office, located in the darkest depths of Hell.

A 2D representation of the adapter in Fusion 360

Until the world is rid of arbitrary limitations in consumer hardware, we’ll keep chronicling the exploits of brave warriors like [Alex Whittemore], who take such matters into their own hands. When he realized that the blades for his newer model Ninja food processor didn’t work on the older motor simply because the spline was a different size, he set out to design and print an adapter to re-unify the Ninja product line.

[Alex] tried taking a picture of the spline and importing that into Fusion 360, but in the end found it was more trouble than it was worth. As is the case with many printed part success stories, he ended up spending some intimate time with a pair of calipers to get the design where he wanted it. Once broken down into its core geometric components (a group of cylinders interconnected with arches), it didn’t take as long as he feared. In the end the adapter may come out a bit tighter than necessary depending on the printer, but that’s nothing a few swift whacks with a rubber mallet can’t fix.

This project is a perfect example of a hack that would be much harder (but not impossible) without having access to a 3D printer. While you could create this spline adapter by other means, we certainly wouldn’t want to. Especially if you’re trying to make more than one of them. Small runs of highly-specialized objects is where 3D printing really shines.


This is an entry in Hackaday’s

Repairs You Can Print contest

The twenty best projects will receive $100 in Tindie credit, and for the best projects by a Student or Organization, we’ve got two brand-new Prusa i3 MK3 printers. With a printer like that, you’ll be breaking stuff around the house just to have an excuse to make replacement parts.


CPAP Hacked Into Super Charged 3D Printer Cooler

Of all the parts on your average desktop 3D printer, the nozzle itself is arguably where the real magic happens. Above the nozzle, plastic is being heated to the precise temperature required to get it flowing smoothly. Immediately below the nozzle there’s a fan blowing to get the plastic cooled back down again. This carefully balanced arrangement of heating and cooling is the secret that makes high quality fused deposition modeling (FDM) printing possible.

But as it turns out, getting the plastic hot ends up being easier than cooling it back down again. The harsh reality is that most of the fans small enough to hang on the side of a 3D printer nozzle are pretty weak. They lack the power to push the volume of air necessary to get the plastic cooled down fast enough. But with his latest project, [Mark Rehorst] hopes to change that. Rather than using some anemic little fan that would be better suited blowing on the heatsink of a Raspberry Pi, he’s using a hacked CPAP machine to deliver some serious airflow.

The brilliance of using a CPAP machine for this hack is two-fold. For one, the machine uses a powerful centrifugal fan rather than the wimpy axial “muffin” fans we usually see on 3D printers. Second, the CPAP pushes air down a lightweight and flexible hose, which means the device itself doesn’t have to be physically mounted to the printer head. All you need is manifold around the printer’s nozzle that connects up to the CPAP hose. This “remote” fan setup means the print head is lighter, which translates (potentially) into higher speed and acceleration.

[Mark] was able to connect the fan MOSFET on his printer’s SmoothieBoard controller up to the brushless motor driver from the CPAP motor, which lets the printer control this monster new fan. As far as the software is concerned, nothing has changed.

He hasn’t come up with a manifold design that’s really optimized yet, but initial tests look promising. But even without a highly optimized outlet for the air, this setup is already superior to the traditional part cooler designs since it’s got more power and gets the fan motor off of the print head.

Getting your 3D printed parts to cool down is serious business, and it’s only going to get harder as printers get faster. We wouldn’t be surprised if fan setups like this start becoming more common on higher-end printers.

Circuit Bent Casio SK-1 Gets An Arduino Brain

The Casio SK-1 keyboard is fairly well-known in the “circuit bending” scene, where its simple internals lend themselves to modifications and tweaks to adjust the device’s output in all sorts of interesting ways. But creating music via circuit bending the SK-1 can be tedious, as it boils down to fiddling with the internals blindly until it sounds cool. [Nick Price] wanted to do something a bit more scientific, and decided to try replacing his SK-1’s ROM with an Arduino so he could take complete control it.

Replacing the ROM chip with header pins.

That’s the idea, anyway. Right now he’s gotten as far as dumping the ROM and getting the Arduino hooked up in place of it. Unfortunately the resulting sound conjures up mental images of a 56K modem being cooked in a microwave. Clearly [Nick] still has some work ahead of him.

For now though, the progress is fascinating enough. He was able to pull the original NEC 23C256 chip out of the keyboard and read its contents using an Arduino and some code he cooked up, and he’s even put the dump online for any other SK-1 hackers out there. He then wrote some new code for the Arduino to spit data from the ROM dump back to the keyboard when requested. In theory, it should sound the same as before, but with the added ability to “forge” the data going back to the keyboard to make new sounds.

The result is what you hear in the video linked after the break. Not exactly what [Nick] had in mind. After some snooping with the logic analyzer, he believes the issue is that the Arduino can’t respond as fast as the original NEC chip did. He’s now got an NVRAM chip on order to replace the original NEC chip; the idea is that he can still use the Arduino to reprogram the NVRAM chip when he wants to play around with the sound.

We’ve covered some pretty fancy circuit bent instruments here in the past, but if you’re looking for something a bit easier to get your feet wet we ran a start-to-finish guide back in the Ye Olden Days of 2011 which should be helpful.

Continue reading “Circuit Bent Casio SK-1 Gets An Arduino Brain”

Repairing A Wounded Mantis

While it’s true that we didn’t specifically say making Hackaday staff exceedingly jealous of your good fortune would deduct points from your entry into our ongoing “Repairs You Can Print Contest”, we feel like [Sam Perry] really should have known better. During a recent dumpster dive he found an older, slightly damaged, but still ridiculously awesome Mantis stereo inspection microscope. Seriously, who’s throwing stuff like this away?

Rendered replacement mount in Fusion 360

Apparently, the microscope itself worked fine, and beyond some scratches and dings that accumulated over the years, the only serious issue was a completely shattered mount. Luckily he still had the pieces and could get a pretty good idea of what it was supposed to look like. After what we imagine was not an insignificant amount of time in Fusion 360, he was able to model and then print a replacement.

The replacement part was printed on a Tronxy P802M in PLA. Even at 0.3mm layer height, it still took over 10 hours to print such a large and complex component. A few standard nuts and bolts later, and he had a drop-in replacement for the original mount.

Whether it’s due to how big and heavy the Mantis is, or a slight miscalculation in his model, [Sam] does mention that the scope doesn’t sit perfectly level; he estimates it’s off by about 5 degrees.

We’re somewhat suspicious that mentioning an error of only 5 degrees is a stealth-brag on the same level as telling everyone you found a Mantis in the trash. But if [Sam] gives us the GPS coordinates of the dumpster in which people are throwing away high-end lab equipment, all will be forgiven.

There’s still plenty of time to get your entry into the “Repairs You Can Print” contest! The top twenty projects will receive $100 in Tindie store credit, and the top entries in the Student and Organization categories will each receive a Prusa i3 MK3 with the Quad Material upgrade kit: arguably one of the best 3D printers currently on the market. If you were considering going back to school, or finally leaving your basement and joining a hackerspace, now would definitely be the time.

Printed Nexus 7 SIM Tray Is Good ‘Nuff

When repairing something, there are in effect two schools of thought: you can craft a repair that seamlessly blends into the original hardware and doesn’t look like a repair, or you can slap that thing together and keep it moving. A lot of variables go into this decision making process, such as the complexity of the repair, the available materials, and of course whether or not you need to keep the fact you broke the thing from your significant other.

When the SIM holder on his Nexus 7 tablet broke recently, [Alex Whittemore] did the mental arithmetic and came to the conclusion that it wasn’t worth his time trying to figure out how to model an exact replacement. But he was able to print something that works well enough for his purposes, which is all that matters in the end. A perfect entry for our ongoing “Repairs You Can Print” contest.

You must be this small to ride

Apparently the SIM holder in the 2013 Nexus 7 is notoriously poor, and of course since this is a known issue, online retailers are trying to get as much as $100 USD out of you for a tiny sliver of plastic. Sometimes it really seems like Google was determined to run the Nexus line into the ground before bailing on it.

Printing such a tiny part, especially with the little details like the channel for you to hook your fingernail into, requires a fairly well calibrated printer. If you can’t muster up a 0.1mm first layer you might as well sit this one out; and if you haven’t mastered the art of bridging, that little valley to help you get the SIM back out may end up overflowing into a river of tears.

For [Alex], the piece ended up working perfectly. It might look a little weird, but if you’ve got the tablet in a case you’ll never see it anyway. It’s also worth noting that this design may work on other devices with a similar SIM arrangement, or at the very least, might be a good starting point to work from if you’ve got to come up with your own.

Remember, there’s still plenty of time to enter your own printed fix into our “Repairs You Can Print” contest. The top 20 repairs will take home $100 in Tindie credit, and for the best repair done by a Student or Organization, there’s two Prusa i3 MK3 printers with the Quad Material upgrade kits on the line.

The Hard-Learned Lessons Of The Columbia Disaster

On February 1st, 2003 at eighteen seconds past 9:00 AM Eastern Standard Time, the Space Shuttle Columbia broke up during atmospheric entry over Texas. Still traveling at approximately Mach 18.3, the disintegration of Columbia was complete and nearly instantaneous. According to the official accident investigation, the crew had at most one minute from realizing they were in a desperate situation to complete destruction of the spacecraft. Due to the design of the Space Shuttle, no contingency plan or emergency procedure could have saved the crew at this point in the mission: all seven crew members were lost in this tragedy.

While the Space Shuttle, officially known as the Space Transportation System (STS) would fly again after the Columbia disaster, even the program’s most ardent supporters had to admit fundamental design of the Shuttle was flawed. Steps needed to be taken to ensure no future astronauts would be lost, and ultimately, the decision was made to retire the Shuttle fleet after primary construction of the International Space Station (ISS) was complete. There was simply too much invested in the ISS at this point to cancel the only spacecraft capable of helping to assemble it, so the STS had to continue despite the crushing loss of human life it had already incurred.

Between the loss of Challenger and Columbia, the STS program claimed fourteen lives in its thirty year run. Having only flown 135 missions in that time, the STS is far and away the most deadly spacecraft to ever fly. A grim record that, with any luck, is never to be broken.

The real tragedy was, like Challenger, the loss of Columbia could have been prevented. Ground Control knew that the Shuttle had sustained damage during launch, but no procedures were in place to investigate or repair damage to the spacecraft while in orbit. Changes to the standard Shuttle mission profile gave future crews a chance of survival that the men and women aboard Columbia never had.

Continue reading “The Hard-Learned Lessons Of The Columbia Disaster”