Pump Up The Resin

Sometimes the best ideas are simple and seem obvious after you’ve heard them. [Danny] showed us a great idea that fits that description. He uses a peristaltic pump to move resin in and out of his print bed. (Video, embedded below.) Normally, you remove the tank and pour the resin out into a container. With the pump, you can leave the tank where it is and simply pull the resin through a tube. The process is slower than pouring, but not as messy and doesn’t risk damage to your FEP film.

You can also use the pump like a vacuum to clean up resin. According to [Danny], the biggest value is when working with very large printers. He shows a Peopoly Phenom which has a huge tank compared to the other printers he shows in the video.

Continue reading “Pump Up The Resin”

3D Printing Rainbows

[The Action Lab] had a very serious technical problem. His daughter wanted to 3D print sparkly unicorns. But how do you make a 3D print sparkly? Turns out, he had used a diffraction grating before to make rainbow-enhanced chocolate.

The method turns out to be surprisingly simple. Using a diffraction grating as a print bed, puts the pattern on the bottom of the 3D print and — thanks to how a diffraction grating works — the 3D print now works like a grating, too.

Continue reading “3D Printing Rainbows”

Sticker Brings The Heat

[Carl] is always looking at making heater plates for PCB reflow and other applications. In his latest video, he shows how he is using thin flexible PCBs with adhesive backs as stickers that get hot. You can find gerber files and design files on GitHub.

You might think that this is a pretty simple thing to do with a flex PCB, but it turns out while the PCB might be flexible, the traces aren’t and so the typical long traces you see in a heater won’t allow the sticker to bend, which is a problem if you want to wrap it around, say, a coffee mug.

Continue reading “Sticker Brings The Heat”

Homemade Probe For 3D Printer: $3

You have a few choices if you want to use a probe to level your 3D printer bed. Rarely, you’ll see optical or capacitive probes. More commonly, though, your probe will sense a metal print or uses a physical probe to touch the print bed. [Design Prototype Test] has long used a BLTouch which uses the latter method. However, putting it in a heated build chamber prevented it from working so he set out to make his own simple design using an Allen key.

We’ve seen Allen key sensors before, but usually, they use a microswitch. We’ve also seen microswitches used to directly probe the bed. But, in this case, a 3D printed fan shroud uses an optical sensor to note when the Allen key hits the bed.

Continue reading “Homemade Probe For 3D Printer: $3”

Maybe The Simplest Cloud Chamber

Have you ever seen a Wilson cloud chamber — a science experiment that lets you visualize ionizing radiation? How hard would it be to build one? If you follow [stoppi’s] example, not hard at all (German, Google Translate link). A plastic bottle. some tape, a flashlight, some water, hot glue, and — the only exotic part — a bit of americium 241. You can see the design in the video below and the page also has some more sophisticated designs including one that uses a CPU cooler. Even if you don’t speak German, the video will be very helpful.

You need to temper your expectations if you build the simple version, but it appears to work. The plastic bottle is a must because you have to squeeze it to get a pressure change in the vessel.

Continue reading “Maybe The Simplest Cloud Chamber”

Tilting At Windmills Nine Bits At A Time

In the old days — we are talking like the 1960s and 1970s — computers were often built for very specific purposes using either discrete logic or “bit slice” chips. Either way, more bits meant more money so frequently these computers were made with just enough bits to meet a required precision. We don’t think that was what was on [Mad Ned’s] mind, though, when he decided to implement a 9-bit CPU called QIXOTE-1 on an FPGA.

Like many hobby projects, this one started with an FPGA board in search of a problem. At first, [Ned] had a plan to create a custom computer along with a custom language to then produce a video game. A quick search on the Internet led to that being a common enough project with one guy that we’ve talked about here on Hackaday before knocking it out of the park.

[Ned] then thought about just doing a no-software video game. Too late to be the first to do that. Not to be deterred, he decided to duplicate the PDP-8. Whoops. That’s been done before, too. Wanting something original, he finally decided on a custom CPU. Since bytes are usually — if not technically — 8 bits, this CPU calls its 9-bit words nonads and uses octal which maps nicely to three digits per nonad.

This first post talks about the story behind the CPU and gives a short overview of its capabilities, but we are waiting for future posts to show more of what’s behind the curtain in what [Ned] calls “Holy Nonads, Part 010.”

The downside to doing a custom CPU is you have to build your own tools. You can always, of course, duplicate something and steal your toolchain. Or go universal.

Making Light Of Superconductors

Once upon a time, making a superconductor required extremely cold temperatures. Scientists understood why superconducting materials could move electrons without loss, but the super cold temperatures were a problem. Then in 1986, a high-temperature superconductor was found. High temperature, of course, is a relative term. The new material works when cooled to a frosty temperature, just not a few degrees off of absolute zero like a conventional superconductor. Since then, the race has been on to find a room-temperature superconductor that doesn’t require other exotic conditions, such as extreme pressure. Department of Energy scientists may have found a different path to get there: X-ray light.

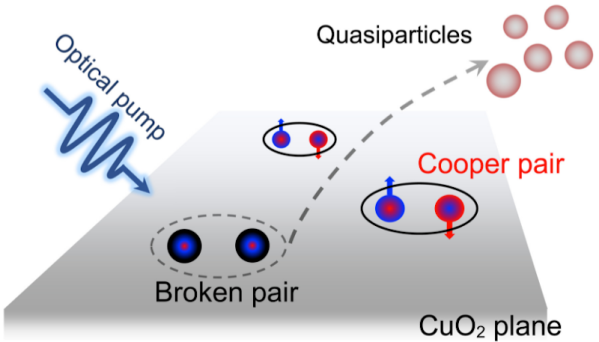
The problem is that scientists don’t fully understand why these high-temperature superconductors work. To study the material, YBCO, scientists chill a sample to it superconducting state and then use a magnetic field to disrupt the superconductivity to study the material’s normal state. The new research has shown that a pulse of light can also disrupt the superconductivty, although the resulting state is unstable.

The research shows that charge density waves, which can serve as markers for superconductivity, occur when the samples are exposed to a magnetic field or to high-energy light pulses. While this is a far cry from creating room temperature superconductors, further study of the mechanism that allows light and magnetic fields to cause similar changes in the material could lead to a better understanding of the physics and maybe — one day — room-temperature superconductors.

Want to make your own YBCO? Go for it! Of course, you can already get room-temperature superconductors if you can stand the pressure.