There’s an old joke where you ask someone what’s the most important thing about comedy. When they get to about the word “important,” you interrupt them and say, “Timing!” Perhaps the same thing can be said for photography. [Ted Kinsman’s] students at the Rochester Institute of Technology would probably agree. They built an Arduino-based rig to do inexpensive stop action photography.
As Arduino projects go, it isn’t very sophisticated. The circuit contains a sound detection module and an optoisolator. The code would easily fit on a piece of notebook paper. When a loud sound occurs, the Arduino triggers the flash. Simple enough, but the resulting pictures are amazing. It also looks like a lot of fun to destroy perfectly good things in the name of art.
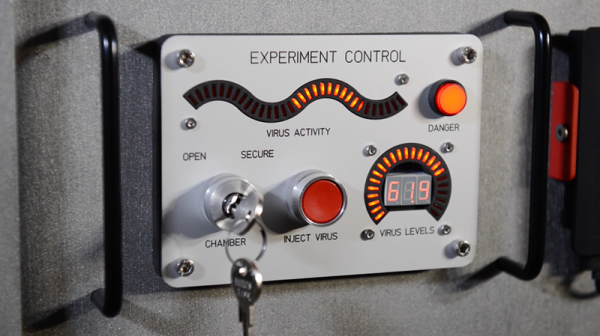
[BikerGlen] wanted to spice up his zombie containment unit (see video below) so he designed and 3D printed some very cool looking bar graphs. Apparently, you can get curved bar graph LEDs, but only if you buy a fairly large quantity. Hand soldering discrete LEDs at the perfect angle would be frustrating, but with a 3D printed jig, it was a piece of cake.
The devices use a MAX6954 LED driver, so it needs very few parts and takes commands via SPI. The chips were not cheap, but the small size and high integration sold [Glen] on it.
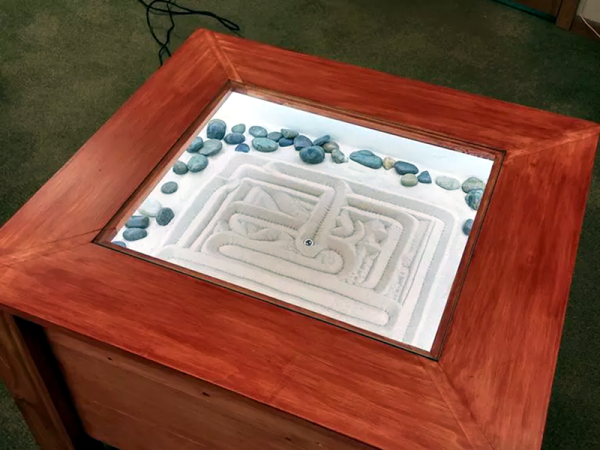
A zen garden should be a source of relaxation and escape from the everyday. The whole point should be to escape from–among other things–your electronics. Unless you are [MakrToolbox]. Then you’ll make a beautiful zen garden end table that allows you to make patterns in the sand using a ball bearing and an Arduino. You can see a video below.
Technically, the device is almost an upside down 3D printer with no Z axis. The mechanism moves a magnet which controls the steel ball and draws patterns in the sand. However, the really impressive parts of this project are the woodworking for the end table and the impressive documentation, should you want to reproduce this project yourself.
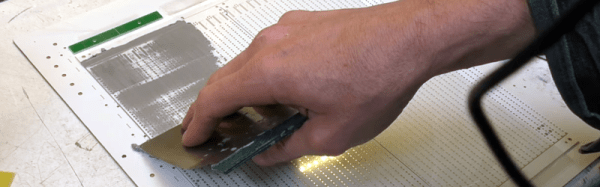
You never know what you might find in an arts and craft store. A relatively recent addition to crafting is automatic cutting machines like the Cricut and Cameo cutters. These are typically used to cut out shapes for scrapbooking, although they will cut or engrave almost anything thin. You can think of them as a printer with a cutting blade in place of the print head. [Mikeselectricstuff] decided to try a Cameo cutter to produce SMD stencils. The result, as you can see in the video below, is quite impressive.
If you’ve ever wanted to do SMD soldering with a reflow oven, stencils are invaluable for putting solder paste on the board where you want it quickly. The board [Mike] has contains a boat-load (over 2,000) of LEDs and dropping solder on each pad with a syringe would be very time consuming (although he did do some touch up with a syringe).
The board he’s using doesn’t have any extreme fine-pitched parts. However, he did some test patterns and decided he could get down to a finer pitch, especially with a little tweaking. However, the stencil he used didn’t need any changes. All he did was export the solder paste layer as a DXF and bring it straight into the Cameo software.
This isn’t the first time we’ve seen one of these cutters pressed into stencil service. You can also get some use out of your 3D printer.
Transparent plastic is nothing new. However, 3D prints are usually opaque or–at best–translucent. [Thomas Sanladerer] wanted to print something really transparent. He noticed that Colorfabb had an article about printing transparent pieces with their HT filament. [Thomas] wanted to try doing the same thing with standard (and cheaper) PETG, which is chemically similar to the HT. Did he succeed? Watch the video below and find out.
You can get lots of clear plastic filament, but the process of printing layers makes the transparency turn cloudy, apparently mostly due to the small gaps between the layers. The idea with the HT filament is to overextrude at a high enough temperature that the layers can fuse together.
[Thomas] wanted to create some clear parts and diffusers for lamps. The diffusers print using vase mode and the lamps he creates when them look great even without clear diffusers.
His first experiments involved layer height and extrusion rates. He tried to determine what was making things better and worse and modifying his technique based on that. There were also some post-processing steps he tried.
If you want to see what the Colorfabb HT parts made by someone other than Colorfabb look like, check out the second video below from [3D Printing Professor]. The prints he is making don’t look very clear until he does some post processing. Even after the post processing, it isn’t going to fool anyone into thinking it is glass-clear. However, the parts that Colorfabb shows on their blog post about the material do look amazing. Between the overextrusion used to prevent gaps and the post processing steps, [3D Printing Professor] warns that it won’t be easy to get parts with precise dimensions using this technique.
If you have a big budget, you could try printing with actual glass. There seem to be several ways to do that.
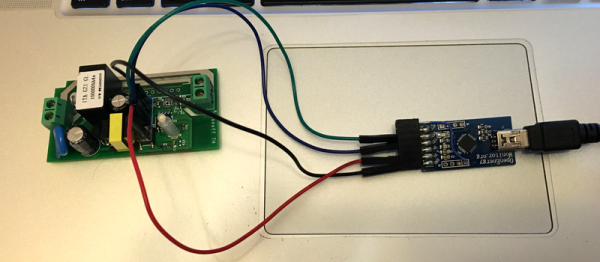
We’ve covered the Sonoff a few times–a very inexpensive box with an ESP8266, a power supply, and an AC relay along with a way to tap into a power cord. Very inexpensive means $5 or $6. The supplied software will work with several systems (including, recently, Alexa). But what self-respecting hacker wants to run the stock firmware on something with an ESP8266 inside?
[Tzapu] certainly didn’t. But he also knew he didn’t want to start from scratch every time he wanted to deploy a switch. So he built SonoffBoilerplate and put the code on GitHub. The code manages taking configuration (including network settings) using a web-portal, can update itself over the air, and integrates with Blynk and MQTT. If you don’t like that code base, there are other choices including one that has a failsafe reconfiguration mode.
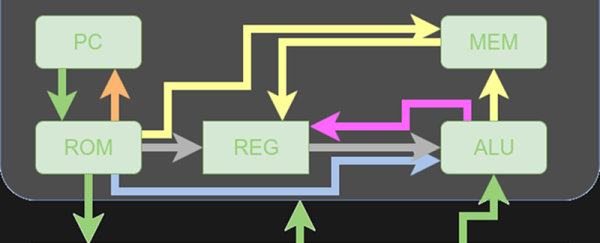
Last time I looked at a simple 16-bit RISC processor aimed at students. It needed a little help on documentation and had a missing file, but I managed to get it to simulate using a free online tool called EDA Playground. This time, I’ll take you through the code details and how to run the simulation.
You’ll want to refer to the previous post if you didn’t read it already. The diagrams and tables give a high-level overview that will help you understand the files discussed in this post.
If you wanted to actually program this on a real FPGA, you’d have a little work to do. The memory and register initialization is done in a way that works fine for simulation, but wouldn’t work on a real FPGA. Anyway, let’s get started!