Yet Another Inductance Measuring Scheme

How do you measure the value of an unknown inductor? If you have an LCR bridge or meter, you are probably going to use that. If not, there are many different techniques you can use. All of them rely on the same thing my Algebra teacher Mr. Harder used to say back in the 1970’s: you have to use what you know to get what you don’t know.

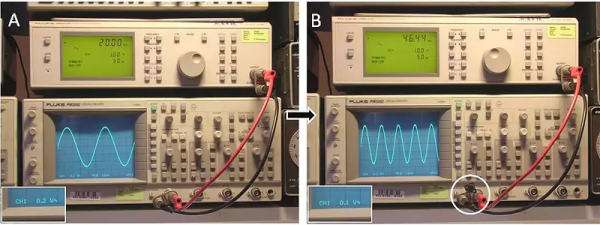
[Ronald Dekker] must think the same way. He took a 50-ohm signal generator and a scope. He puts the signal output to about 20kHz and adjusts for 1V peak-to-peak on the scope. Then he puts the unknown inductor across the signal and adjusts the frequency (and only the frequency) for an output of 1/2 volt peak-to-peak.

Continue reading “Yet Another Inductance Measuring Scheme”

Custom Gaming Keypad Developed With PSoC And Fusion 360

There was a time when building something yourself probably meant it didn’t look very much like a commercial product. That’s not always a bad thing. We’ve seen many custom builds that are nearly works of art. We’ve also seen plenty of builds that are–ahem–let’s say were “hacker chic”.

[AlexanderBrevig] decided to take on a project using a PSoC development board he picked up. In particular, he wanted to build a custom game keypad. He prototyped a number of switches with the board and got the firmware working so that the device looks like a USB HID keyboard.

Continue reading “Custom Gaming Keypad Developed With PSoC And Fusion 360”

Robotic Arm From Cardboard

Google showed the world that you could make a virtual reality headset from cardboard. We figure that might have been [Uladz] inspiration for creating a robotic arm also made out of cardboard. He says you can reproduce his design in about two hours.

You’ll need an Arduino and four hobby servo motors. The cardboard doesn’t weigh much, so you could probably use fairly small motors. In addition to the cardboard, there’s a piece of hardboard for the base and a few metal clips. You can control it all from the Arduino program or add an IR receiver if you want to run it by remote control. There’s a video of the arm–called CARDBIRD–in action, below.

Continue reading “Robotic Arm From Cardboard”

Optimizing The Spread: More Spreadsheet Circuit Design Tricks

Last time I showed you how to set up a reasonably complex design in a spreadsheet: a common emitter bipolar transistor amplifier. Having the design in a spreadsheet makes it easy to do “what if” scenarios and see the effects on the design almost immediately.

Another advantage that spreadsheets offer is a way to “solve” or optimize equations. That can be very useful once you have your model. For Excel, you need to install the Solver add-in (go to the Excel Options dialog, select Manage Add-Ins, and select the Solver Add-In). You might also enjoy OpenSolver. You can even get that for Google Sheets (although it currently lacks a non-linear solver which makes it less useful for what we need).

Continue reading “Optimizing The Spread: More Spreadsheet Circuit Design Tricks”

3D Printing School Of Knocks

Unless you are under age 20, there are probably things you know now that you wish you knew growing up. Even on hacker projects, it isn’t unusual to do better on your second whatchamacallit than on your first one. After all, you learn something each time and apply it to subsequent builds.

[James Lewis] (sometimes known as the [Bald Engineer]) has spent a couple of years with a 3D printer. He says that as of March this year, he had used the machine for about 75 hours. Since then his usage went up to 300 hours because he’s finally learned his lessons about how to get good prints.

If you are experienced, you might not be surprised at the first tip: level the bed. Don’t let that fool you, though. [James] has some good tips on advanced bed materials and print filament, too.

Continue reading “3D Printing School Of Knocks”

Raspberry Pi Plays All That Jazz

[James Bellafaire] wanted a good looking old radio with a modern sound. Granted, you could hollow the case out and replace it with an iPod. Or you could convert the thing to an Internet radio. But where’s the fun in that?

[James] took a different approach. Part woodworking project, part Raspberry Pi project, and part microcontroller project, he wound up with a hard drive-based music player in a 1930’s case with knobs that control the playback.

Continue reading “Raspberry Pi Plays All That Jazz”

Water-Cooled LED Light

[Matt] wanted to drive a Yuji LED array. The LED requires 30 V and at 100 watts, it generates a lot of heat. He used a Corsair water cooling system made for a CPU cooler to carry away the heat. The parts list includes a microphone gooseneck, a boost converter, a buck converter (for the water cooler) and custom-made brackets (made from MDF). There’s also a lens and reflector that is made to go with the LED array.

This single LED probably doesn’t require water cooling. On the other hand, adding a fan would increase the bulk of the lighted part and the gooseneck along with the water cooling tubes looks pretty cool. This project is a good reminder that if you need to carry heat away from something with no fans, self-contained water cooling systems are fairly inexpensive now, thanks to the PC market.

Continue reading “Water-Cooled LED Light”