Community Testing Suggests Bias In Twitter’s Cropping Algorithm

With social media and online services are now huge parts of daily life to the point that our entire world is being shaped by algorithms. Arcane in their workings, they are responsible for the content we see and the adverts we’re shown. Just as importantly, they decide what is hidden from view as well.

Important: Much of this post discusses the performance of a live website algorithm. Some of the links in this post may not perform as reported if viewed at a later date. 

The initial Zoom problem that brought Twitter’s issues to light.

Recently, [Colin Madland] posted some screenshots of a Zoom meeting to Twitter, pointing out how Zoom’s background detection algorithm had improperly erased the head of a colleague with darker skin. In doing so, [Colin] noticed a strange effect — although the screenshot he submitted shows both of their faces, Twitter would always crop the image to show just his light-skinned face, no matter the image orientation. The Twitter community raced to explore the problem, and the fallout was swift.

Continue reading “Community Testing Suggests Bias In Twitter’s Cropping Algorithm” →
How To Create Hermetically Sealed Electrical Connections

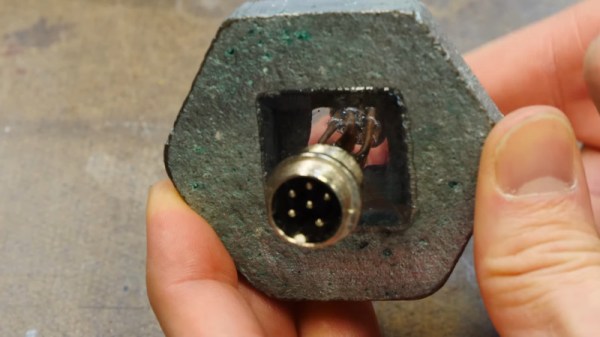
[Eric Strebel] is no stranger to pressure and vaccum tanks, regularly using them for all manner of resin casting jobs for his product design business. However, sometimes it becomes necessary to run equipment within a pressure tank, such as for rotomoulding or other similar jobs. In order to get power into a tank under pressure, [Eric] built a special plug with a hermetic seal to do the job. (Video, embedded below.)

The build starts with a large metal plug which screws into the pressure vessel, into which a square recess is machined. For the electrical passthrough, [Eric] selected GX-16 aviation connectors, in this case packing six conductors. The connectors are hooked up back-to-back through the hole in the metal tank plug, using bare copper wire. This is to avoid insulation on wires acting as a channel for gases to pass through. With the connectors wired up and an acrylic disc in place to stop overflow, the metal plug is filled with resin to create the hermetic seal.

Results are good, with the connectors functioning electrically and the resin acting as a perfect seal. There’s a small risk of short circuit with the exposed copper conductors, but [Eric] is exploring some easy solutions to avoid issues. We’ve seen his work before, too – like this great discussion on cardboard as a design tool. Video after the break.

Continue reading “How To Create Hermetically Sealed Electrical Connections” →

A Digital Guestbook Is A Perfect Hacker Wedding Gift

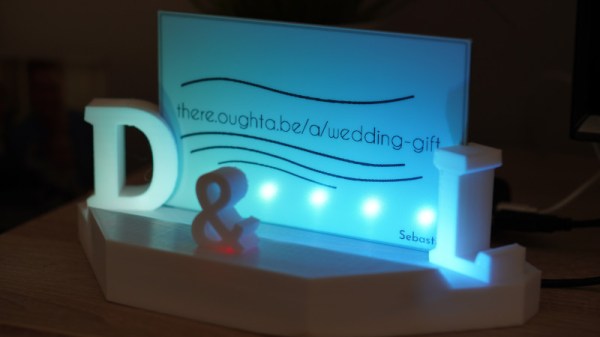
With his brother’s wedding coming up, [Sebastian] needed a wedding gift. Rather than purchasing something, he elected to build a digital guestbook so guests could share their well-wishes with the happy couple. 

The guestbook has a simple web-based interface, which was accessible over a domain name [Sebastian] registered with the couple’s names ahead of the event. There, users could enter text and draw a friendly message for the digital guestbook. The guestbook itself consists of an ESP32 running a e-ink display, packaged in a tidy 3D printed enclosure featuring the couple’s initials. It regularly queries the web server, and displays the messages it finds on the screen.

It’s a great use of an e-ink display, as it made reading the messages in bright daylight easy where other technologies may have faltered. [Sebastian] was also clever to install some LEDs for the night portion of the reception. We’ve featured a few wedding gifts on these pages before, including this particularly amusing sugar cube. Video after the break.

Continue reading “A Digital Guestbook Is A Perfect Hacker Wedding Gift” →

Autonomous Rover Navigates The House With LIDAR

For those wishing to explore robot autonomy, there’s no better way then to learn by doing. [Greg] was in that camp, and decided to build an autonomous rover to roam his house, and learned plenty along the way.

[Greg]’s aims with the project were to build a robot that was capable of navigating his home without external assistance. To do the job, a Raspberry Pi 3 was put in charge, and kitted out with a LIDAR for mapping. Pololu Roboclaw motor controllers are then used to allow the Raspberry Pi to drive the robot’s individual wheel motors, giving the four-wheeled bot skid steering capability.

[Greg] goes into immense detail on the project’s writeup, exploring the code and concepts behind its autonomous abilities. Creating a robot that can navigate using LIDAR is no easy task, but [Greg] does a great job of explaining how it all works, and why.

It’s not the first autonomous rover we’ve seen here, and we’re sure it won’t be the last. If you’ve got your own build coming together in the lab, be sure to let us know. Video after the break.

Continue reading “Autonomous Rover Navigates The House With LIDAR” →

Building A Cell Testing Station For 18650s

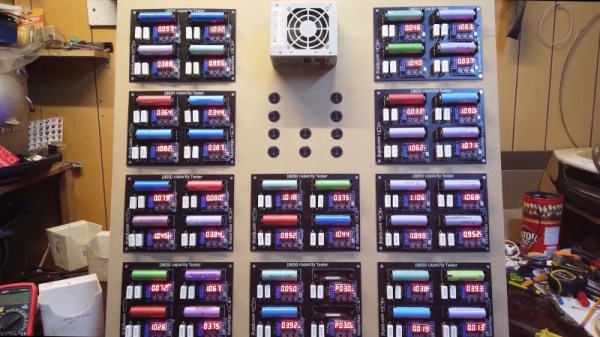
The 18650 is perhaps the world’s favorite lithium battery, even if electric car manufacturers are beginning to move towards larger cells such as the 21700. Used heavily in laptops and flashlights, it packs a useful amount of energy into a compact, easy to use package. There’s a small industry that has developed around harvesting these cells from old equipment and repurposing them, and [MakerMan] wanted to a piece of the action. Thus, he created a cell testing station to help in the effort.

Make no mistake, this is not a grandiose smart cell tester with 40 slots that logs every last iota of data into a cloud spreadsheet for further analysis. Nope, this is good old fashioned batch processing. [MakerMan] designed a single PCB that replicates the same cell testing circuit four times. Since PCB houses generally have a minimum order quantity of ten units, [MakerMan] ended up with forty individual cell testers on ten PCBs. Once populated, the boards were installed on a wooden frame with an ATX power supply which supplies the juice to run the system.

Overall, it’s a quick, cheap way for capacity testing cells en masse that should serve [MakerMan] well. We look forward to seeing where these cells end up. We’ve seen his work before, too – with a self-built laser engraver a particular highlight. Video after the break.

Continue reading “Building A Cell Testing Station For 18650s” →

A Budget Testing Rig For Low-Volume Production

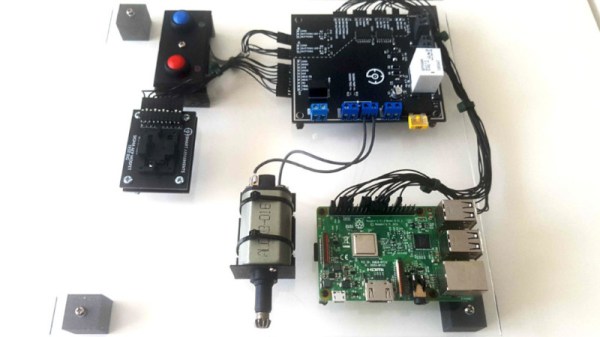
It’s not unheard of for those who tinker in the land of electronics to suddenly find themselves with a project on their hands and potential customers clamoring at the door. Of course, the road to shipping a product is a long one, and requires a unique set of skills quite distinct from those required to build the initial prototype. In developing a product for Airsoft use, [bald greg] realized that a testing rig would be key to ensuring their hundreds of units left the building in working condition.

When shipping units in the hundreds rather than thousands, keeping overheads low is key to maintain a sustainable profit margin on each unit sold. Thus, [bald greg] built a rig that would allow for effective testing of devices rather than breaking the bank. The rig also handles programming, saving the cost of purchasing pre-programmed microcontrollers from the manufacturer. A Raspberry Pi runs the show, using its GPIO pins to program boards and saving test results and serial numbers for later reference. A bed of nails fixture is used to connect to each individual board. Additionally, to test each board as realistically as possible, hardware mimicking a real Airsoft electric pistol is used to properly load the hardware.

[bald greg]’s work is a great example of approaching QC on a budget, and we suspect he’ll sleep soundly knowing the boards in the mail are going to work first time. We’ve seen others take similar approaches, too. If you’re working on your own production testing rig, be sure to let us know!

Continue reading “A Budget Testing Rig For Low-Volume Production” →

Rolex Becomes World’s Most Expensive ESD Strap

Anti-static ESD straps are de rigueur in lab settings for those working with sensitive electronics. They’re a simple protective device, and one that generally doesn’t warrant a second thought. However, [Daniel Bogdanoff] figured they could stand to be a little more fashionable, and set to work on a fancier design.

The first step was to take a look at a regular ESD strap. Typically, they consist of a band that fastens around the wearer’s wrist, with a metal stud for connecting to the earthing lead. The earthing lead contains a high resistance to limit the discharge current to avoid ugly high-energy shorts when wearing the strap.

The metal stud is attached to a replacement link on the ROLEX’s strap, making the modification neat, tidy, and reversible.

With a good understanding of the basics, [Daniel] set about modifying a CASIO calculator watch for practice. After soldering a metal stud to the watch case failed, a second attempt with conductive epoxy worked great. The watch could be connected to the earthing strap, and an ESD tester confirmed the device was doing its job.

But unfortunately, permanently modifying the borrowed ROLEX wasn’t an option. Instead, [Daniel] limited his work to a single replacement link which could be inserted into the watch band. Hooked up to an earthing strap, the luxury watch also passed a basic ESD test successfully.

[Daniel] notes that while this is a fun experiment, using properly rated safety equipment is best. Additionally, he points out that the ROLEX is likely to do worse than the CASIO for the simple fact that a metal-banded watch is more likely to cause shorts when working on electronics. Of course, if a watch isn’t your thing, consider a ring instead. Video after the break.

Continue reading “Rolex Becomes World’s Most Expensive ESD Strap” →