Atomic Clock Trades Receiver For An ESP8266

The advantage of a radio-controlled clock that receives the time signal from WWVB is that you never have to set it again. Whether it’s a little digital job on your desk, or some big analog wall clock that’s hard to access, they’ll all adjust themselves as necessary to keep perfect time. But what if the receiver conks out on you?

Well, you’d still have a clock. But you’d have to set it manually like some kind of Neanderthal. That wasn’t acceptable to [jim11662418], so after he yanked the misbehaving WWVB receiver from his clock, he decided to replace it with an ESP8266 that could connect to the Internet and get the current time via Network Time Protocol (NTP).

Continue reading “Atomic Clock Trades Receiver For An ESP8266”

Using The ESP8266 For Low-Cost Fault Injection

As a general concept, fault injection is a technique that studies how a system reacts to unusual or unexpected external forces. The idea is that, if you can trigger a glitch at the precise moment, you might be able to use that to your advantage in disabling security features or otherwise gaining further access to the device in question. In the hardware world, this could be achieved by fiddling with the power going into the device, or subjecting it to extreme temperatures.

We’ve covered voltage glitching attacks on these pages in the past, but most of the tools used are fairly expensive if you’re not doing this kind of thing professionally. Luckily for us, [Aditya Patil] has developed a fault injection tool that can run on a standard ESP8266 development board. Obviously it’s not as capable as a bespoke device costing hundreds of dollars, but if you just want to experiment with the concept, it’s a fantastic way to wrap your head around it all.

Continue reading “Using The ESP8266 For Low-Cost Fault Injection”

ESP8266 Keeps Tabs On Wood Stove Temperature

Wood heat offers unique advantages compared to more modern heating systems, especially in remote areas. But it also comes with its own challenges, namely, keeping the fire going at the optimum temperature. If it’s too cold you risk buildup in the chimney, but if you’ve got it stoked up more than necessary, you’ll end up burning through your wood faster.

To keep the fire in that sweet spot, [Jay] decided to put an ESP8266 and a thermocouple to work. Now, this might seem like an easy enough job at first, but things are complicated by the fact that the flue temperature above the stove lags considerably behind the temperature inside the stove. There’s also the fact that the top of the chimney will end up being much colder than the bottom.

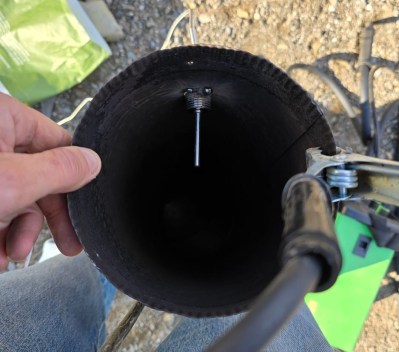
Mounting the thermocouple in the flue pipe.

In an effort to get a more complete view of what’s happening, [Jay] plans on putting at least two thermocouples in the chimney. But as getting on the roof in December isn’t his idea of fun, for now, he’s starting with the lower one that’s mounted right above the stove. He popped a hole in the pipe to screw in a standard K-type probe, and tapped it a few times with the welder to make sure it wasn’t going anywhere.

From there, the thermocople connects to a MAX6675 amplifier, and then to the WeMos D1 Mini development board that’s been flashed with ESPHome. [Jay] provides the configuration file that will get the flue temperature into Home Assistant, as well as set up notifications for various temperature events. The whole thing goes into a 3D printed box, and gets mounted behind the stove.

This project is a great example on how you can get some real-world data into Home Assistant quickly and easily. In the future, [Jay] not only wants to add that second thermocouple, but also look into manipulating the stove’s air controls with a linear actuator. Here’s hoping we get an update as his woodstove learns some new tricks.

ESP8266 Coaster Keeps Your Drink Warm

Looking for the perfect winter desk accessory? [Wq] has created a beautiful coaster made out of PCBs  that can keep your drink warm with an internal heater. (Chinese).

An ESP8266 sits as the main controller, with an additional MQTT control option, where the whole unit is powered over a USB-C connection. On board PCB traces, in the shape of a Hilbert curve, create the heating element used to heat beverages placed on the coaster, where [Wq] reports a measured resistance of the PCB trace network at 1.2 ohms. [Wq] writes that an AON6324 MOSFET replaces the D4184 that was previously being used, but might need some testing to get working properly. There are two capacitive touch sensors which has a TTP223E capacitive touch controller attached to detect input, with a multi-colored FM-3528 RGB LED for user feedback.

We love the artistry that went into building the coaster. For adventurous hackers wanting to build their own, the bill of materials (BOM), source code and board files are all available. We’ve seen everything from coasters and to PCB reflow boards, so it’s nice to see experimentation with a combination of these ideas.

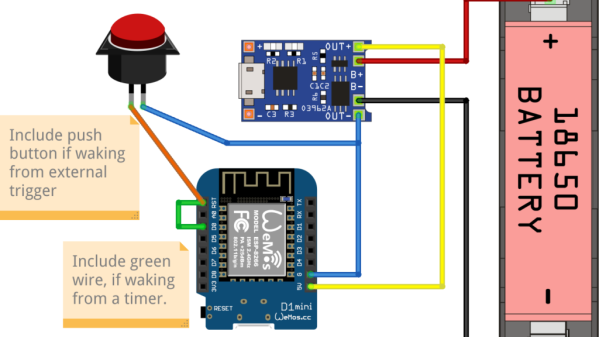
Fritzing diagram of connections between the Wemos D1 board, the TP4056 board, the pushbutton and the LiIon battery

Battery-Powered ESP8266 Sensor? Never Been Simpler

Say, you’re starting your electronics journey with a few projects in mind. You have an ESP8266 board like the Wemos D1, a Li-Ion battery, you want to build a small battery-powered sensor that wakes up every few minutes to do something, and you don’t want to delve into hardware too much for now. Well then, does [Mads Chr. Olesen] have a tutorial for you! Here, you’ll learn the quick and easy way to get your sensor up and running, learn a few tricks for doing sleep Arduino environment, and even calculate how long your specific battery could last. Continue reading “Battery-Powered ESP8266 Sensor? Never Been Simpler”

ESP8266 Web Server Saves 60% Power With A 1 Ms Delay

Arduino has a library for quickly and easily setting up a simple web server on an ESP8622-based board, and [Tomaž] found that power consumption on an ESP-01 can be reduced a considerable amount by simply inserting a 1 ms delay in the right place. The reason this works isn’t because of some strange bug or oddball feature — it’s really just a side effect of how the hardware operates under the hood.

[Tomaž] uses the “hello world” example from ESP8266WebServer to explain. In it, the main loop essentially consists of calling server.handleClient() forever. That process checks for incoming HTTP connections, handles them, sends responses, exits — and then does it all over again. A simple web server like this one spends most of its time waiting.

A far more efficient way to handle things would be to launch server.handleClient() only when an incoming network connection calls for it, and put the hardware to sleep whenever that is not happening. However, that level of control just isn’t possible in the context of the Arduino’s ESP8266WebServer library.

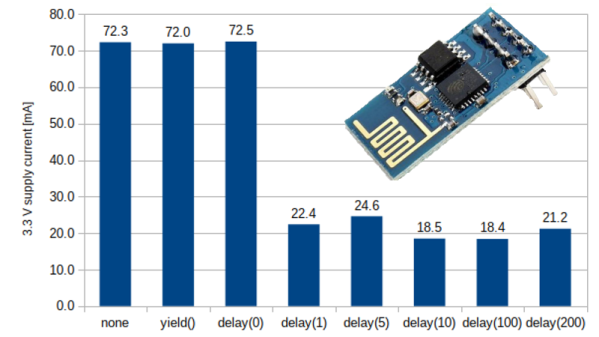
So what’s to be done? The next best thing turns out to be a simple delay(1) statement right after each server.handleClient() call in the main loop.

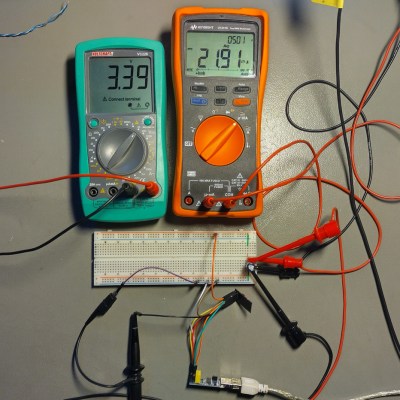
Why does this work? Adding delay(1) actually causes the CPU to spend the vast majority of its time in that one millisecond loop. And counting microseconds turns out to be a far less demanding task, power-wise, than checking for incoming network requests about a hundred thousand times per second. In [Tomaž]’s tests, that one millisecond delay reduced idle power consumption at 3.3 V from roughly 230 mW to around 70 mW — about 60% — while only delaying the web server’s response times by 6-8 milliseconds.

For simple web server applications, this is is for sure a good trick to keep in mind. There are also much more advanced techniques for saving power on ESP8266-based boards; from boards that barely sip a single microamp while sleeping, to coin-cell powered boards that go so far as to modify the TCP/IP stack to help squeeze every bit of power savings possible.

ESP8266 Smart Vents Keep Tabs On Home Temps

Have you ever found that, despite having a central heating and air conditioning system, that not all the rooms in your home end up being the temperature you want them to be? Maybe the dining room gets too hot when the heater is running, or the bedroom never seems to cool off enough in the summer months. If that sounds like your house, then these motorized “smart vents” from [Tony Brobston] might be exactly what you need.

The idea here is pretty simple: an ESP8266 and a servo is built into the 3D printed vent register, which allows it to control the position of its louvers. When connected to your home automation system via MQTT, the vents allow you to control the airflow to each room individually based on whatever parameters you wish. Most likely, you’ll want to pair these vents with an array of thermometers distributed throughout the house.

While [Tony] says the design still needs some testing, he’s released smart vents in a range of sizes from 2×10 to 6×12 inches. He’s also provided excellent documentation on how to print, assemble, and program the devices. It’s clear that a lot of care and thought went into every element of this project, and we’re excited to see how it can be developed further by the new ideas and contributors that will inevitably pop up now that it’s gone public.

Want to add some automation to your HVAC, but don’t have a fancy central unit? Don’t worry, as long as your heater or air conditioner has an infrared remote, you should be able to wedge a WiFi-enabled microcontroller in into the equation.

Continue reading “ESP8266 Smart Vents Keep Tabs On Home Temps”