An Improved Table Saw Fence With Threaded Rod

Back in the bad old days, table saw fences were terrible. You would have to measure the top and bottom of the fence before each cut, just to make sure the fence was square to the blade. In the 1970s, [Bill Biesemeyer] invented a better table saw fence, one that was always square, and included a measuring tape, right on the table saw.

[Jer] wanted an upgrade for his table saw and came up with what might be the next evolution of the table saw fence. It will always produce a square cut, but unlike the 1970s version, this fence has repeatability. If you rip a board to 1″, move the fence, come back to it after a month, and try to rip another board to 1″, those two boards will be exactly the same width.

The secret to this repeatability is a threaded rod. On the front of the fence is a big, beefy piece of threaded rod with 16 threads per inch. On the fence itself is two nuts, cut in half, welded to the guide, with a lever and cam to lock them in place.

When the lever is up and the nuts are disengaged from the threaded rod, the fence easily moves from one side of the table to the other. When the fence is locked down, it locks to the nearest 16th of an inch, and only the nearest 16th of an inch. While that may seem a little large for a relatively expensive tool, this is wood we’re talking about here. There’s not much reason to make the resolution of this fence any smaller; wait until the humidity changes and you’ll have a piece of wood that’s the desired dimension.

Continue reading “An Improved Table Saw Fence With Threaded Rod”

Chicken Coop Door Using Threaded Rod

There’s no rooster to wake them up, and [Steve] and his wife are fine with that. What they’re not fine with is having to get up early anyway in order to let the chickens out of the coop. Like many small-scale egg farmers they sought out an automatic solution for opening the coup in the morning.

[Steve] had seen a bunch of different automatic coup door hacks kicking around the Internet. But all of the ones he could find used a vertical door and pulleys. His setup has a door that opens horizontally and he realized that he needed to build some kind of linear actuator. What he came up with is a system built with hardware store parts. He’s using a plain old piece of threaded rod along with a coupling nut (they’re usually 3/4″ long or so). The nut is held firmly on the door using a conduit mounting bracket, while the threaded rod is turned by an electric screwdriver mounted to the jamb. Two limiting switches are made up of magnetic sensors often used to ring the door entry bell when you enter a store. An Arduino takes care of scheduling and controlling the motor for opening and closing the door. See for yourself in the high-production-value video after the break.

For what it’s worth, we have seen at least one rope and pulley door that slides horizontally.

Continue reading “Chicken Coop Door Using Threaded Rod”

Music Production Studio In A Box

[Emil Smith] is an electronic music producer in the Greater London area. He spent a lot of time commuting in and out of central London, so he decided to put together COVERT-19, a portable music production studio. After making a couple of prototypes, [Emil] settled on what he needed from his portable studio: a sampler, a sequencer, a synthesizer, a mixer, and a way to record his work.

[Emil] didn’t overlook any details with his mechanical design. Taking the beautiful London weather into account, he designed a laser-cut plywood case that has a neoprene foam gasket to keep water out when closed and put all of the inputs and outputs on the interior of the case. Inside the case, he opted for machine screws with threaded inserts so he could disassemble and reassemble his creation as often as he liked, and he included gas springs to keep the studio open while he’s making music. [Emil] even thought to include ventilation slots to keep the built-in PC cool!

A portable studio is useless without a power supply, so [Emil] taught himself some circuit theory and bought his first soldering iron in order to create the custom power delivery system. Power is supplied by a battery of twelve 18650 cells with switching converters to supply the three different voltages his studio needs. Even with all of his music-making gear, he manages to get about four hours of battery life!

The music-making gear consists of a sequencer and synthesizer as well as a touch-screen NUC PC running Xubuntu. The built-in PC runs software that allows him to mix the audio, apply extra effects, record his creations, and save his patches when he’s done working. The system even has an extra MIDI output and audio input to allow it to incorporate an external synthesizer.

If you’re interested in getting started with MIDI synthesizers, but you’re more interested in building than buying, check out the KELPIE.

Custom Tool Helps Hakko Set Threaded Inserts

When the tool you need doesn’t exist, you have to make it yourself. Come to think of it, even if the tool exists, it’s often way more fun to make it yourself. The former situation, though, is one that [Sean Hodgins] found himself in with regard to threaded inserts. Rather than suffer from the wrong tool for the job, he machined his own custom threaded insert tool for his Hakko soldering iron.

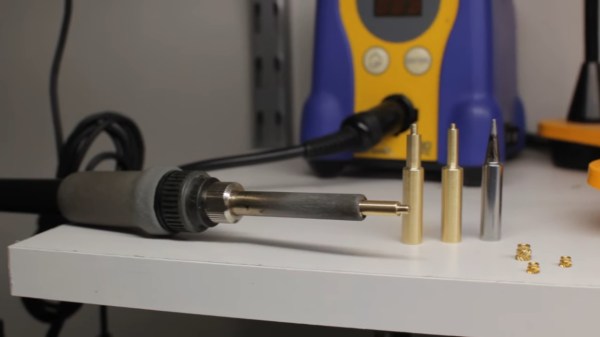
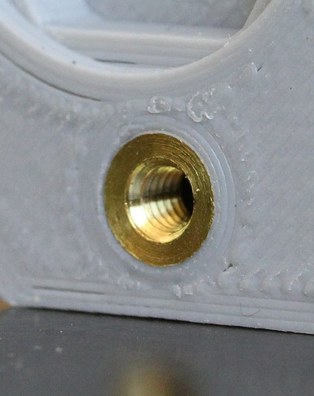
Like many of us, [Sean] has embraced the use of heat-set threaded inserts to beef up the mechanical connections on his 3D-printed parts. [Sean] dedicated a soldering iron to the task, equipping it with a tip especially for the job. But it was the flavor of iron proverbially known as a “fire stick” and he found that this iron was too hot for PLA prints. As the new owner of a lathe, he was able to make quick work of the job using a piece of brass rod stock. Luckily, Hakko tips just slip on the heating element, so no threading operations were needed. [Sean] made insert tips for multiple sized inserts, and the results speak for themselves.

If you haven’t tried these out yet, check out [Joshua Vasquez’s] excellent guide on heat-set inserts. You’ll find this guide to the relative merits of the different types useful when ordering inserts. And if you’ve got the itch to buy a lathe now, we’ve got you covered there too.

Continue reading “Custom Tool Helps Hakko Set Threaded Inserts”

Modular Fixture Plates Perfect For Small Production Runs

If you’ve ever done any small production runs of anything that needs a bit of assembly, you know that jigs and fixtures are a huge time saver. However, these usually need to be mounted, which means you end up drilling holes in your workbench or making one-off mounting plates. [Jim Smith] is no stranger to this problem, and created the Pact Plate, an affordable modular fixture plate and is running a Kickstarter campaign to get it produced.

Each plate 150 mm × 150 mm in size with a 25 × 25 mm grid of holes with M4 threaded inserts. This allows quickly and easily mounted to and removed from the plate without the need to drill additional holes. Plates can be bolted together to form larger plates. The demo video shows him using a variety of 3D printed jigs, toggle clamps, PCB and part holders (available for download) and even a robot to quickly set up small assembly stations. This could also save a lot of time during the prototyping and development phases to hold parts in place.

[Jim]’s prototypes are all 3D printed, but want’s to get tooling made to produce the plates using injection moulding. He doesn’t say what material he intends to use, but it’s likely some type of fibre reinforced plastic. He claims the rigidity is close to that of die-cast aluminium. One addition we would like to see is some plugs for the unused hole to prevent small components from falling into them.

Continue reading “Modular Fixture Plates Perfect For Small Production Runs”

Thread Carefully: An Introduction To Concurrent Python

The ability to execute code in parallel is crucial in a wide variety of scenarios. Concurrent programming is a key asset for web servers, producer/consumer models, batch number-crunching and pretty much any time an application is bottlenecked by a resource.

It’s sadly the case that writing quality concurrent code can be a real headache, but this article aims to demonstrate how easy it is to get started writing threaded programs in Python. Due to the large number of modules available in the standard library which are there to help out with this kind of thing, it’s often the case that simple concurrent tasks are surprisingly quick to implement.

We’ll walk through the difference between threads and processes in a Python context, before reviewing some of the different approaches you can take and what they’re best suited for.

Continue reading “Thread Carefully: An Introduction To Concurrent Python”

A Passive Mixer’s Adventure Through Product Development

The year was 2014, and KORG’s volca line of pint-sized synthesizers were the latest craze in the music world. Cheap synths and drum machines were suddenly a reality, all in a backpack-friendly form factor. Now practically anyone could become an electronic music sensation!

I attended a jam with friends from my record label, and as was the style at the time, we all showed up with our latest and greatest gear. There was the microKORG, a MiniNova, and a couple of guitars, but all attention was on the volcas, which were just so much fun to pick up and play with.

There was just one problem. Like any game-changing low-cost hardware, sacrifices had been made. The volcas used 3.5mm jacks for audio and sync pulses, and the initial lineup came with a bassline, lead, and drum synth. Syncing was easy, by daisy chaining cables between the boxes, but if you wanted to record or mix, you’d generally need to stack adapters to get your signals in a more typical 6.5mm TS format used by other music hardware.

After mucking around, I did some research on what other people were doing. Most were suffering just like we were, trying to patch these little machines into full-sized mixing desks. It seemed like overkill — when you just want to muck around, it’s a bit much to drag out a 24 channel powered mixer. I wanted a way to hook up 3 of these machines to a single set of headphones and just groove out.

To solve this problem, we needed a mixer to match the philosophy of the volcas; simple, accessible, and compact. It didn’t need to be gold-plated or capable of amazing sonic feats, it just had to take a few 3.5mm audio sources, and mix them down for a pair of headphones.

I’d heard of people using headphone splitters with mixed results, and it got me thinking about passive mixing. Suddenly it all seemed so clear — I could probably get away with a bunch of potentiometers and some passives and call it a day! With a friend desperate to get their hands on a solution, I decided to mock up a prototype and took it round to the studio to try out.

Continue reading “A Passive Mixer’s Adventure Through Product Development”