The assembled switch PCB in the palm of its creator's hand

TTP223 Brings Simple Touch Controls To A LED Lamp

You can buy small modules with capacitive touch detection ICs — most often it’s the TTP223, a single-button capacitive model with configurable output modes. These are designed to pair with a microcontroller or some simple logic-level input, but [Alain Mauer] wanted was to bring touch control to a simple LED strip. Not to be set deterred, he’s put together a simple TTP223-based switch board.

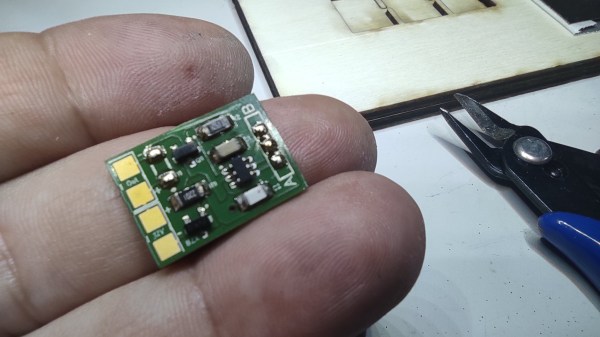
Initially, he made a prototype using one of the regular TTP223 boards as a module, but then transferred the full schematic onto a single PCB. The final board uses an NPN transistor capable of handling up to 3 amps to do the switching job, and Zener-based regulation to provide 5 V for the TTP223 itself from the 12 V input. [Alain] shares the schematic, as well as BOM together with Gerber files for a 2×3 panel in case you’re interested in adding a few of these handy boards to your parts bin.

The TTP223 is a ubiquitous and quite capable chip – we’ve seen it used for building a mouse with low actuation force buttons, a soft power switch, and even a UV-sensing talisman that’s equal parts miniature electronics and fascinating metalwork.

Continue reading “TTP223 Brings Simple Touch Controls To A LED Lamp”

Striping A Disk Drive The 1970 Way

These days, mass storage for computers is pretty simple. It either uses a rotating disk or else it is solid state. There are a few holdouts using tape, too, but compared to how much there used to be, tape is all but dead. But it wasn’t that long ago that there were many kinds of mass storage. Tapes, disks, drums, punched cards, paper tape, and even stranger things. Perhaps none were quite so strange though as the IBM 2321 Data Cell drive — something IBM internally called MARS.

What is a data cell you might ask? A data cell was a mass storage device from IBM in 1964 that could store about 400 megabytes using magnetic strips that looked something like about a foot of photographic film. The strips resided inside a drum that could rotate. When you needed a record, the drum would rotate the strip you needed to the working part and an automated process would remove the strip in question, wrap it around a read/write head and then put it back when it was done.

Continue reading “Striping A Disk Drive The 1970 Way”

An 128x64 OLED display with a weird image on it, showing a mouse cursor, date and time in the bottom right corner, and a whole lot of presumably dithered dots

Making Your Own Technically-HDMI OLED Monitor

One day, [mitxela] got bored and decided to build his own HDMI monitor – the unconventional way. HDMI has a few high-speed differential pairs, but it also has an I2C interface used for detecting the monitor’s resolution and issuing commands like brightness control. In fact, I2C is the backbone for a lot of side channels like these – it’s also one of our preferred interfaces for connecting to cool sensors, and in this case, an OLED display!

[mitxela] describes his journey from start to end, with all the pitfalls and detours. Going through the pinout with a broken hence sacrificial HDMI cable in hand, he figured out how to probe the I2C lines with Linux command-line tools and used those to verify that the display was recognized on the HDMI-exposed I2C bus. Then, he turned to Python and wrote a short library for the display using the smbus bindings – and, after stumbling upon an FPS limitation caused by SMBus standard restrictions, rewrote his code to directly talk to the I2C device node, raising FPS from 2 to 5-10.

From there, question arose – what’s the best software route to take? He tried making a custom X modeline on the HDMI port the display was technically attached to, but that didn’t work out. In the end, he successfully employed the Linux capability called “virtual monitors”, and found out about an interesting peculiarity – there was no mouse cursor to be seen. Turns out, they’re typically hardware-accelerated and overlaid by our GPUs, but in [mitxela]’s case, the GPU was not involved, so he added cursor support to the picture forwarding code, too.

With partial refresh, the display could be redrawn even faster, but that’s where [mitxela] decided he’s reached a satisfactory conclusion to this journey. The write-up is a great read, and if videos are more your forte, he also made a video about it all – embedded below.

We first covered the ability to get I2C from display ports 14 years ago, and every now and then, this fun under-explored opportunity has been popping up in hackers’ projects. We’ve even seen ready-to-go breakouts for getting I2C out of VGA ports quickly. And if you go a bit further, with your I2C hacking skills, you can even strip HDCP!

We thank [sellicott] and [leo60228] for sharing this with us!

Continue reading “Making Your Own Technically-HDMI OLED Monitor”

Breathe Easy With This LED Air Sensor Necklace

When you’re building wearables and glowables, sometimes a flashy rainbow animation is all you need. [Geeky Faye] likes to go a little further, however, and built this impressive necklace that serves to inform on the local air quality. 

The necklace consists of a series of Neopixel LED strips, housed within a tidy 3D printed housing made with flexible filament. A dovetail joint makes putting on and removing the necklace a cinch. A TinyPico V2, based on the ESP32, runs the show, as it’s very small and thus perfect for the wearable application. A USB power bank provides power to the microcontroller and LEDs.

The TinyPico uses its WiFi connection to query a server fed with air quality data from a separate sensor unit. The necklace displays a calm breathing animation as standard in cool tones. However, when air quality deteriorates, it shows warmer and hotter colors in a more pointed and vibrant fashion.

It’s a neat project that shows off [Geeky Faye]’s abilities at both electronics and tasteful wearable fabrication. It’s not always easy to build projects that are both functional and comfortable to wear, but this one works on both counts. Both the 3D files for the necklace and the microcontroller firmware code is included in the GitHub repo for those keen to dive in to the nitty gritty.

We’ve seen some great necklaces over the years, including those that rely on some beautiful PCB art. Video after the break.
Continue reading “Breathe Easy With This LED Air Sensor Necklace”

Image showing differences between WS2815 and WS2813 LED strips - the WS2815 strip lighting is more uniform throughout the strip's length.

Teaching You Everything You Might Have Missed About Addressable LEDs

Often, financial motivation results in people writing great educational material for hackers. Such is absolutely the case with this extensive documentation blog post on addressable LEDs by [DeRun]. This article could very be named “Addressable LEDs 101”, and it’s a must-scroll-through for anyone, whether you’re a seasoned hacker, or an artist with hardly any technical background and a desire to put LEDs in your creations.

This blog post is easy to read, painting a complete picture of what you can expect from different addressable LED types, and with apt illustrations to boot. Ever wonder which one of the addressable strips you should get from your retailer of choice, and what are the limitations of any specific type? Or, perhaps, you’d like to know – why is it that a strip with a certain LED controller is suspiciously cheap or expensive? You’re more than welcome to, at least, scroll through and fill into any of your addressable LED knowledge gaps, whether it’s voltage drops, color accuracy differences, data transfer protocol basics or dead LED failsafes.

Addressable LEDs have a special place in our hearts, it’s as if the sun started shining brighter after we’ve discovered them… or, perhaps, it’s all the LEDs we are now able to use. WS2812 is a staple of the addressable LED world, which is why we see them even be targets of both clone manufacturers and patent trolls. However, just like the blog post we highlight today mentions, there’s plenty of other options. Either way do keep coming cover a new addressable LED-related hack, like rewriting their drivers to optimize them, or adding 3.3V compatibility with just a diode.

We thank [Helge] for sharing this with us!

Servo Larson scanner

No LEDs Required For This Servo-Controlled Larson Scanner

All things considered, it’s pretty easy to get one LED is a strip to light up sequentially, and have it bounce back and forth. Turning that simple animation into a real Larson scanner, with smooth transitions and controlled fade-out, is another thing entirely. And forgetting the LEDs altogether and making a servo-operated Larson scanner is — well, let’s just call it an interesting lesson in hardware abstraction.

The Larson scanner, named after famed TV producer Glen A. Larson for his penchant for incorporating it into shows like Battlestar Galactica and Knight Rider, is actually hard to execute in hardware thanks to the fading tail that follows the lead pixel as it dances back and forth across the display. [Eric Gunnerson] decided to make this and other animation effects easier to achieve with Fade, a custom framework for LED animations that runs on an ESP32.

LED animations are fine, but what about servos? Could Fade be modified to support them? This turned out to be a fairly easy mod thanks to Fade’s architecture and [Eric]’s existing support for non-addressable LEDs via PWM signals. And it was even possible to support more than the 16 PWM channels on an ESP32by adding a UDP connection that puts multiple ESP32s under the control of a central microcontroller.

The video below shows [Eric]’s demo of servo support, with an eight-channel electromechanical Larson scanner. Each “pixel” is a painted ping pong ball swinging back and forth on a hobby servo, and the whole thing sounds just about as awful as you’d expect it to. If you squint just right, the effect looks pretty convincing, but that’s hardly the point. The real story here is [Eric]’s thoughtful architecture, which made the mods easier than starting from scratch.

Continue reading “No LEDs Required For This Servo-Controlled Larson Scanner”

DIY Nanoleaf LED Panels Offer Peace Of Mind

Nanoleaf light panels are a popular product for creating glowing geometric designs on walls. However, for those that like to avoid IoT devices that integrate with big cloud services, they’re not ideal, and involve compromising on one’s privacy, somewhat. [Viktor] decided to build something of his own instead to avoid this problem.

The design is that of an equilateral triangle, which allows the panels to tesselate well. Each panel consists of two 3D printed parts. The black PLA base holds the WS2812B LED strips, cabling, and ESP8266 controller, while a white PLA cover goes over the top, which acts as a diffuser to spread the light from the individual LEDs. Each triangle contains 24 LEDs, and six triangles together consume around 1.6 amps when in use.

The benefit of the system is that it’s not controlled from a company’s cloud system, which can be shutdown at any time. [Viktor’s] setup runs entirely independently, and can be controlled from a simple web page. Plus, there’s nothing stopping him from modifying the code to use the panels for any purpose; commercial products like Nanoleaf don’t offer anywhere near the flexibility of building your own.

We’ve seen others build their own smart lighting with similar techniques before, too. Video after the break.

Continue reading “DIY Nanoleaf LED Panels Offer Peace Of Mind”