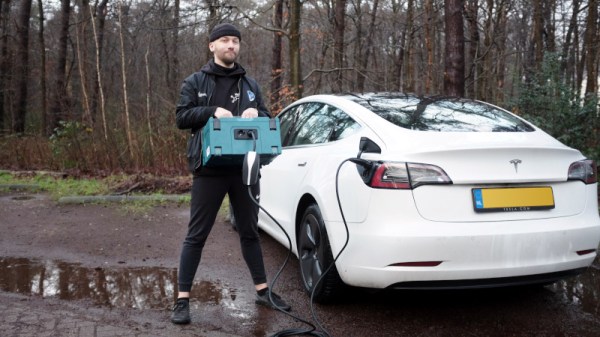
Modern Brownie Camera Talks SD And WiFi

If you’re at all into nostalgic cameras, you’ve certainly seen the old Brownie from Kodak. They were everywhere, and feature an iconic look. [JGJMatt] couldn’t help but notice that you could easily find old ones at a good price, but finding and developing No. 117 film these days can be challenging. But thanks to a little 3D printing, you can install an ESP32 camera inside and wind up with a modern but retro-stylish camera. The new old camera will work with a memory card or send data over WiFi.

The Brownie dates back to 1900 and cost, initially, one dollar. Of course, a dollar back then is worth about $35 now, but still not astronomical. After cleaning up and tuning up an old specimen, it was time to fire up the 3D printer.

There are also mods to the camera to let it accept an M12 lens. There are many lenses of that size you can choose from. There are a few other gotchas, like extending the camera cable, but it looks like you could readily reproduce this project if you wanted one of your very own.

We’ve seen old cameras converted before. Or, you can just start from scratch.

Siphoning Energy From Power Lines

The discovery and implementation of alternating current revolutionized the entire world little more than a century ago. Without it, we’d all have inefficient, small neighborhood power plants sending direct current in short, local circuits. Alternating current switches the direction of current many times a second, causing all kinds of magnetic field interactions that result in being able to send electricity extremely long distances without the resistive losses of a DC circuit. The major downside, though, is that AC circuits tend to have charging losses due to this back-and-forth motion, but this lost energy can actually be harvested with something like this custom-built transformer.

[Hyperspace Pilot] hand-wound this ferromagnetic-core transformer using almost two kilometers of 28-gauge magnet wire. The more loops of wire, the more the transformer will be able to couple with magnetic fields generated by the current flowing in other circuits. The other thing that it needs to do is resonate at a specific frequency, which is accomplished by using a small capacitor to tune the circuit to the mains frequency. With the tuning done, holding the circuit near his breaker panel with the dryer and air conditioning running generates around five volts. There’s not much that can be done with this other than hook up a small LED, since the current generated is also fairly low, but it’s an impressive proof of concept.

After some more testing, [Hyperspace Pilot] found that the total power draw of his transformer is only on the order of about 50 microwatts in an ideal setting where the neutral or ground wire wasn’t nearby, so it’s not the most economical way to steal electricity. On the other hand, it could still be useful for detecting current flow in a circuit without having to directly interact with it. And, it turns out that there are better ways of saving on your electricity bill provided you have a smart meter and the right kind of energy-saving appliances anyway.

Continue reading “Siphoning Energy From Power Lines”

A Nintendo 64 controller with a USB adapter

Play N64 Games The Right Way With This Classic Controller Adapter

Game consoles typically support a limited number of input devices, meaning that console games are often completely optimized for the default controller supplied with that platform. Nintendo’s tendency to completely reinvent their controllers pretty much every generation can therefore become a little irritating, especially when they also enable their newer consoles to play games from their back catalog. So when [Robson Couto] found that using the Switch’s Joy-Cons was a bit awkward for playing emulated Nintendo 64 games, he decided to figure out how to connect real N64 controllers to a Nintendo Switch.

While you can buy modern N64-style controllers for the Switch, even straight from Nintendo themselves, [Robson] thought it would be way more interesting to reuse an old controller and implement the translation step from scratch. In the video (embedded below) he takes a deep dive into all the timing details of the N64 controller protocol, which is basically a 1-wire setup, and explains how to use an STM32F411 BlackPill board to read out the controller’s buttons and joystick.

Next, he explores how to map the resulting data to the USB HID protocol used by the Switch. Most of the buttons have a clear one-on-one mapping, but since the “minus”, “capture” and “home” buttons are missing on the N64 controller, he chose to map these to button combinations unlikely to be used during regular gameplay. [Robson] also ran into the common issue of the analog joystick having a poorly-defined maximum range, for which he added a rudimentary auto-calibration feature.

Finally, he designed and 3D-printed a neat enclosure for his system with an N64 controller port on one side and a USB port on the other. By 3D-printing the whole thing he also avoided having to either source the non-standard connector or permanently modify his hardware. The end result of [Robson]’s project is an unobtrusive gadget that connects classic controllers to modern hardware – but of course, the reverse process is very much possible, too. If you want, you can even play N64 games with a mouse and keyboard.

Continue reading “Play N64 Games The Right Way With This Classic Controller Adapter”

2023 Hackaday Prize: The Primordial Soup’s On With This Modified Miller-Urey Experiment

It’s a pretty sure bet that anyone who survived high school biology has heard about the Miller-Urey experiment that supported the hypothesis that the chemistry of life could arise from Earth’s primordial atmosphere. It was literally “lightning in a bottle,” with a mix of gases like methane, ammonia, hydrogen, and water in a closed-loop glass apparatus and a pair of electrodes to provide a spark to simulate lightning lancing across the early prebiotic sky. [Miller] and [Urey] showed that amino acids, the building blocks of protein, could be cooked up under conditions that existed before life began.

Fast forward 70 years, and Miller-Urey is still relevant, perhaps more so as we’ve extended our reach into space and found places with conditions similar to those on early Earth. This modified version of Miller-Urey is a citizen science effort to update the classic experiment to keep up with those observations, plus perhaps just enjoy the fact that it’s possible to whip up the chemistry of life from practically nothing, right in your own garage. Continue reading “2023 Hackaday Prize: The Primordial Soup’s On With This Modified Miller-Urey Experiment”

Listening To The ISS On The Cheap

Like any hobby, amateur radio has no upper bounds on what you can spend getting geared up. Shacks worth tens of thousands of dollars are easy to come by, and we’ll venture a guess that there are hams out there pushing six figures with their investment in equipment. But hands down, the most expensive amateur radio station ever has to be the one aboard theĀ  International Space Station.

So what do you need to talk to a $100 billion space station? As it turns out, about $60 worth of stuff will do, as [saveitforparts] shows us in the video below. The cross-band repeater on the ISS transmits in the 70-cm ham band, meaning all that’s needed to listen in on the proceedings is a simple “handy talkie” transceiver like the $25-ish Baofeng shown. Tuning it to the 437.800-MHz downlink frequency with even a simple whip antenna should get you some reception when the ISS passes over.

In our experience, the stock Baofeng antenna isn’t up to the job, so something better like the Nagoya shown in the video is needed. Better still is a three-element Yagi tuned down slightly with the help of a NanoVNA; coupled with data on when the ISS will be within line-of-sight, picking up the near-constant stream of retransmissions from the station as Earth-based hams work it should be a snap — even though [saveitforparts] only listened to the downlink frequency here, for just a bit more of an investment it’s also possible for licensed hams to uplink to the ISS on 145.900 MHz.

For those who want a slightly higher level of difficulty, [saveitforparts] also has some tips on automating tracking with an old motorized mount for CCTV cameras. Pitchfork notwithstanding, it’s not the best antenna tracker, but it has promise, and we’re eager to see how it pans out — sorry. But in general, the barrier to entry for getting into space communications is so low that you could easily make this a weekend project. We’ve been discussing this and other projects on the new #ham-shack channel over on the Hackaday Discord. You should pop over there and check it out — we’d be happy to see you there.

Continue reading “Listening To The ISS On The Cheap”

Crafting Ribbon Cables For Retro Hardware

Building a modern computer is something plenty of us have done, and with various tools available to ensure that essentially the only thing required of the end user is to select parts and have them delivered via one’s favorite (or least expensive) online retailer. Not so with retro hardware, though. While some parts can be found used on reselling sites like eBay, often the only other option is to rebuild parts from scratch. This is sometimes the best option too, as things like ribbon cables age poorly and invisible problems with them can cause knock-on effects that feel like wild goose chases when troubleshooting. Here’s how to build your own ribbon cables for your retro machines.

[Mike] is leading us on this build because he’s been working on an old tower desktop he’s calling Rosetta which he wants to be able to use to host five different floppy disk types and convert files from one type to another. Of course the old hardware and software being used won’t support five floppy disk drives at the same time so he has a few switches involved as well. To get everything buttoned up neatly in the case he’s building his own ribbon cables to save space, especially since with his custom cables he won’t have the extraneous extra connectors that these cables are famous for.

Even though, as [Mike] notes, you can’t really buy these cables directly anymore thanks to the technology’s obsolescence, you can still find the tools and parts you’d need to create them from scratch including the ribbon, connectors, and crimping tools. Even the strain relief for these wide, fragile connectors is available and possible to build into these projects. It ends up cleaning up the build quite nicely, and he won’t be chasing down any gremlins caused by decades-old degraded multi-conductor cables. And, even though [Mike] demonstrated the floppy disk drive cables in this build, ribbon cable can be used for all kinds of things including IDE drive connectors and even GPIO cables for modern electronics projects.

Continue reading “Crafting Ribbon Cables For Retro Hardware”

Using FreeCAD To Replace OEM Parts

As much as we might all like it if manufacturers supported their products indefinitely with software updates or replacement parts, this just isn’t feasible. Companies fail or get traded, technologies evolve, and there’s also an economic argument against creating parts for things that are extremely old or weren’t popular in the first place. So, for something like restoring an old car, you might have to resort to fabricating replacement parts for your build on your own. [MangoJelly] shows us how to build our own replacement parts in FreeCAD in this series of videos.

The build does assume that the original drawings or specifications for the part are still available, but with those in hand FreeCAD is capable of importing them and then the model scaling to match the original specs shown. This video goes about recreating a hinge on an old truck, so with the drawings in hand the part is essentially traced out using the software, eventually expanding it into all three dimensions using all of the tools available in FreeCAD. One of the keys to FreeCAD is the various workbenches available that all have their own sets of tools, and being able to navigate between them is key to a build like this.

FreeCAD itself is an excellent tool for anyone repairing old vehicles like this or those making 3D prints, designing floorplans for houses, or really anything you might need to model in a computer before bringing the idea into reality. It does have a steep learning curve (not unlike other CAD software) so it helps to have a video series like this if you’re only just getting started or looking to further hone your design skills, but the fact that it’s free and open-source make it extremely attractive compared to its competitors.

Continue reading “Using FreeCAD To Replace OEM Parts”