Bicycle Gets Turn Signals And Brake Lights For Added Safety

Traveling by bicycle can be a fun and exciting mode of transportation, and can also save a ton of money compared to driving a car. There are plenty of places around the world where a bicycle is the primary mode of transportation for a significant percentage of the population, but there are many more places that are designed entirely for cars with little thought given to anyone else. For anyone riding a bike, especially for people living in these car-dominated areas, additional safety measures like this LED array are often necessary.

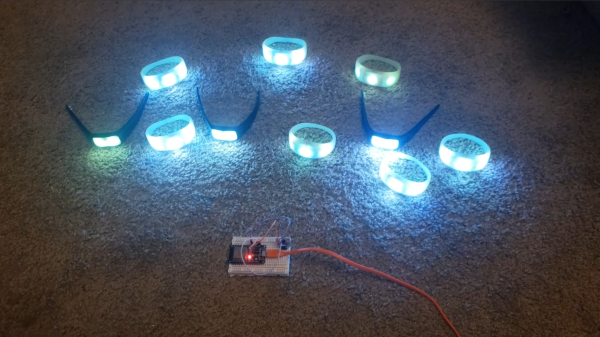
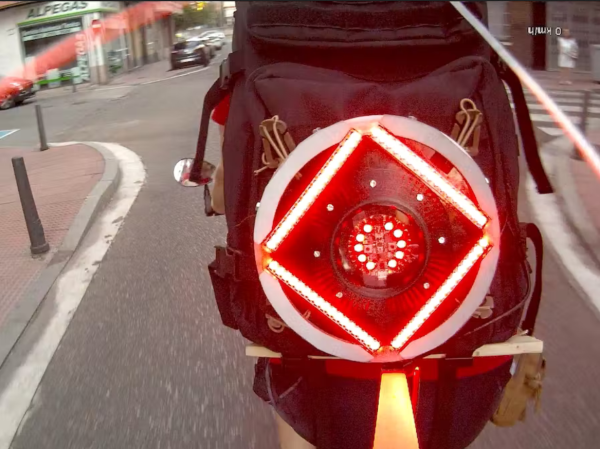
The light array was created by [Estudio Roble] for traveling around his city. The design is based on the Adafruit Circuit Playground Express, which sits directly in the middle of the light fixture. Surrounding it is a diamond-shaped strip of LEDs within an additional ring. The light uses a bright blue color for normal driving, but is programmed to turn red when the accelerometer in the dev board detects braking. There are also integrated turn signals which operate similarly to motorcycle turn signals. The signal is sent wirelessly between the handlebar switch to the lights.

The device itself clips onto any backpack, and since the controller is wireless there are no wires to connect every time a rider gets on their bike. It’s quite an improvement over the complete lack of lighting on most bikes. If you’ve read this far, you need to check out this bicycle headlight which uses a projector to display information directly in the path of travel.

Continue reading “Bicycle Gets Turn Signals And Brake Lights For Added Safety”

A slide carousel with a DSLR attached to its lens output

Digitize Your Slide Deck With This Arduino-Powered Slide Carousel

If you’re above a certain age, you probably remember the atmosphere of a pre-Powerpoint 35 mm slide show. The wobbly screen being unrolled, the darkened room, the soft hum of the projector’s fan, the slightly grainy picture on the screen and that unmistakable click-whoosh-clack sound as the projector loaded the next slide. Nowadays you’ll be hard pressed to find anyone willing to set up a screen and darken the room just to watch a few photos, so if you still have any slides lying around you’ll probably want to digitize them. If you’ve also kept your projector then this doesn’t even have to be that difficult, as [Scott Lawrence] shows in his latest project.

[Scott] made a setup to directly connect a DLSR, in this case a Nikon D70, to a Kodak 760 slide carousel. The attachment is made through a 3D-printed adapter that fits onto the Nikon’s macro lens on one side and slides snugly into the carousel’s lens slot on the other. The adapter also holds an IR transmitter which is aimed at the camera’s receiver, in order to trigger its remote shutter release function.

The carousel’s original light source was replaced with a compact LED studio light, which allows for precise brightness control and of course remains nice and cool compared to the original incandescent bulb. The light, camera and carousel motor are all controlled through a central user interface driven by an Arduino Leonardo which can automatically advance the carousel and instruct the camera to take a picture, thereby taking the hard work out of digitizing huge stacks of slides.

[Scott] plans to make the software and STL files available on GitHub soon, so anyone can go ahead and turn their projector into a digitizer. If you’ve misplaced your projector however, a simple 3D-printed slide adapter for your camera also works for small slide decks.

Continue reading “Digitize Your Slide Deck With This Arduino-Powered Slide Carousel”

Retrotechtacular: The Original Weather Channel

The Weather Channel has decided to pull the plug on its automated weather display, a favorite experience for weather geeks everywhere. However, it wasn’t the original weather nerd TV station.  Early cable TV networks had their own low-tech versions of this much longer ago than you might expect. For example, check out the video below which shows one of these weather stations back in 1975.

The audio was from a local FM station and you can enjoy handwritten public service announcements, as well.

Continue reading “Retrotechtacular: The Original Weather Channel”

2022 Cyberdeck Contest: Picking The Best Of The Best

Given how many incredible builds we’ve covered over the last couple of years, we knew that an official Cyberdeck Contest would certainly receive some impressive entries. But never in our wildest dreams could we have predicted that more than 100 decks would end up crossing the finish line, or that of them, the vast majority would be never-before-seen designs. In fact, the response to this contest was so overwhelming that the judging process took far longer than we originally anticipated.

Ultimately, we decided that there were simply too many phenomenal builds entered into the contest to award $150 Digikey spending sprees to just three of them. So as an added bonus, we’ve rustled up some $50 Tindie gift certificates that will go to the four special category honorable mentions.

With that, let’s take a look at the cyberdecks that took top honors as decided by our panel of judges.

Continue reading “2022 Cyberdeck Contest: Picking The Best Of The Best”

An Automated Digitizer For 35mm Slides

Slides make for great old-timey fun, but it’s awesome to have a digital backup of your old photos, too. An automatic digitizer can make quick work of your collection, and this build from [rbwood53] will do just that.

The digitizizer is based on a Kodak carousel slide projector. It’s fitted with LED strips instead of the original light source, which are used to illuminate the slides themselves. An Arduino Nano is used to command a camera to take photos, via a hacked-up shutter release remote. The camera is set up with a zoom lens and relies on auto-focus to get crisp, clear images of the slides. The Arduino is also charged with telling the carousel system to advance to the next slide as required. It keeps count as the slides go by, so it stops when the entire carousel has been imaged.

Overall, it’s a straightforward build that automatically imaged over 40 boxes of slides for [rbwood53] without issue. If you’ve got a smaller collection to digitize, you might find this simple 3D-printed adapter to be useful, too!

This Vintage Alphanumeric Display Was Huge, Hot, Heavy, And Expensive

It’s easy to take display technology for granted nowadays, but the ability to display data in a human-readable way was not always easy. This is demonstrated well by the Pinlite 30003 Alphanumeric Display Module, a four-character display that was pure luxury for its time.

Each display is a rectangular vacuum tube containing 17 incandescent light filaments.

Not only were the 17 segments that make up each display capable of showing any letter or number, but they were even daylight-readable! Each of those 17 segments is an incandescent lamp filament, which is how the required brightness was achieved. The sturdy module shown here holds four such displays, each of which is on its own pluggable board with a dedicated character decoder chip directly behind it.

As [AnubisTTL] points out, the resulting unit is bulky, has terrible character spacing, and was no doubt very costly. By today’s standards, it is almost unimaginably heavy, hot, and impractical. But before high-brightness LEDs were a thing, a daylight-readable alphanumeric character display was really something special. It would absolutely have been worth the money and effort to the right people.

Before small and efficient displays were commonplace, the solution to the problem of how to display data efficiently and in an easy-to-read format took a lot of really unusual (and clever) turns as engineers worked around the limitations of the time. This resulted in oddities like the SD-11 Sphericular Display, which is mostly empty space on the inside. Another great example is the Eidophor, a projector from before projectors were even a thing.

A family of PixMob bracelets being coltrolled by an ESP32 with an IR transmitter attached to it. All the bracelets are shining a blue-ish color

PixMob Wristband Protocol Reverse-Engineering Groundwork

The idea behind the PixMob wristband is simple — at a concert, organizers hand these out to the concertgoers, and during the show, infrared projectors are used to transmit commands so they all light up in sync. Sometimes, attendees would be allowed to take these bracelets home after the event, and a few hackers have taken a shot at reusing them.

The protocol is proprietary, however, and we haven’t yet seen anyone reuse these wristbands without tearing them apart or reflashing the microcontroller. [Dani Weidman] tells us, how with [Zach Resmer], they have laid the groundwork for reverse-engineering the protocol of these wristbands.

Our pair of hackers started by obtaining a number of recordings from a helpful stranger online, and went onto replaying these IR recordings to their wristbands. Most of them caused no reaction – presumably, being configuration packets, but three of them caused the wristbands to flash in different colors. They translated these recordings into binary packets, and Dani went through different possible combinations, tweaking bits here and there, transmitting the packets and seeing which ones got accepted as valid. In the end, they had about 100 valid packets, and even figured out some protocol peculiarities like color animation bytes and motion sensitivity mode enable packets.

The GitHub repository provides some decent documentation and even a video, example code you can run on an Arduino with an IR transmitter, and even some packets you can send out with a  Flipper Zero. If you’re interested in learning more about the internals of this device, check out the teardown we featured back in 2019.