This week, Jonathan Bennett and Ben Meadors talk to Darko Fabijan about Semaphore, the newly Open Sourced Continuous Integration solution! Why go Open, and how has it gone so far? Watch to find out!
A piece of musical history is the Maplin 4600, a DIY electronic music synthesizer from the 1970s. The design was published in an Australian electronics magazine and sold as a DIY kit, and [LOOK MUM NO COMPUTER] got his hands on an original Maplin 4600 that he refurbishes and puts through its paces.
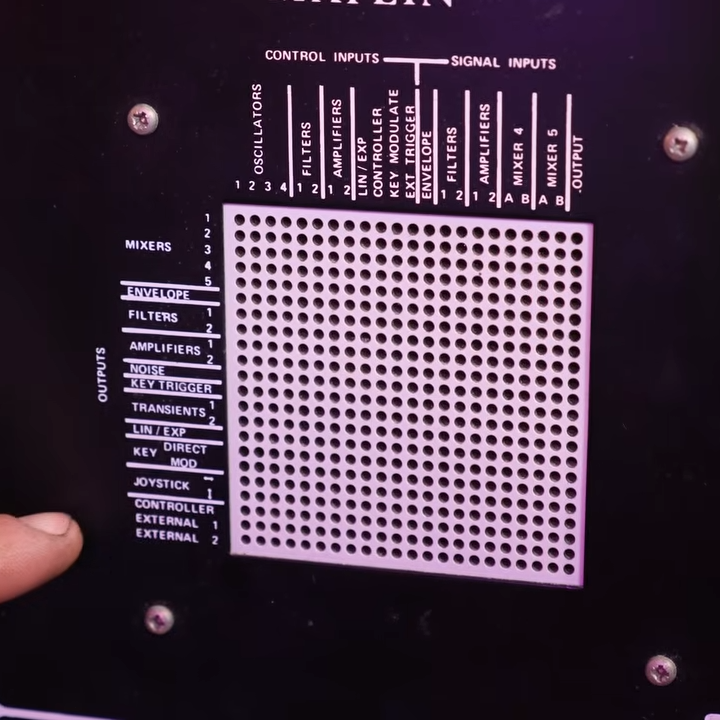
Inserting conductive pegs is how the operator connects different inputs and outputs.
The Maplin 4600 is a (mostly) analog device with a slightly intimidating-looking layout. It features multiple oscillators, mixers, envelope generators, filters, and a complex-looking patch bay on the right hand side that is reminiscent of a breadboard. By inserting conductive pins, one can make connections between various inputs and outputs.
Internally the different features and circuits are mostly unconnected from one another by default, so the patch board is how the instrument is “programmed” and the connections made can be quite complex. The 4600 is one of a few synthesizer designs by [Trevor Marshall], who has some additional details about on his website.
The video (embedded below) is a complete walk-through of the unit, including its history, quirks, and design features. If you’d like to skip directly to a hands-on demonstrating how it works, that begins around the 10:15 mark.
Synthesizers have a rich DIY history and it’s fascinating to see an in-depth look at this one. And hey, if you like your synths complex and intimidating, do yourself a favor and check out the Starship One.
Do you like high-detail 3D models intended for resin printing, but wish you could more easily print them on a filament-based FDM printer? Good news, because [Jacob] of Painted4Combat shared a tool he created to make 3D models meant for resin printers — the kind popular with tabletop gamers — easier to port to FDM. It comes in the form of a Blender add-on called Resin2FDM. Intrigued, but wary of your own lack of experience with Blender? No problem, because he also made a video that walks you through the whole thing step-by-step.
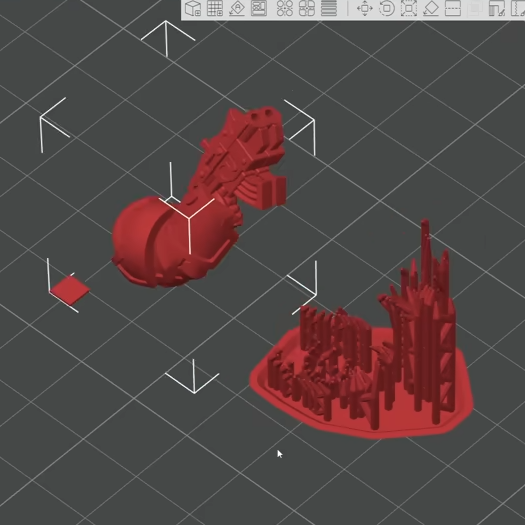
Resin2FDM separates the model from the support structure, then converts the support structure to be FDM-friendly.
3D models intended for resin printing aren’t actually any different, format-wise, from models intended for FDM printers. The differences all come down to the features of the model and how well the printer can execute them. Resin printing is very different from FDM, so printing a model on the “wrong” type of printer will often have disappointing results. Let’s look at why that is, to better understand what makes [Jacob]’s tool so useful.
Rafts and a forest of thin tree-like supports are common in resin printing. In the tabletop gaming scene, many models come pre-supported for convenience. A fair bit of work goes into optimizing the orientation of everything for best printed results, but the benefits don’t carry directly over to FDM.
For one thing, supports for resin prints are usually too small for an FDM printer to properly execute — they tend to be very thin and very tall, which is probably the least favorable shape for FDM printing. In addition, contact points where each support tapers down to a small point that connects to the model are especially troublesome; FDM slicer software will often simply consider those features too small to bother trying to print. Supports that work on a resin printer tend to be too small or too weak to be effective on FDM, even with a 0.2 mm nozzle.
To solve this, [Jacob]’s tool allows one to separate the model itself from the support structure. Once that is done, the tool further allows one to tweak the nest of supports, thickening them up just enough to successfully print on an FDM printer, while leaving the main model unchanged. The result is a support structure that prints well via FDM, allowing the model itself to come out nicely, with a minimum of alterations to the original.
Resin2FDM is available in two versions, the Lite version is free and an advanced version with more features is available to [Jacob]’s Patreon subscribers. The video (embedded below) covers everything from installation to use, and includes some general tips for best results. Check it out if you’re interested in how [Jacob] solved this problem, and keep it in mind for the next time you run across a pre-supported model intended for resin printing that you wish you could print with FDM.
Glasses for the blind might sound like an odd idea, given the traditional purpose of glasses and the issue of vision impairment. However, eighth-grade student [Akhil Nagori] built these glasses with an alternate purpose in mind. They’re not really for seeing. Instead, they’re outfitted with hardware to capture text and read it aloud.
Yes, we’re talking about real-time text-to-audio transcription, built into a head-worn format. The hardware is pretty straightforward: a Raspberry Pi Zero 2W runs off a battery and is outfitted with the usual first-party camera. The camera is mounted on a set of eyeglass frames so that it points at whatever the wearer might be “looking” at. At the push of a button, the camera captures an image, and then passes it to an API which does the optical character recognition. The text can then be passed to a speech synthesizer so it can be read aloud to the wearer.
It’s funny to think about how advanced this project really is. Jump back to the dawn of the microcomputer era, and such a device would have been a total flight of fancy—something a researcher might make a PhD and career out of. Indeed, OCR and speech synthesis alone were challenge enough. Today, you can stand on the shoulders of giants and include such mighty capability in a homebrewed device that cost less than $50 to assemble. It’s a neat project, too, and one that we’re sure taught [Akhil] many valuable skills along the way.
Laser microphones have been around since the Cold War. Back in those days, they were a favorite tool of the KGB – allowing spies to listen in on what was being said in a room from a safe distance. This project by [SomethingAbtScience] resurrects that concept with a DIY build that any hacker worth their soldering iron can whip up on a modest budget. And let’s face it, few things are cooler than turning a distant window into a microphone.
At its core this hack shines a laser on a window, detects the reflected light, and picks up subtle vibrations caused by conversations inside the room. [SomethingAbtScience] uses an ordinary red laser (visible, because YouTube rules) and repurposes an amplifier circuit ripped from an old mic, swapping the capsule for a photodiode. The build is elegant in its simplicity, but what really makes it shine is the attention to detail: adding a polarizing filter to cut ambient noise and 3D printing a stabilized sensor mount. The output is still a bit noisy, but with some fine tuning – and perhaps a second sensor for differential analysis – there’s potential for crystal-clear audio reconstruction. Just don’t expect it to pass MI6 quality control.
While you probably won’t be spying on diplomats anytime soon, this project is a fascinating glimpse into a bygone era of physical surveillance. It’s also a reminder of how much can be accomplished with a laser pointer, some ingenuity, and the curiosity to see how far a signal can travel.
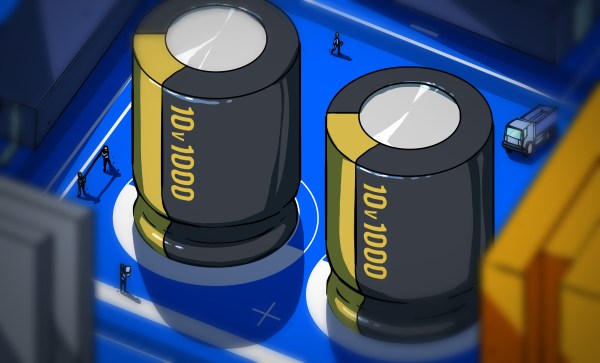
Somewhere between the period of 1999 and 2007 a plague swept through the world, devastating lives and businesses. Identified by a scourge of electrolytic capacitors violently exploding or splurging their liquid electrolyte guts all over the PCB, it led to a lot of finger pointing and accusations of stolen electrolyte formulas. In a recent video by [Asianometry] this story is summarized.
The bad electrolyte in the faulty capacitors lacked a suitable depolarizer, which resulted in more gas being produced, ultimately leading to build-up of pressure and the capacitor ultimately failing in a way that could be rather benign if the scored top worked as vent, or violently if not.
Other critical elements in the electrolyte are passivators, to protect the aluminium against the electrolyte’s effects. Although often blamed on a single employee stealing an (incomplete) Rubycon electrolyte formula, the video questions this narrative, as the problem was too widespread.
More likely it coincided with the introduction of low-ESR electrolytic capacitors, along with computers becoming increasingly more power-hungry, and thus stressing the capacitors in a much warmer environment than in the early 1990s. Combine this with the presence of counterfeit capacitors in the market and the truth of what happened to cause the Capacitor Plague probably involves a bit from each column, a narrative that seems to be the general consensus.
There’s something that kills coding speed—iteration time. If you can smash a function key and run your code, then watch it break, tweak, and smash it again—you’re working fast. But if you have to first compile your code, then plug your hardware in, burn it to the board, and so on… you’re wasting a lot of time. It’s that problem that inspired [Larry] to create an embedded system simulator to speed development time for simple projects.
The simulator is intended for emulating Arduino builds on iPhone and Mac hardware. For example, [Larry] shows off a demo on an old iPhone, which is simulating an ESP32 playing a GIF on a small LCD display. The build isn’t intended for timing-delicate stuff, nor anything involving advanced low-level peripherals or sleep routines and the like. For that, you’re better off with real hardware. But if you’re working on something like a user interface for a small embedded display, or just making minor tweaks to some code… you can understand why the the simulator might be a much faster way to work.
For now, [Larry] has kept the project closed source, as he’s found that it wouldn’t reasonably be possible for him to customize it for everyone’s unique hardware and use cases. Still, it’s a great example of how creating your own tools can ease your life as a developer. We’ve seen [Larry]’s great work around here before, like this speedy JPEG decoder library. Continue reading “Simulating Embedded Development To Reduce Iteration Time”→