Renewable Hydrogen Sucked From Thinish Air

Stored hydrogen is often touted as the ultimate green energy solution, provided the hydrogen is produced from genuinely green power sources. But there are technical problems to be overcome before your average house will be heated with pumped or tank-stored hydrogen. One problem is that the locations that have lots of scope for renewable energy, don’t always have access to plenty of pure water, and for electrolysis you do need both. A team from Melbourne University have come up with a interesting way to produce hydrogen by electrolysis directly from the air.

Redder areas have more water risk and renewable potential

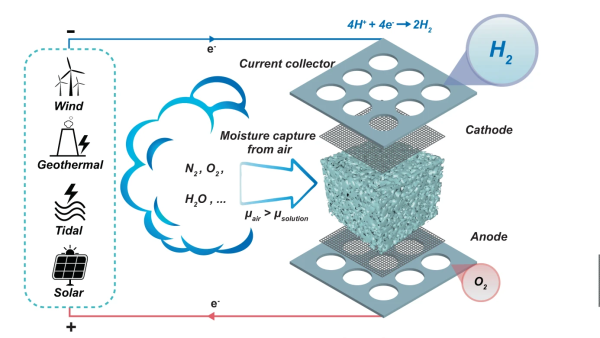
By utilising a novel electrolysis cell with a hygroscopic electrolyte, the so-called direct air electrolysis (DAE) can operate with humidity as low as 4% relative, so perfectly fine even in the most arid areas, after all there may not be clouds but the air still holds a bit of water. This is particularly relevant to regions of the world, such as deserts, where there is simultaneously a high degree of water risk, and plenty of solar potential. Direct electrolysis of saline extracted at coastal areas is one option, but dealing with the liberated chlorine is a big problem.

The new prototype is very simple in construction, with a sponge of melamine or a sintered glass foam soaked in a compatible electrolyte. Potassium Hydroxide (alkaline) was tried as was Potassium Acetate (base) and Sulphuric Acid, but the latter degraded the host material in a short time. Who would have imagined? Anyway, with electrolysis cell design, a key problem is ensuring the separate gasses stay separate, and in this case, are also separate from the air. This was neatly ensured by arranging the electrolyte 
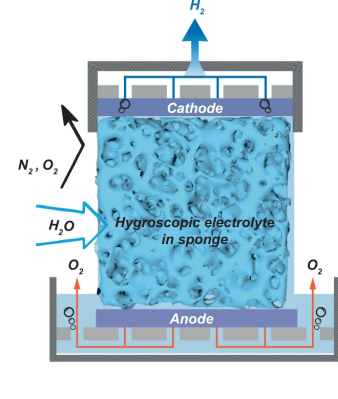
sponge fully covered both electrodes, so as the hygroscopic material extracted water from the air, the micro-channels in the structure filled up with liquid, with it touching both ends of the cell, forming the circuit and allowing the electrolysis to proceed.

Hydrogen, being very light, would rise upward through holes in the cathode, to be collected and stored. Oxygen simply passed back into the air, after passing though the liquid reservoir at the base. Super simple, and from reading the paper, quite effective too.

You can kind of imagine a future built around this now, where you’re driving your hydrogen fuel cell powered dune buggy around the Sahara one weekend, and you stop at a solar-powered hydrogen fuel station for a top up and a pasty. Ok, possibly not that last bit.

The promised hydrogen economy may be inching closer. We covered using aluminium nanoparticles to rip hydrogen out of water. But once you have the gas, you need to store and handle it. Toyota might have a plan for that. Then perhaps handling gas directly at all isn’t a great idea, and maybe the future is paste?

Thanks to [MmmDee] for the tip!

Nevermore Is What You Get When Engineers Design Air Filters For 3D Printers

What happens when an air filter for 3D printers gets designed by engineers with a passion for function, a refusal to compromise, and a desire to do without bad smells or fumes? You get the Nevermore, a design for a recirculating active-carbon filtration system to deal with VOCs (volatile organic compounds) from 3D printing.

3D-printable parts and an easy-to-fill chamber for bulk-activated carbon make this recirculating air filter for VOCs a smart, space-saving design.

The Nevermore Micro (and larger Nevermore Max) were originally intended to complement the Voron 3D printer design, but are made such that they can be used with just about anything else. These filters use 3D-printable parts, and are designed to be easily filled (and refilled) using bulk-activated carbon instead of some kind of proprietary pre-packed filter like most commercial offerings. The Voron project is all about a printer without compromises, and the Nevermore comes from that same design ethos.

A Nevermore filter sits inside the build chamber, and works by recirculating air inside while passing it through the activated carbon. The idea is that by concentrating on dealing with the problem at the source inside a relatively small build chamber, one doesn’t need a lot of airflow. A small recirculating air filter can do the job efficiently, though for best results, the build chamber should be as sealed as possible.

One interesting caution is that it seems not all activated carbon is the same, and it is absolutely crucial to use only acid-free, steam-activated (not acid-washed) carbon in a recirculating filter like the Nevermore. There are horrifying photos of oxidized metal surfaces resulting from using acid-residue carbon, some of which took only minutes to occur. Thankfully, there are pointers to trusted sources for the known-good stuff.

It’s known that 3D printing results in chemical and particle emissions. These differ significantly depending on both material and type of printer, but it’s enough of an issue to warrant attention. One deals with particulates with something like a HEPA filter, but VOCs require a carbon filter. This is where the Nevermore comes in. Active carbon filters will wear out simply from exposure to the air, so if one is serious about cleaning VOCs when printing, it is definitely worth looking into bulk carbon with a design like the Nevermore.

A Guide To 3D Printing Model Aircraft Wings

The exact airfoil shape of a wing has a massive effect on the performance and efficiency of an aircraft and will be selected based on the intended flight envelope. If you’re moving beyond foam board wings, 3D printing is an excellent way to create an accurate airfoil, and [Tom Stanton] provides us with an excellent guide to modeling wing sections for easy printing.

[Tom] used the process demonstrated in the video after the break to create the wing for his latest VTOL RC aircraft. It was printed with lightweight PLA, which can ooze badly when it stops extruding. To get around this, he designed the wings and their internal ribs to be printed in one continuously extruded line.

He wanted a wing that would allow a smooth transition from hover to forward flight, and used the Airfoil Tools website to find and download the appropriate airfoil profile. After importing the profile into Fusion 360, he created internal ribs in a diagonal grid pattern, with lightening holes running along the length of the wing. A cylinder runs along the core of the wing to fit a carbon fiber wing spar. The ribs are first treated as a separate body in CAD and split into four quadrants. When these quadrants combine with the outer shell, it allows the slicer to treat the entire print as a continuous external perimeter line using “vase mode“.

These steps might seem simple, but it took about 3 weeks of experimentation to find a process that works. It’s primarily intended for straight wings with a continuous profile, but it should be adaptable to tapered/swept wings too. A well-designed airframe is essential when pushing aircraft to the edge of efficiency, like solar-powered plane to fly overnight.

Continue reading “A Guide To 3D Printing Model Aircraft Wings”

Hackaday Podcast 182: Sparkpunk Photography, Anti-Xiomi Air Filters, And Keyfob Foibles

Editor-in-Chief Elliot Williams and Managing Editor Tom Nardi are here to bring you the best stories and hacks from the previous week (and maybe a little older). Things kick off with news that the Early Bird tickets for the 2022 Hackaday Supercon tickets sold out in only two hours — a good sign that the community is just as excited as we are about the November event. But don’t worry, regular admission tickets are now available for those who couldn’t grab one out of the first batch.

This week there’s plenty of vehicular hacks to talk about, from John Deere tractors running DOOM to a particularly troublesome vulnerability found in many key fobs. We’ll also lament about the state of 3D CAD file formats, marvel at some retro-futuristic photography equipment, and look at the latest in home PCB production techniques. Wrapping things up there’s a whole lot of cyberdeck talk, and a trip down silicon memory lane courtesy of Al Williams.

Direct download it for yourself right here.

Check out the links below if you want to follow along, and as always, tell us what you think about this episode in the comments!

Continue reading “Hackaday Podcast 182: Sparkpunk Photography, Anti-Xiomi Air Filters, And Keyfob Foibles”

The project's hardware, including the ESP32 camera module, stuffed into the GoPro-intended waterproof shell. The camera portion of the ESP32 module sticks out exactly where the GoPro's camera would be. To the left, a hacked ESP32-CAM module is shown.

Hackaday Prize 2022: Solar-Harvesting ESP32 Camera Is Waterproof, Repeatable

[alberto nunez] shows off his sleek build of a solar-harvesting ESP32 camera – waterproof, somewhat energy-efficient, and able to be built by more-or-less anyone. For that, he’s chosen fairly jellybean components – an ESP32-CAM module with a matching protoboard, a small solar cell, a LiFePO4 battery, and a waterproofed GoPro shell that all of these parts neatly fit into.

A BQ25504 energy harvesting chip is used to ensure the ‘solar’ part of the project can meaningfully contribute to the project’s power budget, with energy otherwise mainly provided by the LiFePo4 battery. Since this battery’s nominal voltage is 3.2 V, it can be wired straight to ESP32’s power input and there’s no need for a regulator – thus, that one got mercilessly desoldered. [alberto] has also modded the board using a FET to gate power to the ESP32-CAM module’s camera, with all of these hacks bringing the board’s deep sleep current from 2.8 mA to 0.8 mA. Not great for a low-power device, but not terrible for something you can build so easily. Plus, it’s waterproof, dust-resistant, and quite robust!

These ESP32 camera modules are seriously nifty – we see them put to good use on the regular. Whether you need to detect motion in your Halloween project, decode your water meter readings, or perhaps merely a security camera, it’s worth having a few in your toolbox. Maybe even pick up a programming helper for these while you’re at it!

a full gaming rig built into a LCD-386

A Portable Computer Living In 1988 But Also In The Future

Every once in a while, there will be a project that is light on details but inundated with glorious, drool-worthy pictures. [Nexaner7] recently showed off his cyberdeck he built over a year inside an old LCD-386. So what’s special about it? This isn’t just a Raspberry Pi or some SBC inside but a complete AMD Ryzen 5600, Nvidia RTX 3060, screen, and keyboard in a 19.5-liter space (0.68 cubic feet). Since there wouldn’t be enough space inside for decent airflow, he decided to water-cool everything, which added to the build.

the back of the sleeper LCD-386 cyberdeck

While [Nexaner7] doesn’t have a video walkthrough, he does have a build log with dozens of pictures in two parts: part 1 and part 2. As you can imagine, there were copious amounts of 3d printing for brackets and holders, trying various screens and GPUs to see what fit and what didn’t. He tried to use the original keyboard, even with a 5-pin DIN to PS2 to USB adapter, but the keyboard was flakey, likely due to rust. He dropped in a CM Quickfire TK PCB with a few modifications as it was close to the same size. He swapped the display for a 1440p portable monitor with a thin ribbon HDMI cable to route from the GPU to the screen.

We’re happy to report that the parts inside were sold to someone who restores old PC, so a somewhat rare LCD-386 wasn’t destroyed. With a gorgeous build like this, perhaps he should enter the Cyberdeck contest. Eagle-eyed readers might notice that recently we covered an LCD-386 with its contents retrieved via a hacked-together serial bus.

Loki Is Part Cyberdeck, Part Sinclair Spectrum, And Pretty Tricky

You’ve got to watch out for Loki — he’s a trickster, after all, and he might make you think this semi-cyberdeck mash-up machine is named after him, when the backstory on this build is more interesting than anything in the current Marvel scene.

According to [Steve Anderson], Loki was the name of a mocked-up machine that Sinclair teased in the mid-1980s as a competitor for the Amiga. [Steve] coveted the vaporware machine and never quite got over it, but rather than pine for something that never existed, he created his own Loki. He only loosely qualifies the machine as a cyberdeck — it has some features of the genre, like a Raspberry Pi and a cast-off iPad screen for a display, but isn’t really intended to be as portable as a real cyberdeck. To scratch his Sinclair itch, the machine also includes a ZX Uno, which is an FPGA emulator of the Sinclair Spectrum. The keyboard is hand-wired using mechanical switches, and is backed up by a Pico running custom software so it can talk both USB and PS/2.

[Steve] has much more detail on Loki and his other cyberdeck builds over on his blog, which you should probably check out. Somewhat surprisingly, it doesn’t look like he’s entered Loki in our new Cyberdeck Contest that just launched. Hopefully that’s just an oversight.