Arduino Library Makes Digital Rain Like It’s 1999

There’s going to be a new Matrix movie in theaters next month, and you know what that means: we’re about to see a whole new generation get obsessed with the franchise’s iconic “Digital Rain” effect. Thanks to modern advertisement technology, expect to see lines of glittering text pouring down the displays of everything from billboards to gas pumps pretty soon.

Doesn’t get much easier than that.

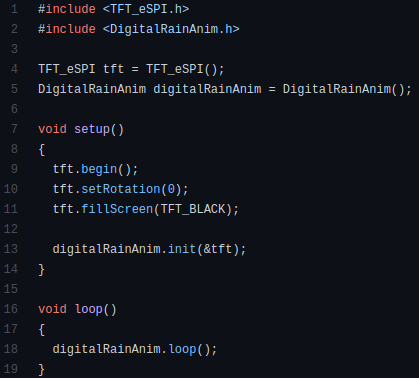
For those of us who’ve just been looking for an excuse to break out the old Matrix screensavers, you might as well get a jump on things using this handy Arduino library for the ESP8266 and ESP32. Developed by [Eric Nam], it lets you start up a digital rainstorm on displays supported by the TFT_eSPI library as easily as running digitalRainAnim.loop().

You can even install the library through the Arduino IDE, just open the Library Manager and search for “Digital Rain” to get started. You’ve still got to hook the display up to your microcontroller, but come on, [Eric] can’t do it all for you.

Looking at the examples, it seems like various aspects of the animation like color and speed can be configured by initializing the library with different values. Unfortunately we’re not seeing much in the way of documentation for this project, but by comparing the different examples, you should be able to get the high points.

While our first choice would certainly be a wall of green alphanumeric LED displays, we can’t help but be impressed with how easy this project makes it to spin up your own little slice of the Matrix on the workbench.

Continue reading “Arduino Library Makes Digital Rain Like It’s 1999”

NTP, Rust, And Arduino Make A Phenomenal Frequency Counter

Making a microcontroller perform as a frequency counter is a relatively straightforward task involving the measurement of the time period during which a number of pulses are counted. The maximum frequency is however limited to a fraction of the microcontroller’s clock speed and the accuracy of the resulting instrument depends on that of the clock crystal so it will hardly result in the best of frequency counters. It’s something [FrankBuss] has approached with an Arduino-based counter that offloads the timing question to a host PC, and thus claims atomic accuracy due to its clock being tied to a master source via NTP. The Rust code PC-side provides continuous readings whose accuracy increases the longer it is left counting the source. The example shown reaches 20 parts per billion after several hours reading a 1 MHz source.

It’s clear that this is hardly the most convenient of frequency counters, however we can see that it could find a use for anyone intent on monitoring the long-term stability of a source, and could even be used with some kind of feedback to discipline an RF source against the NTP clock with the use of an appropriate prescaler. Its true calling might come though not in measurement but in calibration of another instrument which can be adjusted to match its reading once it has settled down. There’s surely no cheaper way to satisfy your inner frequency standard nut.

Binaural Hearing Modeled With An Arduino

You don’t have two ears by accident. [Stoppi] has a great post about this, along with a video you can see below. (The text is in German, but that’s what translation is for.) The point to having two ears is that you receive audio information from slightly different angles and distances in each ear and your amazing brain can deduce a lot of spatial information from that data.

For the Arduino demonstration, cheap microphone boards take the place of your ears. A servo motor points to the direction of sound. This would be a good gimmick for a Halloween prop or a noise-sensitive security camera.

Continue reading “Binaural Hearing Modeled With An Arduino”

Arduino Piano Tuner Is Pitch Perfect

[JanHerman] knows that tuning musical instruments is all about precision and that precision is measured in a logarithmic unit called a cent. A cheap tuner unit might be accurate to 1.5 cents which sounds good until you look at one for ten times the price and find it is accurate to 0.1 cents. So you can spend $800 for precision or $60 for something less. [Jan] decided to build something better and cheaper using a 32-bit Arduino and a DDS frequency generator chip on a breakout board.

Oddly enough, the device doesn’t have a display. Instead, it generates a precise frequency and couples it to the piano using a transducer. You tune the string to the corresponding note. The post has a lot of detail about how piano tuning works.

Continue reading “Arduino Piano Tuner Is Pitch Perfect”

This Arduino Terminal Does All The Characters

The job of a dumb terminal was originally to be a continuation of that performed by a paper teletype, to send text from its keyboard and display any it receives on its screen. But as the demands of computer systems extended beyond what mere ASCII could offer, their capabilities were extended with extra characters and graphical extensions whose descendants we see in today’s Unicode character sets and thus even in all those emojis on your mobile phone. Thus a fully-featured terminal has a host of semigraphics characters from which surprisingly non-textual output can be created. It’s something [Michael Rule] has done some work on, with his ILI9341TTY, a USB serial terminal monitor using an Arduino Uno and an ILI9341 LCD module that supports as many of the extended characters as possible.

A graph, entirely in Unicode characters.

It’s fair to say that most of us who regularly use a terminal don’t go far beyond the ASCII, as it’s likely that a modern terminal will sit in a window over a desktop GUI. So even if you have little use for a hardware terminal monitor there’s still plenty of interest to be found in those rarely-seen character sets. Our favourite is probably the Symbols for Legacy Computing, an array of semigraphics characters that may be familiar to readers who have used an 8-bit home computer or two. He includes a graph example using these characters coloured with ANSI escape codes, and it’s certainly not what you expect from a terminal.

If microcontroller terminals capture your interest, this isn’t the first we’ve brought you.

A game board with five LEDs and a hand shining a laser pointer at it

Laser Pointer And Arduino Make A Minimalistic Shooting Game

Video games are great and all, but sometimes you just want the thrill of manipulating actual objects in addition to watching action on a screen. This must have been the reason why Nintendo’s Duck Hunt became so popular despite the simplicity of its gameplay. Prolific hacker [mircemk] similarly made a computer-plus-physical game called “Laser Shooter“, which somehow reminds us of the good old NES game.

The game is based on an Arduino Nano, to which five LEDs as well as five photoresistors (LDRs) are connected. When the game is started, the LEDs light up at random and the player has a limited time to “shoot” the corresponding LDR with a laser pointer. This time limit is decreased as the game progresses, and the game is over once the player fails to hit the target on time. The “Game Over” message is accompanied by a sad tune, but luckily no giggling dog.

Complete schematics and code are available for anyone willing to try their hand at replicating or improving this game. And no, you can’t simply sweep your laser across the five LDRs all the time, because you lose if you shoot at the wrong target. For more laser pointer-based games, try this Laser Command clone or this laser tag badge system.

Continue reading “Laser Pointer And Arduino Make A Minimalistic Shooting Game”

Arduino Brings USB Mouse To Homebrew Computer

When building your own homebrew computer, everything is a challenge. Ultimately, that’s kind of the point. If you didn’t want to really get your hands dirty with the nuts and bolts of the thing, you wouldn’t have built it in the first place. For example, take the lengths to which [rehsd] was willing to go in order to support standard USB mice on their 6502 machine.

Code for mapping mouse movement to digital output.

The idea early on was to leverage existing Arduino libraries to connect with a standard USB mouse, specifically, the hardware would take the form of an Arduino Mega 2560 with a USB Host Shield. There was plenty of code and examples that showed how you could read the mouse position and clicks from the Arduino, but [rehsd] still had to figure out a way to get that information into the 6502.

In the end, [rehsd] connected one of the digital pins from the Arduino to an interrupt pin on the computer’s W65C22 versatile interface adapter (VIA). Then eleven more digital pins were connected to the computer, each one representing a state for the mouse and buttons, such as MOUSE_CLICK_RIGHT and MOUSE_LEFT_DOWN.

Admittedly, [rehsd] says the mouse action is far from perfect. But as you can see in the video after the break, it’s at least functional. While the code could likely be tightened up, there’s obviously some improvements to be made in terms of the electrical interface. The use of shift registers could reduce the number of wires between the Arduino and VIA, which would be a start. It’s also possible a chip like the CH375 could be used, taking the microcontroller out of the equation entirely.

From classic breadboard builds to some impressively practical portable machines, we’ve seen our fair share of 6502 computers over the years. Despite the incredible variation to be found in these homebrew systems, one thing is always the same: they’re built by some of the most passionate folks out there.

Continue reading “Arduino Brings USB Mouse To Homebrew Computer”