Art of 3D printer in the middle of printing a Hackaday Jolly Wrencher logo

3D Printering: One Bed Level To Rule Them All

In an ideal world, your FDM 3D printer’s bed would be perfectly parallel with the print head’s plane of movement. We usually say that means the bed is “level”, but really it doesn’t matter if it is level in the traditional sense, as long as the head and the bed are the same distance apart at every point. Of course, in practice nothing is perfect.

The second best situation is when the bed is perfectly flat, but tilted relative to the print head. Even though this isn’t ideal, software can move the print head up and down in a linear fashion to compensate for the tilt. Things are significantly worse if the bed isn’t itself flat, and has irregular bumps up and down all over.

To combat that, some printer firmware supports probing the bed to determine its shape, and adjusts the print head up and down as it travels across the map. Of course, you can’t probe the bed at every possible point, so the printer will have to interpolate between the measured reference points. Marlin’s bilinear bed leveling is an example.

But if you have enough flash space and you use Marlin, you may want to try unified bed leveling (UBL). This is like bilinear leveling on steroids. Unfortunately, the documentation for this mode is not as plain as you might like. Everything is out there, but it is hard to get started and information is scattered around a few pages and videos. Let’s fix that.

Continue reading “3D Printering: One Bed Level To Rule Them All”

A PoE adapter's RJ45 jack added inside an Acer laptop

Laptop Empty Space Filled With RS485 And PoE

Out of all the laptop upgrade options typically available, you wouldn’t expect this specific one. [controlmypad] decided to take a part of his RS485 device programming workflow and put it inside of a spare laptop he picked up for cheap. Typically, he’d occupy some desk space and lay out an unwieldy combination of a USB-RS485 dongle, a PoE power injector, a PSU for that injector, and a few cables to join it all – being extra weight in the tool bag, cluttering the workspace when laid out, and the RS485 adapter slowly wearing out the USB ports during the work-related motions. No reason that all of this couldn’t be packed inside a laptop, however.

What helps a lot is that, in many modern cheap laptops, the motherboard is fairly small, and the DVD drive plastic placeholder can be omitted without second thought. Cutting off the plastic molding from both of the adapters turns them into a nicely reusable circuit board and a small PoE module, respectively. After laborious yet careful cutting of the laptop case with a hobby knife, the PoE injector fits right in and, essentially, adds an extra RJ45 port to the laptop. From where the Hackaday.io write-up left off, it doesn’t seem like this mod got fully completed, but most of the important details are there for us to learn from. What got left out is connecting it to an internal USB port (should help that the motherboard’s schematics are available online), as well as creating 12V-24V from the laptop’s power rails. At this point, however, this mod is a big step forward usability-wise, even if it still requires an external PSU.

Laptop internal upgrade projects are rare but cherished – it’s a combination of “daring”, “inquisitive” and “meticulous” that results in people successfully hacking on a thing they certainly were not meant to hack, and have that thing serve their needs better. Apart from all the EEE PC upgrade options that set the bar for a generation of laptop modders, there’s a myriad of unconventional laptop modification vectors – you could do a thorough from-scratch Type-C charging port conversion, replace your webcam with an FSF-endorsed open firmware WiFi dongle, build in a “12-axis” sensor for auto-orientation and data-logging, or invent a remote self-destruct mechanism for your laptop. Those are, indeed, quite a few things you won’t typically find in the list of available options while customizing your laptop at the manufacturer website.

Does This Lead Make My Car Look Fat?

When looking at the performance of a vehicle, weight is one of the most important factors in the equation. Heavier vehicles take more energy to accelerate and are harder to stop. They’re also more difficult to control through the corners. Overall, anything that makes a vehicle heavier typically comes with a load of drawbacks to both performance and efficiency. You want your racecar as light as possible.

However, now and then, automakers have found reason to intentionally add large weights to vehicles. We’ll look at a couple of key examples, and discuss why this strange design decision can sometimes be just what the engineers ordered.

Continue reading “Does This Lead Make My Car Look Fat?”

Dice Rolls From The Beginning Of Time

Generating random numbers might seem like a trivial task, that is until the numbers need to be truly random for cryptography or security reasons. When that’s the case, it turns out that these numbers are really “pseudo-random” and follow a predictable pattern. Devices that can produce truly random numbers often do it by sampling random events in the real world rather than relying on a computer to do it directly, like this machine which simulates a dice roll by looking at the cosmic microwave background radiation.

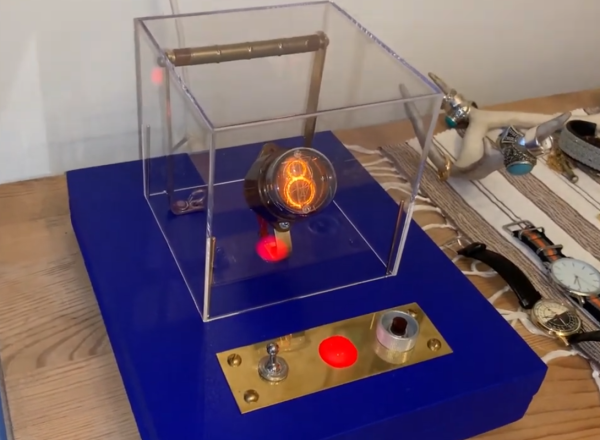
The cosmic microwave background radiation exists in the infrared at the farthest edges of the observable universe as a remnant of the big bang. It’s an excellent source of randomness, but tapping into it poses a bit of a challenge. For this build, [iSax] is using an old Soviet-era Geiger tube to detect the appropriate signal, and a Nixie tube to display the dice roll. After the device detects two particles from the Big Bang, the device measures the amount of time that passed between the detection of both particles and uses this number to calculate the dice roll.

While it takes a little bit longer to roll this dice than a traditional one since it has to wait to detect the right kind of particles, if you really need the randomness it can’t be beat. It certainly works as dice, but we can also see some use for generating truly random numbers for other applications as well. For some other sources of random inspiration be sure to check out our own [Voja Antonic]’s deep dive into truly random number generation.

Continue reading “Dice Rolls From The Beginning Of Time”

WiFi bird box with phone showing video of a rubber ducky

Building A WiFi-Enabled Bird Box On The Cheap

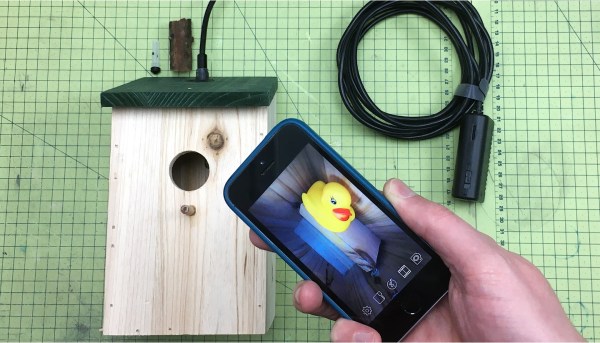
[Jude] was looking for a fun DIY project for him and his son and thought that a bird box might be a good option. He wanted to equip the box with a WiFi camera so he could watch his little guests from his phone but didn’t find any suitable, inexpensive, commercially-available options. So with that, he built one himself.

He did, however, start with a generic bird box, which he bought online, and then modified with his particular features of interest. He wanted the project to be scalable so after-school programs and other kids clubs could easily implement his design within a classroom setting. He figured minimizing the woodwork would make the project easier for children.

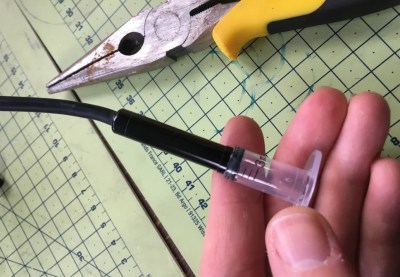
He added a dowel to the generic bird box he bought online, but cautions that readers need to investigate if a dowel would attract invasive species in their area. He found a relatively inexpensive WiFi-enabled endoscope that he noted was far more affordable than the camera-equipped, commercially-available bird boxes he found earlier. He craftily used a plastic syringe as a waterproof spy hole that housed the endoscope, allowing him to easily slip the camera in and out of the bird box without disturbing its occupants. He noted that the 3 mL syringe had the perfect inner diameter to fit the endoscope rather snugly.

[Jude] doesn’t intend to have the endoscope active 24/7, so he needed a way to seal the access hole when the camera was not in use. His many years at Dyson taught him that implementing a removable, water-tight, rubber seal is not as easy as people may think. Fortunately, the rubber stopper at the tip of the syringe’s plunger was naturally a perfect removable seal and he could use it to plug the access hole when the endoscope was not in use.

The endoscope was mostly waterproof, except for the WiFi transmitter, so [Jude] needed to place that end of the device in a waterproof enclosure. He said these are often called “IP rated” enclosures and he figured these could come in handy for any number of outdoor electronics projects so we imagine this might come in handy for a lot of our readers as well.

Mother nature has certainly inspired many projects here at Hackaday and [Jude]’s bird box is no exception. Cool project!

Improved Thermochromic Clock Uses PCB Heaters For Better Contrast

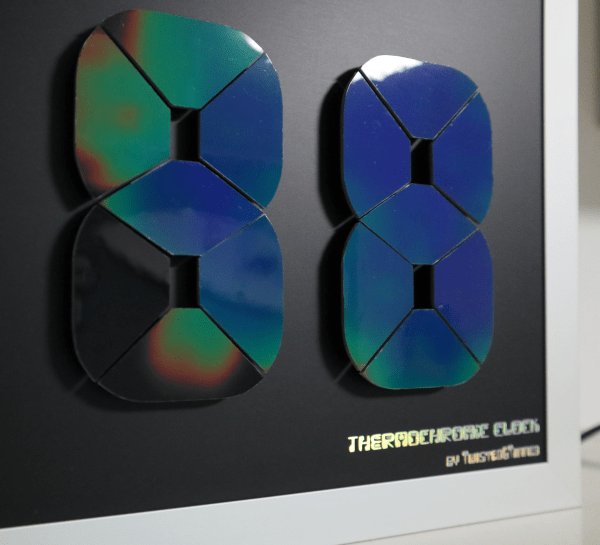
We love timepiece projects round these parts, so here we are with another unusual 7-segment clock design. Hackaday’s own [Moritz Sivers] wasn’t completely satisfied with his last thermochromic clock, so has gone away and built another one, solved a few of the issues, and this time designed it to be wall mounted. The original design had a single heater PCB using discrete resistors as heating elements. This meant that the heat from active elements spread out to adjacent areas, reducing the contrast and little making it a bit hard to read, but it did look really cool nonetheless.

This new version dispenses with the resistors, using individual segment-shaped PCBs with heater traces, which gives the segment a more even heat and limited bleeding of heat into neighbouring inactive air-gapped segments.  Control is via the same Wemos D1 Mini ESP8266 module, driving a chain of 74HC595 shift registers and a pile of dual NMOS transistors. A DS18B20 thermometer allows the firmware to adjust for ambient temperature, giving more consistency to the colour change effect. All this is wrapped up in an aluminium frame, and the results look pretty nice if you ask us.

Both PCB designs and the Arduino firmware can be found on the project GitHub, so reproducing this should be straightforward enough for those so inclined, just make sure your power supply can handle at least 3 amps, as these heaters sure are power hungry!

Got a perfectly good clock, but desperately need a thermochromic temperature/humidity display? [Moritz] has you covered. And if this digital clock is just too simple, how about a mad 1024-element analog thermochromic clock instead?

Continue reading “Improved Thermochromic Clock Uses PCB Heaters For Better Contrast”

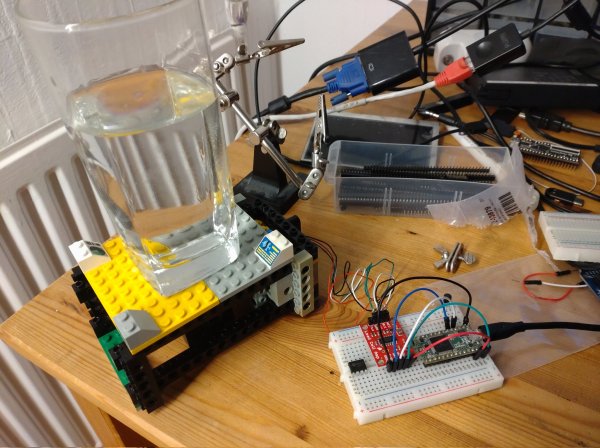
A Lego cup holder with a glass of water and electronics on a breadboard

LEGO Cup Holder Helps You To Stay Hydrated

Eat more fruit, exercise more, drink more fluids; early January is traditionally the time to implement New Year’s resolutions. Most of the common ones simply require willpower, but if it’s staying hydrated that you’re targeting, then some help is available. [Pepijn de Vos] designed a LEGO cup holder and an accompanying desktop app that tell you exactly how much water you’ve had so far, making it easier to get to those eight glasses a day.

The basic idea is simple: the cup holder contains a load cell that senses the weight of your drinking vessel. If the weight decreases, then a message is sent to your PC detailing the amount lost. If the weight increases, then the glass must have been refilled and the previous weight is disregarded. This way, the app simply needs to add up all the amounts reported, without having to compensate for the weight of the empty glass.

The tricky bit was integrating a load cell into the LEGO structure. It required some fiddling with Flex System hoses to ensure the platform’s weight rested only on the load cell, while still being stable enough to safely hold a full glass of water. The load cell is read out through an amplifier and A/D converter, while the USB communication is handled by a Teensy 3.

[Pepijn] modified an existing GNOME desktop widget to display a cup icon and the total volume consumed, which seems to work pretty smoothly judging from the video embedded below. All the code and even a complete set of LEGO build instructions are available on the project’s Github page. If simply monitoring your fluid intake isn’t enough of a nudge for you, then check out this device that floods your desk if you don’t drink enough.

Continue reading “LEGO Cup Holder Helps You To Stay Hydrated”