At 71,572 KM, You Won’t Beat This LoRa Record

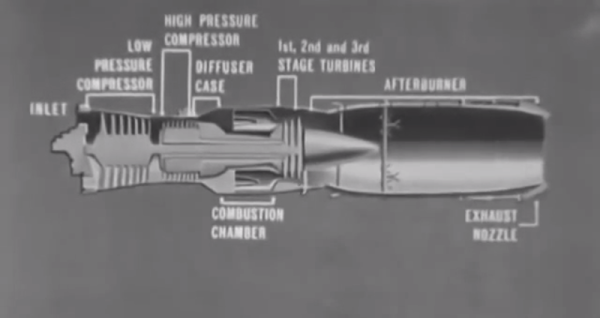
A distance record for LoRa transmission has been set that you probably won’t be able to beat. Pack up your gear and go home, nothing more to achieve here. At a superficial reading having a figure of 71,572 km (44,473 miles) seems an impossible figure for one of the little LoRa radio modules many of us have hooked up to our microcontrollers, but the story isn’t quite what you’d expect and contains within it some extremely interesting use of technology.

So the folks at Outernet have sent data over LoRa for that incredible distance, but they did so not through the little ISM band modules we’re used to but over a suitably powerful Ku-band uplink to a geostationary satellite. They are also not using the LoRaWAN protocols of the earthbound systems, but simply the LoRa modulation scheme. So it’s not directly comparable to terrestrial records such as the 702 km we reported on last year, and they are the first to admit that.

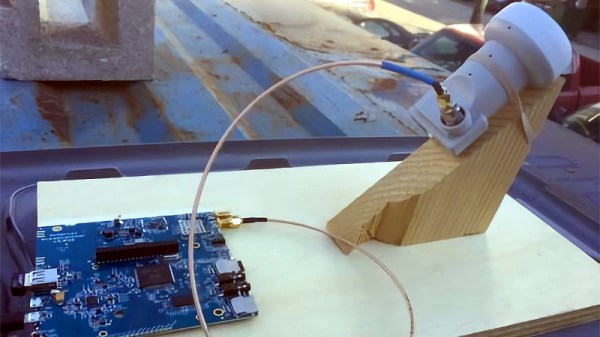
Where their achievement becomes especially interesting though is in their choice of receiver. We are all used to Ku-band receivers, you may even have one on your house somewhere for satellite TV. It will probably involve a parabolic dish with a narrow beam width and an LNB whose horn antenna is placed at its focus. It would have required some skill and effort to set up, because it has to be pointed very carefully at the satellite’s position in the sky. Outernet’s mission of delivering an information service with the lowest possible barrier to entry precludes the extra expense of shipping a dish and providing trained staff to align it, so they take a very different approach. Their receiver uses either an LNB horn or a small patch antenna pointing at the satellite, with none of the dishes or phased arrays you might be used to in a Ku-band installation.

You might wonder how such a receiver could possibly work with such a meagre antenna, but the secret lies in LoRa’s relatively tiny bandwidth as well as the resistance to co-channel interference that is a built-in feature of the LoRa modulation scheme. Even though the receiver will be illuminated by multiple satellites at once it is able to retrieve the signal and achieve a 30 kb/s data rate that they hope with technical refinements to increase to 100 kb/s. This rate will be enough over which to push an SD video stream to name just one of the several examples of the type of content they hope to deliver.

It’s likely that the average Hackaday reader will not be hiring satellite uplink time upon which to place their LoRa traffic. But this story does provide a demonstration of LoRa’s impressive capabilities, and will make us look upon our humble LNBs with new eyes.

Via ABOpen.

LEDs Give HP 3457A DDM’s LCD Display The Boot

Have you ever been so frustrated with a digital display that you wanted to rip the whole thing out and create a better one? That is exactly what [xi] did. Replacing their constantly used HP 3457A multimeter’s LCD display with a brighter LED one was a necessary project — and a stress reducing one at that.

While this digital multimeter is well-known for its reliability, its standard display is rather lacking. In fact, there are several mods already out there that simply add a backlight. However, as [xi] notes, LCD screens always have a certain angle where they still don’t quite show properly. So this hack reverses the LCD’s protocol and details the process of creating new LED display.

The issue of dim displays that comes with traditional digital multimeters is not a new one. One solution to this that we have seen before is a hack where someone decided to add a backlight onto their cheap multimeter. [Ken Kaarvik] got around the dimness altogether by giving his multimeter a wireless remote display of his choosing. It is interesting to see the different solutions that are made to the same nuisance. The first item on the agenda of [xi]’s hack was to successfully analyze the HP LCD protocol. With the aid of an ATmega32, the digits were decoded throughout the transmission frames.

Continue reading “LEDs Give HP 3457A DDM’s LCD Display The Boot”

Saturday clock - 1 CPU clock cycle per day

Saturday Clock: An 0.000011574Hz ATtiny85 Clock

In these times when we try to squeeze out extra clock cycles by adding more cores to our CPUs and by enlisting the aid of GPUs, [Ido Gendel] thought it would be fun to go in the exact opposite direction, supply a clock to the ATtiny85 that cycles only once per day, or at 0.000011574Hz. What application could this have? Well, if he could do it in seven instructions or less, how about turning on an LED at sunset Friday evening, to indicate the start of the Jewish Shabbat (Saturday), and turn it off again at sunset Saturday evening.

Notice the subtlety. A clock that cycles once per day means you can execute at most one instruction per day. Luckily on AVR microcontrollers, the instructions he needed can execute in just one cycle. That of course meant diving down into assembly code. [Ido] wasn’t an assembly wizard, so to find the instructions, he compiled C code and examined the resulting assembly until he found what he needed. One instruction turns on the LED and the instruction immediately following turns it off again, which normally would make it happen too fast for the human eye to register. But the instruction to turn it on runs on Friday evening and the very next instruction, the one that turns it off, doesn’t run until Saturday evening. Do you feel like you’re in a science fiction story watching time slowed down? Freaky. A few NOPs and the jump for the loop take up the remaining five cycles for the week.

For the source of the clock he chose to use an LDR to detect when the light level dropped at the end of the day. The problem he immediately ran into was that clouds, bird shadows, and so on, also cause drops in the light level. The solution he found was to widen the light and dark range by adding a TLV3702 push-pull output comparator and some resistors. [Ido] gives a detailed explanation of the circuit in the video after the break.

Continue reading “Saturday Clock: An 0.000011574Hz ATtiny85 Clock”

1575 Bottles Of Beer On The (LED) Wall

Say hello to my little friend, lovingly named Flaschen Taschen by the members of Noisebridge in San Francisco. It is a testament to their determination to drink Corona beer get more members involved in building big displays each year for the Bay Area Maker Faire. I pulled aside a couple of the builders for an interview despite their very busy booth. When you have a huge full-color display standing nine feet tall and ten feet wide it’s no surprise the booth was packed with people.

Check out the video and then join me after the break for more specifics on how they pulled this off.

Continue reading “1575 Bottles Of Beer On The (LED) Wall”

Hacklet 57 – CNC Hacks

Everyone’s first microcontroller project is making an LED blink. It’s become the de-facto “Hello World” of hardware hacking.  There’s something about seeing wires you connected and the code you wrote come together to make something happen in the real world. More than just pixels on a screen, the LED is tangible. It’s only a short jump from blinking LEDs to making things move. Making things move is like a those gateway drug – it leads to bigger things like robots, electric cars, and CNC machines. Computer Numerical Control (CNC) is the art of using a computer to control movement. The term is usually applied to machine tools, which cut, engrave, or perform other operations on wood, plastic, metal and other materials. In short, tools to make more things. It’s no surprise that hackers love CNCs. This week’s Hacklet is all about some of the best CNC projects on Hackaday.io!

charliexWe start with [Charliex] and Grizzly G0704 CNC Conversion. [Charliex] wanted a stout machine capable of milling metal. He started with a Grizzly  G0704, which is small compared to a standard knee mill, but still plenty capable of milling steel. [Charliex] added a Flashcut CNC conversion kit to his mill. While they call them “conversion kits” there is still quite a bit of DIY ingenuity required to get a system like this going. [Charliex] found his spindle runout was way out of spec, even for a Chinese mill. New bearings and a belt conversion kit made things much smoother and quieter as well. The modded G0704 is now spending its days cutting parts in [Charliex’s] garage.


makesmithNext up is [brashtim] with Makesmith CNC. Makesmith was [brashtim’s] entry in the 2014 Hackaday prize. While it didn’t win the prize, Makesmith did go on to have a very successful Kickstarter, with all the machines shipping in December of 2014. The machine itself is unorthodox. It uses closed loop control like large CNC machines, rather than open loop stepper motors often found in desktop units. The drive motors are hobby type servos.  We’re not talking standard servos either – [brashtim] picked microservos. By using servos, common hardware store parts, and laser cut acrylic, [brashtim] kept costs down. The machine performs quite well though, easily milling through wood, plastic, foam, and printed circuit boards.


reactronNext we have [Kenji Larsen] with Reactron material processor: Wireless CNC mill. [Kenji] started with a  Shapeoko 2, and gave it the Reactron treatment. The stock controller was replaced with a Protoneer shield, which is connected to the Reactron network via a HopeRF radio module. The knockoff rotary tool included with the kit was replaced with a DeWalt DW660 for heavy-duty jobs, or a quieter Black and Decker RTX-6. A tool mounted endoscope keeps an eye on the work. [Kenji] mounted the entire mill in a custom enclosure of foam and Roxul insulation. The enclosure deadens the sound, but it also keeps heat in. [Kenji] plans to add a heat exchanger to keep things cool while maintaining relative quiet in his shop.

cnc2Finally we have a [hebel23] with DIY Multiplex Plywood CNC Router. [hebel23] wanted to build a big machine within a budget – specifically a working area of  400 x 600 x 100 mm and a budget of 800 Euro. As the name implies, [hebel23] used birch plywood as the frame of his machine. He chose high quality plywood rather than the cheap stuff found in the big box stores. This gives the machine a stable frame. The moving components of the machine are also nice – ball screws, linear bearings, and good stepper controllers. The stepper motors themselves are NEMA-23 units, which should give the CNC plenty of power to cut through wood, plastic, and even light cuts on metal. [hebel23] spent a lot of time on the little details of his CNC, like adding an emergency stop switch, and a wire-chain to keep his gantry control wires from ending up tangled up in the work piece. The end result is a CNC which would look great in anyone’s workshop.

If you want more CNC goodness, check out our brand new CNC project list! Did I miss your project? Don’t be shy, just drop me a message on Hackaday.io. That’s it for this week’s Hacklet, As always, see you next week. Same hack time, same hack channel, bringing you the best of Hackaday.io!

Retrotechtacular: The J-57 Afterburner Engine

The J-57 afterburner engine appeared in many airplanes of notable make, including the F-101, -102, and -103. This USAF training film shows the parts of the J-57, explains the complex process by which the engine produces thrust, and describes some maintenance and troubleshooting procedures.

The name of this game is high performance. Precision thrust requires careful rigging of the engine’s fuel control linkage through a process called trimming. Here, the engine fuel control is adjusted with regard to several different RPM readings as prescribed in the manual.

One of the worst things that can happen to a J-57 is known as overtemping. This refers to high EGT, or exhaust gas temperature. If EGT is too high, the air-fuel ratio is not ideal. Troubleshooting a case of high EGT should begin with a check of the lines and the anti-icing valve. If the lines are good and the valve is closed, the instruments should be checked for accuracy. If they’re okay, then it’s time for a pre-trimming inspection.

In addition to EGT, engine performance is judged by RPM and PP7, the turbine discharge pressure. If RPM and PP7 are within spec and the EGT is still high, the engine must be pulled. It should be inspected for leaks and hot spots, and the seals should be examined thoroughly for cracks and burns. The cause for high EGT may be just one thing, or it could be several small problems. This film encourages the user to RTFM, which we think is great advice in general.

Continue reading “Retrotechtacular: The J-57 Afterburner Engine”

An Interview With Tesla Battery Hacker [wk057]

We covered [wk057] and his Tesla Model S battery teardown back in September. Since then we had some time to catch up with him, and ask a few questions.

You’ve mentioned that you have a (non hacked) Tesla Model S. What do you think of the car?

It’s the best car I’ve ever driven or owned, period. Not to get too into it, but, I love it. I’ve put almost 20,000 miles on it already in under a year and I have no real complaints. Software feature requests… but no complaints. After almost a year, multiple 1700-miles-in-a-weekend trips, and an overall great experience… I can never go back to a gas vehicle after this. It would be like going back to horses and buggies.

A salvage Tesla Lithium battery had to be expensive compared to a Lead Acid setup. What made you go with the Tesla?

Actually, if you consider that the Model S battery is already pre-setup as a high-capacity pack, contains the wiring to do so, and the modules are much more energy and power dense than any lead acid battery bank, it’s actually almost cheaper than a comparable lead acid bank and all the trimmings.

I haven’t officially weighed them, but the modules from the Model S battery are roughly 80 lbs. 80 lbs for a 5.3 kWh battery is around 15 lbs per kWh, which is impressive. For comparison, a decent lead acid battery will have a little over 1 kWh (of low-rate discharge capacity) and weigh almost the same.

Also, the Tesla pack is much more powerful than a lead acid bank of the same capacity.
Generally a lead acid battery bank would have a capacity that would only be realized with slow discharges, so, 1/20C. Much over that and you sacrifice capacity for power. 1/20C for an 85kWh pack is only 4.25kW, barely enough for a central air unit and some lights without losing capacity.

Now the Tesla pack can be discharged (based on how it does so in the vehicle) at up to 3.75C for short periods, and at 1/2C continuously without really affecting the overall capacity of the pack. That means I can run 10x more power than lead acid without a loss in overall charge capacity. Leads to a much more flexible battery solution since the loads will, in reality, always be so low that this will not even come into play with the Tesla pack, but would almost always be a factor with lead acid.

Charging is also somewhat better with the Tesla battery. Charge a lead acid battery at a 1/2C and it will boil. Charge the Tesla pack at 1/2C (42kW) and it might warm up a few degrees. Oh, and the charging losses at high rates are much less than lead acid also.
Overall, without continuing to yack about the technical aspects, it’s just a much better battery, takes up less space, weighs less, and has more power available.

There are likely decent arguments for other solutions, but the rest aside, this one won out because it was definitely more interesting.

Click past the break to read the rest of our interview with [wk057]!

Continue reading “An Interview With Tesla Battery Hacker [wk057]”