PCIe For Hackers: The Diffpair Prelude

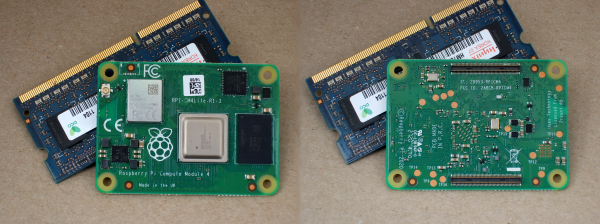
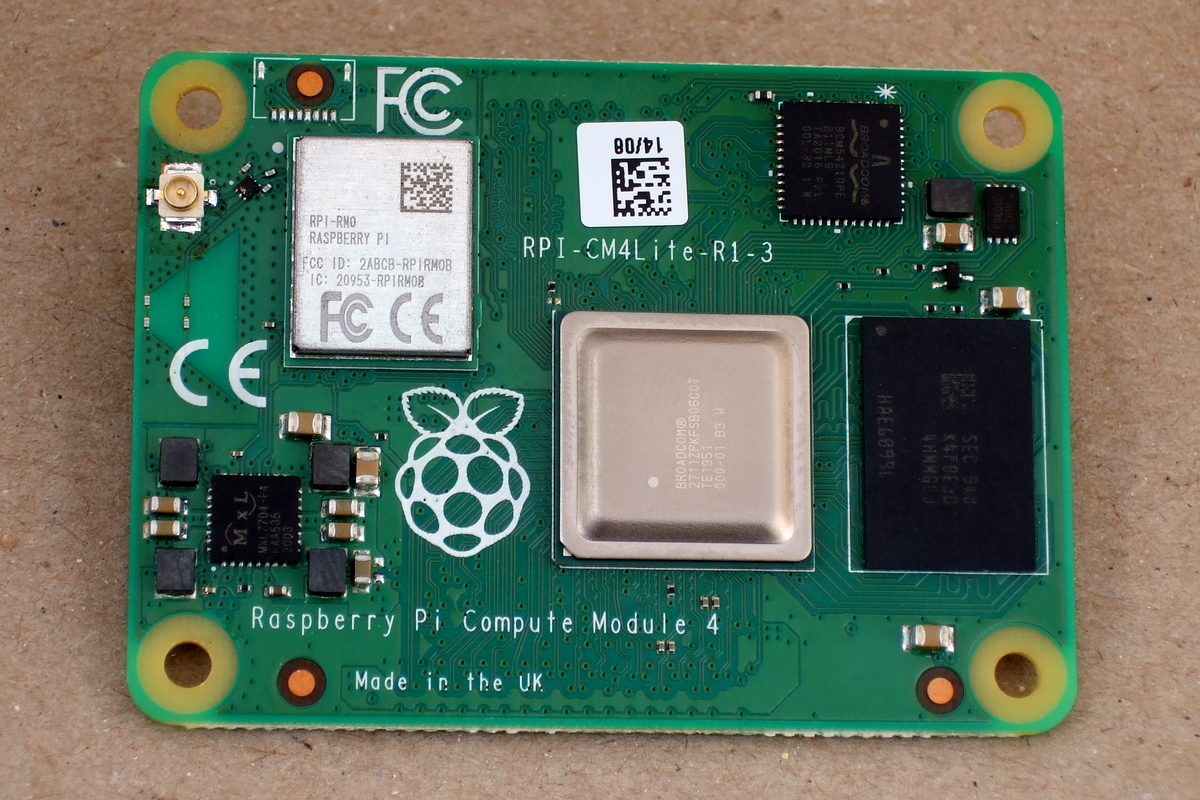
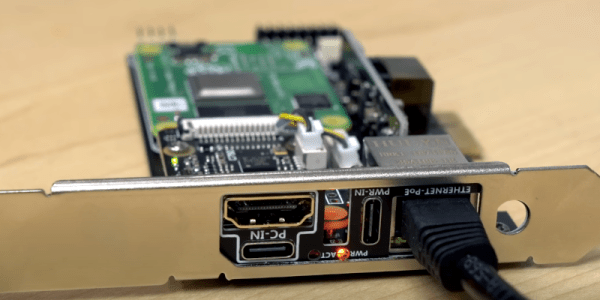
PCIe, also known as PCI-Express, is a highly powerful interface. So let’s see what it takes to hack on something that powerful. PCIe is be a bit intimidating at first, however it is reasonably simple to start building PCIe stuff, and the interface is quite resilient for hobbyist-level technology. There will come a time when we want to use a PCIe chip in our designs, or perhaps, make use of the PCIe connection available on a certain Compute Module, and it’s good to make sure that we’re ready for that.

PCIe is everywhere now. Every modern computer has a bunch of PCIe devices performing crucial functions, and even iPhones use PCIe internally to connect the CPU with the flash and WiFi chips. You can get all kinds of PCIe devices: Ethernet controllers, high-throughput WiFi cards, graphics, and all the cheap NVMe drives that gladly provide you with heaps of storage when connected over PCIe. If you’re hacking on a laptop or a single-board computer and you’d like to add a PCIe device, you can get some PCIe from one of the PCIe-carrying sockets, or just tap into an existing PCIe link if there’s no socket to connect to. It’s been two decades since we’ve started getting PCIe devices – now, PCIe is on its 5.0 revision, and it’s clear that it’s here to stay.

Continue reading “PCIe For Hackers: The Diffpair Prelude”

Raspberry Pi Grants Remote Access Via PCIe (Sort Of)

[Jeff] found a Raspberry Pi — well, the compute module version, anyway — in an odd place: on a PCI Express card. Why would you plug a Raspberry Pi into a PC? Well, you aren’t exactly. The card uses the PCI Express connector as a way to mount in the computer and connect to the PC’s ground. The Pi exposes its own network cable and is powered by PoE or a USB C cable. So what does it do? It offers remote keyboard, video, and mouse (KVM) services. The trick is you can then get to the PC remotely even if you need to access, say, the BIOS setup screen or troubleshoot an OS that won’t boot.

This isn’t a new idea. In fact, we’ve seen the underlying Pi-KVM software before, so if you don’t mind figuring out your mounting options for a Raspberry Pi, you probably don’t need this board. Good thing too. Judging by the comments, they are hard to actually buy — perhaps, due to the chip shortage.

Continue reading “Raspberry Pi Grants Remote Access Via PCIe (Sort Of)”

Picture of the setup described in the article, with PCI-E cards strewn around the desk, all interconnected, and a powered-up laptop, a large TV screen behind the laptop

This Laptop Gets All The PCIe Devices

Did you ever feel like your laptop’s GPU was sub-optimal, or perhaps that your laptop could use a SAS controller? [Rob Rogers] felt like that too, so now he has the only Dell Latitude business-class laptop that’s paired with an AMD RX580 GPU – and more. Made possible because of a PCIe link he hijacked from the WiFi card, he managed to get a SAS controller, a USB 3.0 expansion card, the aforementioned GPU and a dual-port server network adapter, all in a single, desk-top setup, as the video demonstrates.

First off, we see a PCIe packet switch board based on a PLX-made chip, wrapped in blue tape, splitting a single PCIe x1 link into eight. The traditional USB 3.0 cables carry the downstream x1 links to the four PCIe cards connected, all laid out on [Rob]’s desk. [Rob] demonstrates that all of the cards indeed function correctly – the SAS controller connected to a server backplane with whole 22 TB of storage in it, a few devices plugged into a USB 3.0 card, an Ethernet cable with an active link in the network card, and wrapping up the video showing 3DMark results of the RX580 clearly paired with the laptop’s mobile CPU. There’s four more spots on the PCIe switch card, so if you wanted to connect a few NVMe SSDs without the costly USB enclosures that usually entails, you absolutely could!

The setup on the desk, laptop-less, still interconnected and with the mini pci-e adapter visible
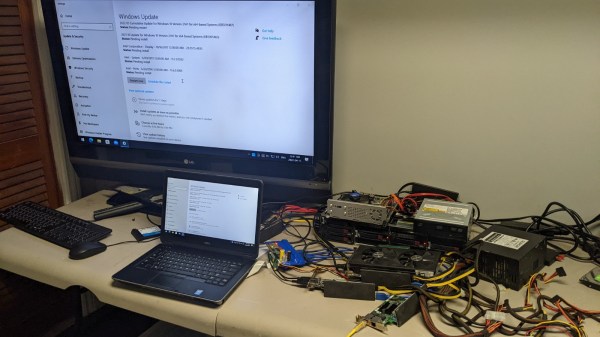
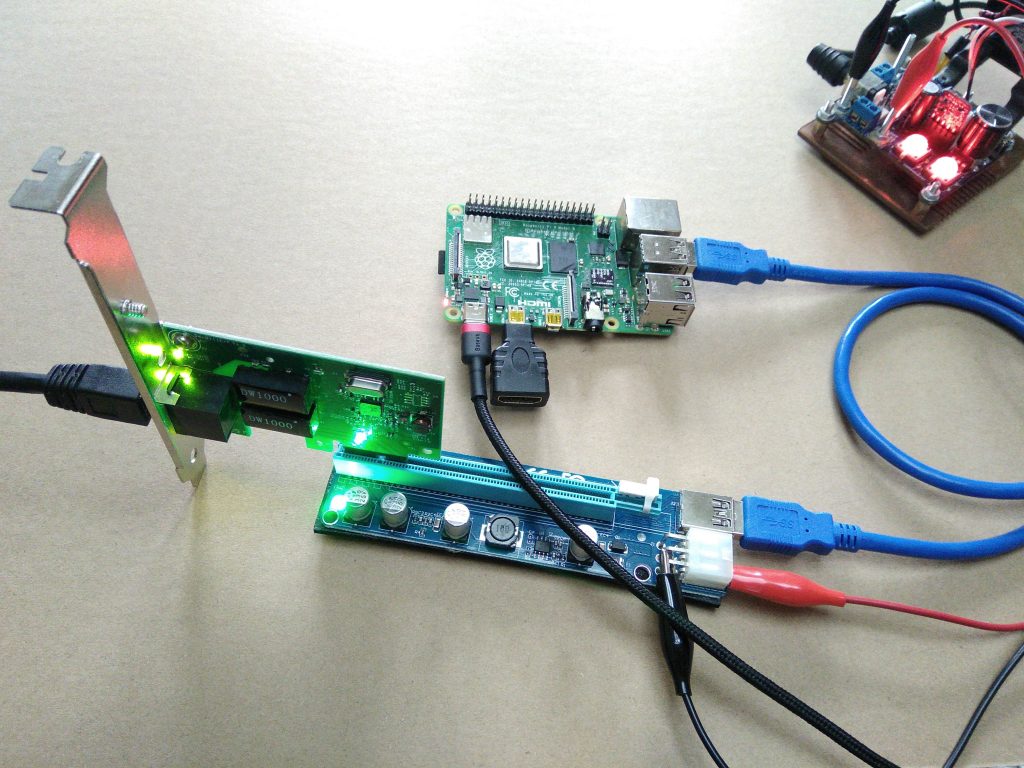
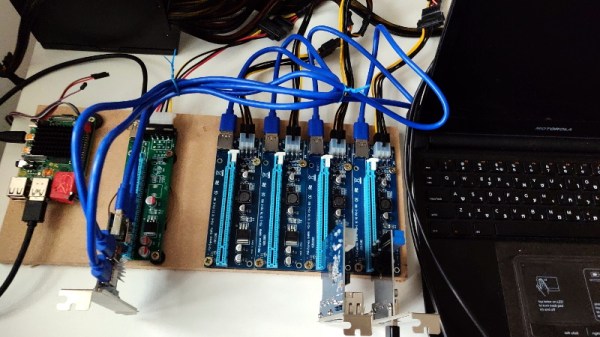
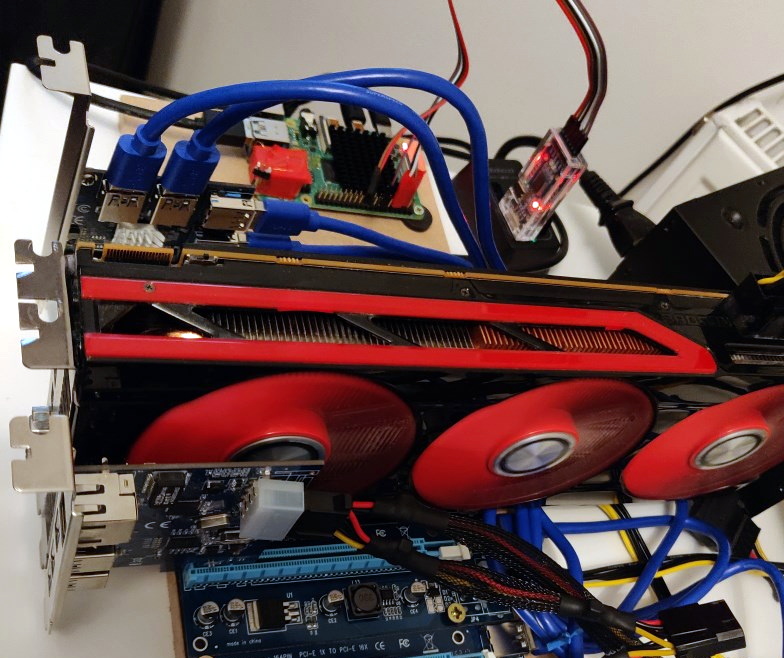
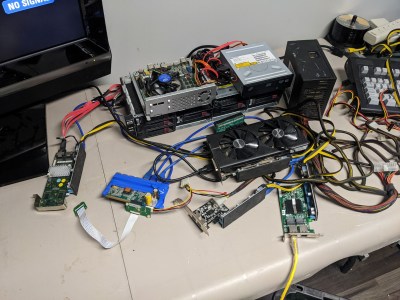
Now, there’s a reason why we don’t see more of such hacks. This seems to be a Latitude E5440 and the card is plugged into a mini-PCIe slot, which means the entire contraption is bound by a single PCI-E Gen2 x1 link, heavily offsetting the gains you’d get from an external GPU when, say, gaming. However, when it comes to the types and amount of peripherals, this is unbeatable – if you want to add an external GPU, high-speed networking and a SAS controller to the same computer that you usually lug around, there isn’t really a dock station you can buy for that!

Our collection of cool PCIe hacks has been growing, with hackers adding external GPUs through ExpressCard and mini PCIe alike, fitting PCIe slots where the factory refused to provide one, and extending the onboard M.2 slots for full-size PCIe cards. Nowadays, with these packet switches, it’s easy as ever to outfit any PCIe capable device with a whole slew of features – as this Raspberry Pi Computer Module motherboard with eleven PCIe slots demonstrates. Wonder how PCIe works, and why all of that is possible? We’ve written an entire article on that!

Continue reading “This Laptop Gets All The PCIe Devices”

New Raspberry Pi 4 Compute Module: So Long SO-DIMM, Hello PCIe!

The brand new Raspberry Pi Compute Module 4 (CM4) was just released! Surprised? Nope, and we’re not either — the Raspberry Pi Foundation had hinted that it was going to release a compute module for the 4-series for a long while.

The form factor got a total overhaul, but there’s bigger changes in this little beastie than are visible at first glance, and we’re going to walk you through most of them. The foremost bonuses are the easy implementation of PCIe and NVMe, making it possible to get data in and out of SSDs ridiculously fast. Combined with optional WiFi/Bluetooth and easily designed Gigabit Ethernet, the CM4 is a connectivity monster.

One of the classic want-to-build-it-with-a-Pi projects is the ultra-fast home NAS. The CM4 makes this finally possible.

If you don’t know the compute modules, they are stripped-down versions of what you probably think of as a Raspberry Pi, which is officially known as the “Model B” form-factor. Aimed at commercial applications, the compute modules lack many of the creature comforts of their bigger siblings, but they trade those for flexibility in design and allow for some extra functionality.

The compute modules aren’t exactly beginner friendly, but we’re positively impressed by how far Team Raspberry has been able to make this module accessible to the intermediate hacker. Most of this is down to the open design of the IO Breakout board that also got released today. With completely open KiCAD design files, if you can edit and order a PCB, and then reflow-solder what arrives in the mail, you can design for the CM4. The benefit is a lighter, cheaper, and yet significantly more customizable platform that packs the power of the Raspberry Pi 4 into a low-profile 40 mm x 55 mm package.

So let’s see what’s new, and then look a little bit into what is necessary to incorporate a compute module into your own design.

Continue reading “New Raspberry Pi 4 Compute Module: So Long SO-DIMM, Hello PCIe!”

Adding PCIe To Your Raspberry Pi 4, The Easier Way

Ever since people figured out that the Raspberry Pi 4 has a PCIe bus, the race was on to be the first to connect a regular PCIe expansion card to a Raspberry Pi 4 SBC. Now [Zak Kemble] has created a new approach, using a bridge PCB that replaces the VL805 USB 3 controller IC. This was also how the original modification by [Tomasz Mloduchowski] worked, only now it comes in a handy (OSHPark) PCB format.

After removing the VL805 QFN package and soldering in the bridge PCB, [Zak] confirmed that everything was hooked up properly and attempted to use the Raspberry Pi 4 with a PCIe extender. This showed that the Raspberry Pi would happily talk with a VL805-based USB 3.0 PCIe expansion card, as well as a Realtek RTL8111-based Ethernet card, but not a number of other PCIe cards. Exactly why this is is still unclear at this point.

As a bonus, [Zak] also found that despite the removal of the VL805 IC from the Raspberry Pi rendering its USB 3 ports useless, one can still use the USB-C ‘power input’ on the SBC as a host controller. This way one can have both PCIe x1 and USB on a Raspberry Pi 4.

This is the third iteration we’ve seen for using PCIe with the Pi. If you’re building on the work of [Thomasz Mloduchowski], which inspired [Colin Riley] to add expanders, and now this excellent hack by [Zak], we want to hear about it!

(Thanks to Itay for the tip)

PCIe Multiplier Expands Raspberry Pi 4 Possibilities

It probably goes without saying that hardware hackers were excited when the Raspberry Pi 4 was announced, but it wasn’t just because there was a new entry into everyone’s favorite line of Linux SBCs. The new Pi offered a number of compelling hardware upgrades, including an onboard PCI-Express interface. The only problem was that the PCIe interface was dedicated to the USB 3.0 controller; but that’s nothing a hot-air rework station couldn’t fix.

We’ve previously seen steady-handed hackers remove the USB 3.0 controller on the Pi 4 to connect various PCIe devices with somewhat mixed results, but [Colin Riley] has raised the bar by successfully getting a PCIe multiplier board working with the diminutive Linux computer. While there are still some software kinks to work out, the results are very promising and he already hasĀ  a few devices working.

Getting that first PCIe port added to the Pi 4 is already fairly well understood, so [Colin] just had to follow the example set by hackers such as [Tomasz Mloduchowski]. Sure enough, when he plugged the port multiplier board in (after a bit of what he refers to as “professional wiggling”), the appropriate entry showed up in lspci.

But there was a problem. While the port multiplier board was recognized by the kernel, nothing he plugged into it showed up. Checking the kernel logs, he found messages relating to bus conflicts, and one that seemed especially important: “devices behind bridge are unusable because [bus 02] cannot be assigned for them“. To make a long story short, it turns out that the Raspbian kernel is specifically configured to only allow a single PCI bus.

Fortunately, it’s an easy fix once you know what the problem is. Using the “Device Tree Compiler” tool, [Colin] was able to edit the Raspbian Device Tree file and change the PCI “bus-range” variable from <0x0 0x1> to <0x0 0xff>. From there, it was just a matter of plugging in different devices and seeing what works. Simple things such as USB controllers were no problem, but getting ARM Linux support for the NVIDIA GTX 1060 he tried will have to be a topic for another day.

[Thanks to Paulie for the tip.]

Catching The (PCIe) Bus

If you are trying to learn about FPGAs, there is only so far you can go with the usual blinking lights and VGA outputs. Eventually, you want to do something more. Although not terribly cheap, you can get FPGA boards in a PCIe form-factor and use them directly with PC software. Is it easy? Well, it isn’t flashing an LED, but there are tools to help. [Angelos Kyriakos] did a Master’s thesis on the very subject and used a project known as RIFFA to help with the task.

RIFFA (Reusable Integration Framework for FPGA Accelerators) is a simple framework for communicating data from a host CPU to an FPGA via a PCI Express bus. The framework requires a PCIe enabled workstation and an FPGA on a board with a PCIe connector. RIFFA supports Windows and Linux, Altera and Xilinx, with bindings for C/C++, Python, MATLAB, and Java. With proper design, RIFFA can transfer quite a bit of data in a short period of time between your computer and your FPGA.

Continue reading “Catching The (PCIe) Bus”