Sit Pretty On Would-Be Garbage With An Upcycled Chair

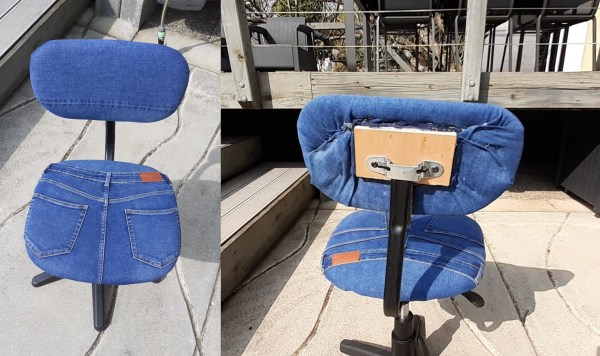
What’s the coolest thing about doing upholstery work? Aside from the fact that you end up with a new thing to sit on, sometimes the work only involves clever stapling, and no sewing is necessary. Such is the case with [wyldestyle]’s upcycled jeans chair, which started as a bare-wood swivel number from the dump. In fact, this project is almost completely made from recycled materials, except of course for those staples that hold it all together. And really, that heavy-duty stapler is likely the fanciest tool you’d need to make your own.

[wyldestyle] didn’t have any furniture foam, and we think that stuff is too expensive, anyway. So the padding treatment begins with a piece of thick Styrofoam that covers the seat screws and bolts. This is glued in place and trimmed down to match the contours of the chair’s seat and back.

Here’s where things gets tricky: the next step is wrapping over the stiff foam board with a few layers of that foam sheeting stuff that’s often used as packing material. This sheeting needs to be taut, but pull it too tight, and it will rip.

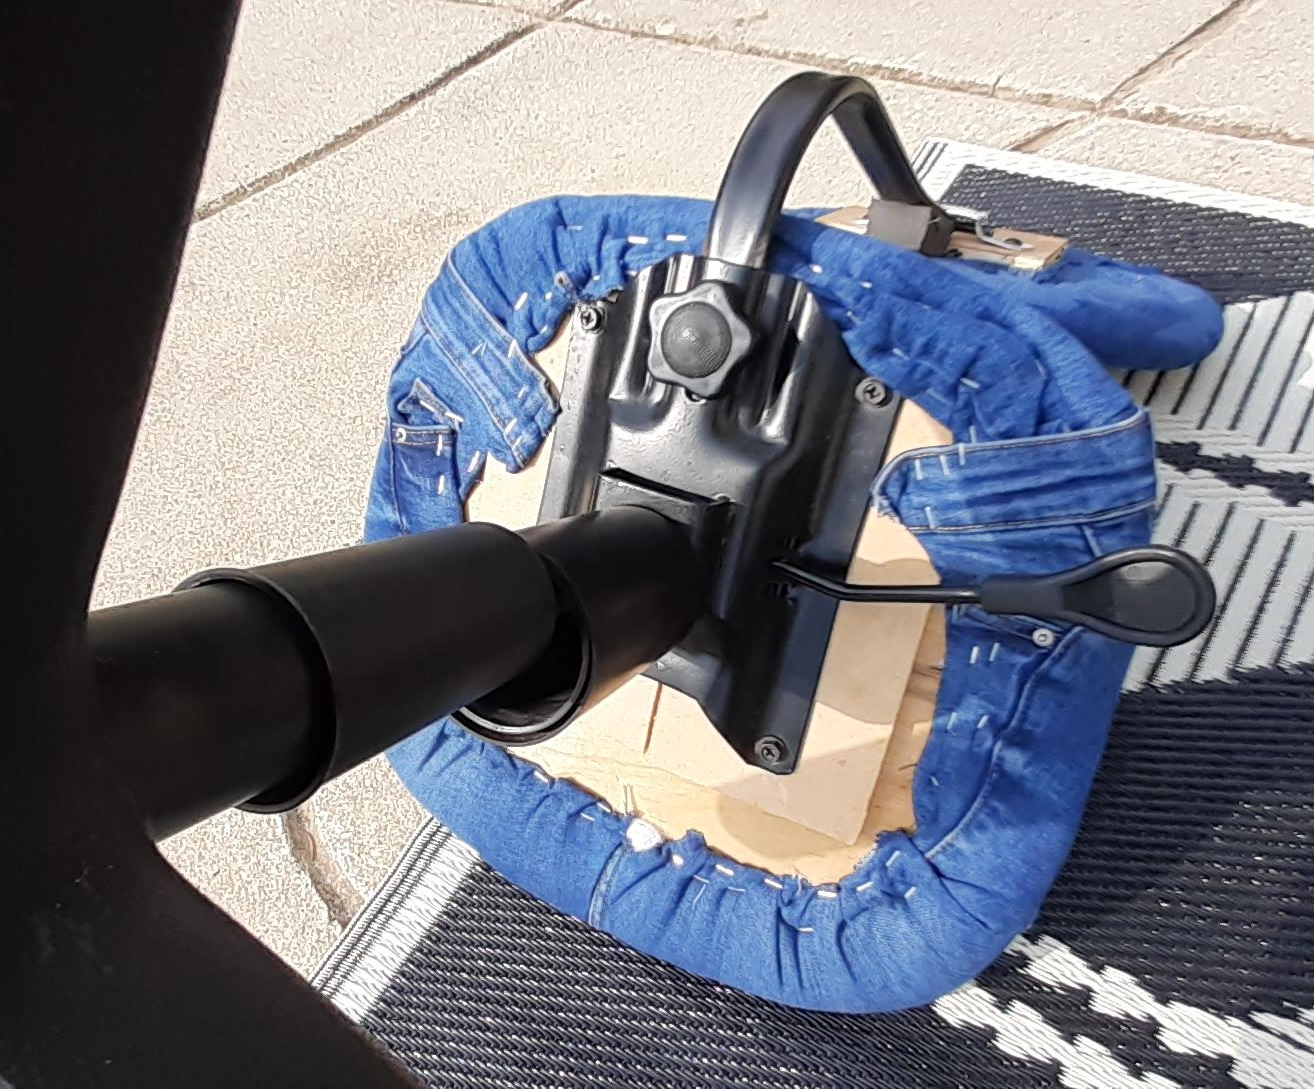
To add some loft to the chair, [wyldestyle] stretched and stapled the stuffing from an old pillow that was headed for the garbage. The final step is strategically scissoring jean scraps to fit, then stretching and stapling those to cover all the layers underneath. We like the way this chair looks, and would probably try to place pockets somewhere useful, like the back of the chair.

It’s a shame that so much denim goes to waste all over the world. There’s often a lot of life left in most of the fabric, which can be repurposed into all kinds of things, including eyeglasses frames using a wicked set of jigs.

Improved Graphics-to-Drawing Tablet Conversion

[Akaki Kuumeri] had an old Wacom Intuos digitizing graphics tablet collecting dust, and figured out how to non-destructively transform it into a drawing tablet. He was inspired by an old Hackaday post of a similar hack, but it required literally hacking a big hole into your Wacom tablet. Not wanting to permanently ruin the Wacom tablet,  [Akaki] instead designed a 3D printed frame which he holds in place with a pair of straps. The design files are available on Thingiverse. He names the project, incorrectly as he later points out, WacomOLED (it rhymes with guacamole, we think).

As for the screen, he buys an old third-generation iPad and removes its Retina display panel and the foil backing, which would otherwise block the stylus’s connection to the tablet. Toss in an HDMI driver board to connect the display to your computer, and presto — you have made your own a drawing tablet. Even if you don’t need a drawing tablet, [Akaki]’s hack is still interesting, if only to remind us that we can put custom HDMI displays into any project for $65 using this technique.

In the end, [Akaki] notes that unless you already have a non-graphical digitizing tablet laying around, it’s probably cheaper to just buy a iPad. This is not [Akaki]’s first go at user input devices — we wrote about his Smash Brothers game controller and flight controller yoke project last year.

Do any of you use a graphics tablet in your day to day workflow? Let us know in the comments below.

Continue reading “Improved Graphics-to-Drawing Tablet Conversion”

Pocket Sized Wii Sets The Bar For Portable Builds

Over the last few years we’ve seen several projects that convert Nintendo’s Wii into a handheld console by way of a “trimming”, wherein the system’s motherboard is literally cut down to a fraction of its original size. This is made possible due to the fact that the majority of the console’s critical components were physically arranged in a tight grouping on the PCB. While it might not be the smallest one we’ve ever seen, the Wii SPii by [StonedEdge] is certainly in the running for the most technically impressive.

It took [StonedEdge] the better part of a year to go from the first early 3D printed case concepts to the fully functional device, but we’d say it was certainly time well spent. The general look of the portable is strongly inspired by Nintendo’s own GameBoy Advance SP, albeit with additional buttons and control sticks. In terms of software, the system is not only able to run Wii and Gamecube game ISOs stored on its SD card, but also several decades worth of classic titles through the various console emulators available for the system.

The Wii SPii makes use of a particularly difficult variation of the Wii miniaturization concept known as the OMEGA trim, and is supported by a custom PCB that’s responsible for things like power management and audio output. As it was never designed to be particularly energy efficient, the trimmed Wii motherboard will deplete the system’s dual 18650 cells in about two and a half hours, but at least you’ll be able to get charged back up quickly thanks to USB-C PD support. All of the hardware just fits inside the custom designed case, which was CNC milled from acrylic and then sandblasted to achieve that gorgeous frosted look.

[StonedEdge] says the Wii SPii was inspired by the work of accomplished smallerizer [GMan], and even uses some of the open source code he developed for the audio and power management systems. In fact, given its lengthy list of acknowledgements, this project could even be considered something of a community affair. Just a few years after we marveled at a functional Wii being crammed into an Altoids tin, it’s truly inspiring to see what this dedicated group of console modders has been able to accomplish by working together.

Continue reading “Pocket Sized Wii Sets The Bar For Portable Builds”

SpaceX Drops The Ball On Catching Fairings

You don’t have to look very hard to find another rousing success by SpaceX. It’s a company defined by big and bold moves, and when something goes right, they make sure you know about it. From launching a Tesla into deep space to the captivating test flights of their next-generation Starship spacecraft, the private company has turned high-stakes aerospace research and development into a public event. A cult of personality has developed around SpaceX’s outlandish CEO Elon Musk, and so long as he’s at the helm, we can expect bigger and brighter spectacles as he directs the company towards its ultimate goal of putting humans on Mars.

Of course, things don’t always go right for SpaceX. While setbacks are inevitable in aerospace, the company has had a few particularly embarrassing failures that could be directly attributed to their rapid development pace or even operational inexperience. A perfect example is the loss of the Israeli AMOS-6 satellite during a static fire of the Falcon 9’s engines on the launch pad in 2016, as industry experts questioned why the spacecraft had even been mounted to the rocket before it had passed its pre-flight checks. Since that costly mistake, the company has waited until all engine tests have been completed before attaching the customer’s payload.

SpaceX’s concept art for propulsive landing

But sometimes the failure isn’t so much a technical problem as an inability for the company to achieve their own lofty goals. Occasionally one of Musk’s grand ideas ends up being too complex, dangerous, or expensive to put into practice. For instance, despite spending several years and untold amounts of money perfecting the technology involved, propulsive landings for the Crew Dragon were nixed before the idea could ever fully be tested. NASA was reportedly uncomfortable with what they saw as an unnecessary risk compared to the more traditional ocean splashdown under parachutes; it would have been an impressive sight to be sure, but it didn’t offer a substantive benefit over the simpler approach.

A similar fate recently befell SpaceX’s twin fairing recovery ships Ms. Tree and Ms. Chief, which were quietly retired in April. These vessels were designed to catch the Falcon’s school bus sized payload fairings as they drifted down back to Earth using massive nets suspended over their decks, but in the end, the process turned out to be more difficult than expected. More importantly, it apparently wasn’t even necessary in the first place.

Continue reading “SpaceX Drops The Ball On Catching Fairings”

Hacking An Air Assist For The Ortur Laser

Getting great results from a laser cutter takes a bit of effort to make sure all of the settings are just right. But even then, if the air between the material and the laser source is full of smoke and debris it will interfere with the laser beam and throw off the results. The solution is to add air assist which continuously clears that area.

Earlier this year I bought an Ortur laser engraver/cutter and have been hacking on it to improve the stock capabilities. last month I talked about putting a board under the machine and making the laser move up and down easily. But I still didn’t have an air assist. Since then I found a great way to add it that will work for many laser cutter setups.

I didn’t design any of these modifications, but I did alter them to fit my particular circumstances. You can find my very simple modifications to other designs on Thingiverse. You’ll also find links to the original designs and you’ll need them for extra parts and instructions, too. It is great to be able to start with work from talented people and build on each other’s ideas.

Continue reading “Hacking An Air Assist For The Ortur Laser”

Soviet Axe Restoration: Replace Or Repair?

What do you do with a cool-looking misfit guitar that has non-working built-in effects and some iffy design aspects? Do you try to fix it and keep it original, or do you gut it and strut your stuff with new bits from around the shop? This is the conundrum that [Tim Sway] finds himself in with this late 70s/early 80s Formanta Solo II straight out of the USSR. (Video, embedded below.)

[Tim] likes a lot of things about it (and we do, too), especially the acid green pick guard, the sparkly pickups, and the beefy bridge that lets him set the string spacing individually, on the fly. It even has a built-in phaser and distortion, but those aren’t working and may never have worked that well at all.

The non-working effects guts.

As you can see in the video below, [Tim] has already spent a few hours making it playable and a little more palatable in order to figure out what to do with it electronics-wise. He started by making the 9 V compartment big enough to actually fit a battery inside, and drilled out bigger holes for new tuners.

Interestingly, these guitars had a 5-pin DIN receptacle instead of a 1/4″ jack. [Tim] bought an adapter just in case, but once someone dug up a schematic and sent it over, he decided to rewire it with a 1/4″.

For all of its plus sides, [Tim] doesn’t like the headstock on this thing at all and found the neck to be too chunky for the modern guitarist, so he cut down the headstock, shaved down the neck a bit, and stained it dark. He also made a new nut out of what looks like rosewood. Then it was on to the more standard stuff — file down the frets and polish them, oil the fretboard, and clean up the body.

The point of this exercise is to make a usable guitar for the modern musician. As [Tim] says, this is not a particularly valuable guitar, nor is it rare, and it wasn’t built that well to begin with. One of the issues is the switches — they’re kind of light and cheesy feeling, and one of them is directly in the strum path. Will [Tim] change those out but fix the original effects, or will he make the thing completely his own? We wait with bated breath.

Want to mess around with cheap old guitars, but don’t know where to start? Our own [Sven Gregori] has your back with Axe Hacks.

Via adafruit

Portable Telescope Rolls Anywhere

Since Galileo began observing celestial objects with a telescope, an almost uncountable number of improvements have been made to his designs and methods. Telescopes can now view anything from radio waves to gamma waves, come in a wide range of sizes and shapes, and some are also fairly accessible to hobbyists as well. In fact, several homemade telescopes are specifically designed for ease of use, portability, and minimum cost, like this portable ball telescope. (Google Translate from Italian)

The telescope was designed and built by [andrea console] and features a ball-shaped mount for the mirror which was built from a bowl. Ball designs like this are easier to orient than other telescopes since the ball allows for quick repositioning in any direction, but the main focus of this project was to investigate focal length with various accessories while also being as portable as possible. To that end, the mount for the eyepiece is on a lattice that assembles and disassembles quickly, and the ball and other equipment are easily packed. This makes transportation quick and easy and reduces weight compared to a more traditional, or even Dobsonian, telescope.

This build is impressive not just from having an extremely portable telescope, but also from [andrea console]’s documentation of the optics in his build. It includes some adjustable parts which can increase the magnification and has detailed notes on all of the finer points of its operation. The ball telescope is a popular build, and we’ve recently seen others made out of parts from IKEA as well.

Continue reading “Portable Telescope Rolls Anywhere”