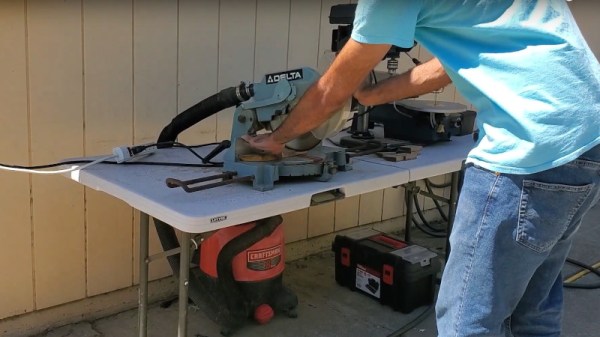
Is there anything more satisfying than building a useful machine from mostly junk? We think not. [ke4mcl] is a big fan of reusing and repurposing things before settling for the recycle bin, and was in the market for a vibratory parts tumbler to quickly clean off old, rusty bits and bobs in the course of repairing old electronics. For just $10, most of which went into a new tube of RTV silicone, [ke4mcl] built their own tumbler and came away with a reusable amplifier setup in the process.
We’ve all seen speaker cones dance, and they are definitely our favorite way to observe non-Newtonian fluids. This old woofer can still move, so it’s got a second life shaking sand and screws around until they’re somewhat shiny. The ideal woofer for this purpose has a rubber surround — that’s the ring that connects the speaker cone to the frame. [ke4mcl]’s foam-surrounded woofer works just as well, though it may not last as long.
After scrounging a container with a screw-top lid that fits the woofer perfectly, [ke4mcl] joined them together with a bead of RTV silicone. Since there weren’t any amplifiers lying around, [ke4mcl] spent a few bucks on a class D amplifier board and found a spare laptop brick to power it. An old phone with a tone generator app gets the sand churning with a friendly sine wave, which you can see in the videos after the break.
The other day, I saw this gigantic mutant strawberry on reddit that looked like it had either been growing in a radiation zone, hitting the gym regularly, or sprinkled with magic dust. I immediately felt more than mildly interested in this phenomenon, which is called fasciation.
As it turns out, fasciation is fairly rare occurrence that nonetheless occurs in a wide variety of vascular plants. These mutant strawberries may be a bit unnerving to look at, but they are totally safe to eat. The only problem is that you’re more likely to come across a fasciated dandelion or daisy out in the wild than a strawberry or pineapple at the grocery store because the so-called ugly produce tends to be weeded out.
Fasciation is essentially unregulated tissue growth that occurs when the apical meristem, better known as the growing tip of the plant strays from shooting upward in cylindrical fashion and instead splays out flat, resulting in ribbon-like plant stems, elongated or multiple flower heads, and semi-circular strawberries.
Although fasciation tends to present as a flattened main stem, the phenomenon can occur nearly anywhere in the plant — the root, stem, leaves, flower heads, or fruit. It can be localized to just one area, or it affect the entire plant.
Fasciation gets compared to cancer because it has a number of causes and ways of expression, but it’s not quite as harmful or scary. Some races of plants exhibit extreme expression of fasciation. While it’s not fatal, it’s also not ideal, because the condition can result in broken tissues, distorted organization, and a decrease in fertility.
Fasciation: How does it work?
One absolute unit of dandelion. Image via Wild Yorkshire
Fasciation has many causes both internal and external. Internally, it happens because of a hormonal imbalance in the growth cells, a bacterial or viral infection, or a random genetic mutation. There are also environmental causes, like chemical exposure, cold and frost exposure, or fungi, mite, and insect attacks.
The wonder of fasciation knows no geographical, climatic, ecological, or taxonomical bounds among vascular plants. It equally affects annuals, biennials, and perennials; woody and herbaceous plants; shrubs, trees, and vines. Although fasciation can occur in any vascular plant, it is quite common in the rose (includes strawberries), legume, sunflower, and cactus families, and is often found among dandelions and snapdragons.
Some vascular plants are prone to fasciation and prized for it, like the cockscomb (Celosia cristata) flower. A few fasciated flora have even become objects of reverence, like the Virgin Mary appearing on a slice of toast. There was once a fasciated pumpkin vine growing in South India. The twenty-foot-long fasciated portion drew huge crowds of people to worship it, believing the vine to be an incarnation of King Cobra or Naga Sarpa, messenger of the god Vishnu.
This spring, I’ll be looking high and low for abnormal dandelions and daisies. I’ve already started scouting the produce at the grocery store for giant strawberries and found these two in the same box. Won’t you join me? We’re probably more likely to find fasciated fruits or flowers than four-leaf clovers.
Star Trek famously showed its medical staff using a multifunctional device by the name of the tricorder. While no such devices are regularly used by current medical staff in this timeline, the concept is nonetheless appealing to fans of the show. [directive0] is one such person, and built himself a replica by the name of the Picorder 2.
Picorder 2 is inspired by the tricorders from Star Trek: The Next Generation. The name is an indication that this isn’t a first attempt; it builds upon an earlier project based on the models from the original series. It’s built with a nifty 3D printed case that folds in half, just like the real deal. Plenty of attention to detail has been invested in the decals and backlit controls to really complete the look.
Inside, a Raspberry Pi Zero W runs the show, paired with a bunch of sensors and accessories to get the job done. The human interface is via capacitive touch, and data is displayed on an ST7735 LCD display for output. The graphing software [directive0] built does a great job of creating a Trekesque aesthetic, displaying data from various in-built sensors, such as temperature, humidity, and barometric pressure. There’s also a low-resolution thermal imaging camera – and it’s hard to get more sci-fi than that.
While we’re a ways off from medically-useful tricorders, it’s nonetheless fun to see replica props that have some life and functionality built into them. The tricorder remains a popular build – we see them pretty regularly! – and we can’t wait to see where the fandom takes them over the next few years. Video after the break.
Like the looks of stained glass, but not the amount of work, skill, and materials involved? Well, [Northern Geometry] shows how to sidestep all that nonsense and use a 3D printed frame, epoxy, and some alcohol-based inks to create a pretty good fake stained-glass effect piece of art.
A smooth polypropylene board is the key to a glassy smooth back.
[Northern Geometry] has played with this idea before, but shares some refinements and tips on getting the best results. One suggestion is to begin by securely taping the 3D printed frame to a smooth polypropylene board as a backer. Giving the cured resin a smooth surface is important to get the right look, and since resin will not bond to the polypropylene, it can be used as a backer to get that done.
Once the frame is mounted, pour a small amount of epoxy into each cavity and ensure it gets into every corner, then let it cure. The thin bottom layer of resin will seal things as well as create a glassy-smooth backing that is the perfect foundation for finishing the piece with colored resin as needed.
Once that is done, and everything has had plenty of time to cure fully, just pop the piece off the board. Check it out in the video embedded below, where [Northern Geometry] shows the process from start to finish.
The days when a computer had a front panel bristling with switches and LEDs are long gone, and on balance that’s probably for the better in terms of ease of use, raw power, and convenience. That’s not to say there aren’t those who long for the days of flipping switches to enter programs, of course, but it’s a somewhat limited market. So unless you can find an old IMSAI or Altair, chances are you’ll have to roll your own — and you could do a lot worse than this aluminum beauty of a 6502 machine.
The machine is named PERSEUS-8 by its creator, [Mitsuru Yamada]. It follows earlier machines bearing the PERSEUS badge, all of them completely homebrewed and equally gorgeous. The PERSEUS-8 would have been an impressive machine had it come along 45 years ago — the 2 MHz version of the 6502, a full 16-bit memory address space, and 16 kB of battery-backed RAM. But the mechanical and electrical construction methods and the care and craftsmanship taken are where this build really shines. The case is fabricated out of aluminum sheets and angles and looks like it could have come from a server rack. The front panel is to die for — [Mitsuru] carefully brushed the aluminum before drilling the dozens of holes needed for the toggle switches and LEDs. And the insides are equally lovely — socketed chips neatly arranged on perfboard with everything wired up using period-correct wirewrap methods. Even the labels, both on the front panel and even on the motherboard, are a joy to behold.
If you crave experiencing or reliving what computing was like “back then” you have a lot of options. One option, of course, is to load an emulator and pretend like you have the hardware and software you are interested in. Another often expensive option is to actually buy the hardware on the used market. However, [mit-pdos] has a different approach: port the 6th edition of Unix to RISC-V and use a modern CPU to run an old favorite operating system.
It isn’t an exact copy, of course, but Xv6 was developed back in 2006 as a teaching operating system at MIT. You can find resources including links to the original Unix source code, commentary on the source code, and information about the original PDP 11/40 host computer on the project’s main page.
Stock tickers were telegraph-based machines from the 19th century, and quickly fell by the wayside with the advent of computer replacements from the 1960s onwards. However, there’s something charming about small machines that deliver us paper strips of information – as demonstrated by this notification ticker from [DIYprojects] (Russian language, Google Translate link).
The heart of the build is an Arduino Mini, which receives the text content of smartphone notifications via a Bluetooth module hooked up to its serial port. The machine mounts a small roll of paper strip, which is pulled along by a stepper motor fitted with a rubber earbud for added grip. The pen is moved along the paper by a servo using a Lambda mechanism to allow it to move nicely perpendicular to the paper’s direction of travel. Instead of moving the pen up and down, the paper is pushed into the pen by a solenoid mounted underneath.
It’s a fun little project, and one we can imagine being great for educational purposes. It teaches skills required to work with steppers, servos, solenoids and Bluetooth, all at once. It’s a little different from some other pen plotter designs, but the ticker format has a certain charm that’s hard to replicate any other way. Video after the break.