One of my favorite ways to think of engineering is that a glass is not half empty or half full, only twice as large as it needs to be. As useful as that idea is, it also means that I rarely put any effort into the aesthetics of my projects – I learn or accomplish what I need, desolder and recycle the components, then move on. Few of my projects are permanent, and custom cases tend to be non-reusable, so I skip the effort and expense.
Once in a while though, I need to make a gift. In that case form and function both become priorities. Thankfully, all that glitters is not gold – and over the last year I’ve been learning to etch the copper alloys commonly classified as ‘brass’. We’ve covered some truly excellentetched brass pieces previously, and I was inspired to try and etch larger pieces of metal (A4 and larger) without sacrificing resolution. I thought this would be just like etching circuits. In fact, I went through several months of failed attempts before I produced anything halfway decent!
Although I’m still working on perfecting my techniques, I’ve learned enough in the meantime to give a report. Read on if you’re feeling the need for more fancy brass signs in your life.
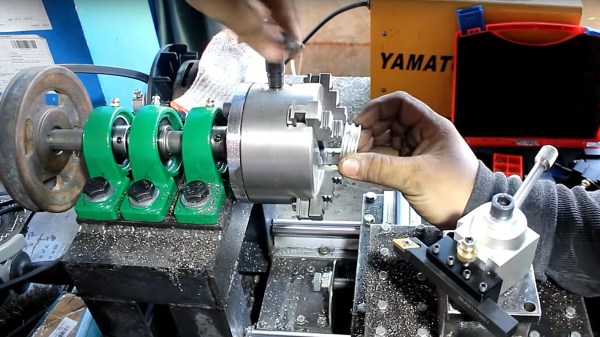
Most people have a piece of equipment without which they consider their workshop or bench to be incomplete. For some, it is an oscilloscope, for others a bandsaw, but for many metalworkers, it is a lathe. Lathes are expensive if you are seeking a good one, quite cheap if you don’t mind a bad one, and sometimes even free if you can deal with a good one that’s very old and needs six burly friends and a forklift truck to move.
There is another way to acquire a lathe, and it’s one that [Sek Austria] demonstrates in the video below the break: build your own. It’s a fascinating demonstration of how machine tools evolved with each successive generation made by the last at every increasing precision. He achieves good-enough construction from a welded steel frame with little more than hand tools, and though his result is by no means a perfect lathe it does allow him to achieve the next level of machining precision. Off the shelf come a set of optical guide rails and linear bearings along with a chuck and tool holder, but the rest is all his. And the washing machine motor driving it is a touch of pure class, even though he is embarrassed enough to cover it with a glove for filming. Sometimes in our community, we adopt the sledgehammer to crack a nut methodology, using CNC or similar techniques to fabricate things that can be made more speedily with less accomplished methods. We couldn’t help wincing at his hammering in the vice to create the lead screw nut bracket, though.
As homemade lathes go, this one is surprisingly conventional. Others have been fashioned from engine parts, or concrete.
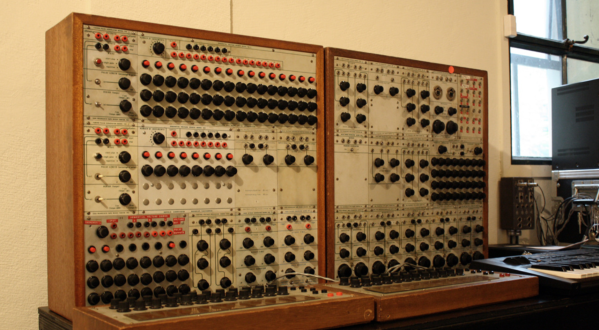
[Eliot Curtis] found himself a little too close to 1960’s counterculture while restoring a vintage modular synthesizer — he began tripping out on acid. The instrument in question is a Buchla Model 100. The Buchla is a modular synth. Instead of a keyboard, it used capacitance-sensitive touch plates. This particular model 100 was purchased by California State University East Bay Campus. The synth was popular for a while, but eventually fell into disuse, and was stored in a classroom closet.
Modular synths are experiencing a renaissance, as can be seen right here on Hackaday. The Buchla was pulled out of storage and given a proper restoration. [Eliot Curtis] is the Broadcast Operations Manager at KPIX 5, the San Francisco CBS TV station. He also is the hacker who volunteered to restore the Buchla.
During the restoration, [Curtis] found residue and crystals stuck under one of the knobs of the Control Voltage Processing Module. Was it flux, conformal coating, or something else? [Eliot] hit the board with contact cleaner and wiped it down. Within 45 minutes, he was feeling a strange tingling. It was the beginning of a nine-hour LSD trip. Three independent tests on the module came back positive for LSD.
Lysergic acid diethylamide (LSD for short) can be readily absorbed through the skin, which is exactly what happened to [Eliot]. Synth designer [Don Buchla] was friends with [Owsley Stanley], who worked for the Grateful Dead and allegedly cooked up some very potent LSD. Some of Buchla’s modules even found their way into Ken Keesey’s hands, where they wound up on his famous bus “further”. As it turns out there were rumors that modules had been dipped in LSD back in the ’60s. Why someone would do that to an electronic module, we’re not sure — they must have been on drugs. [Eliot] recovered from his brush with the ’60s and continued with the restoration with gloves on.
If there is a moral here, it should be to take precautions when working on equipment which might contain dangerous substances. We’ve learned this lesson ourselves cracking open broken laptops. You might find anything from coffee to soda, to pet urine or worse. A box of nitrile gloves definitely should be standard equipment in any hacker’s lab.
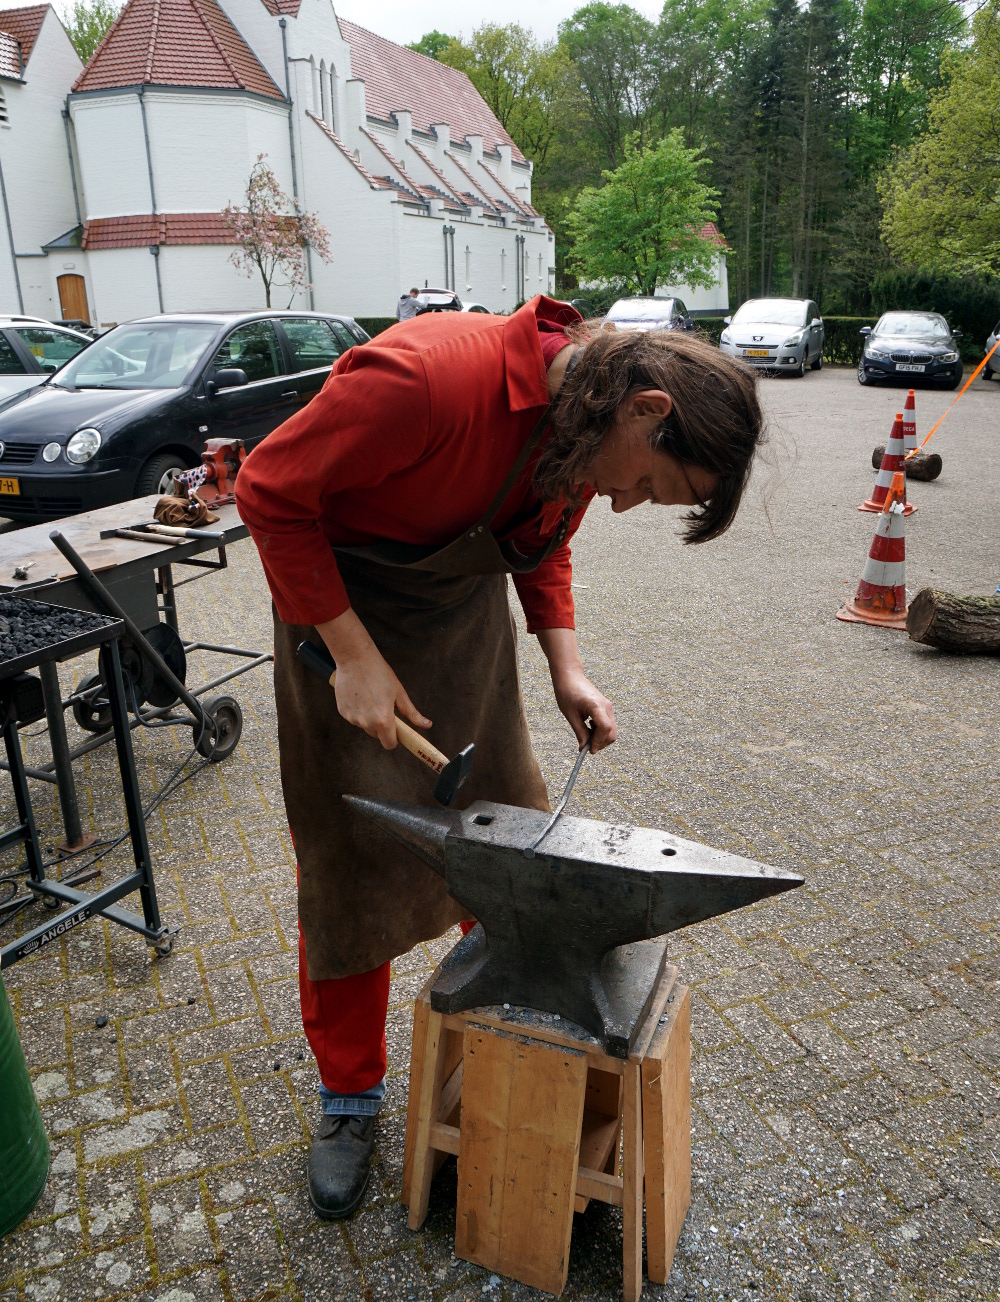
Regular readers will recognise this as the third part of a series exploring blacksmithing for those who have perhaps always fancied having a go but have never quite known where to start. It’s written from a position of the unusual experience of having grown up around a working forge, my dad may now be retired but he has a blacksmith specialising in architectural ironwork.
So far in this series we’ve looked in detail at the hearth and anvil that you might find in a typical forge, and delivered some pointers as to where you might look to find or even construct your own.Those are the signature pieces of equipment you’ll find in a forge, but with them alone you can still not be a blacksmith.
If I Had A Hammer…
An array of hammers of different weights and types.
Given an anvil, a hearth, and a vat of water to quench hot work in, and you’re almost set for your forge, but not quite. Most of a modern blacksmith’s workshop is the standard metalworking assortment of welders and angle grinders, but there is a set of tools that remain essential for blacksmithing alone. Your hammers are what connect you to the work, and can be as individual as the preferences of the blacksmiths themselves. There is no “right” answer to the question of what hammer you should use, instead you should use the one that works best for you. I instinctively favour a round-faced ball-peen hammer because that’s what my dad mostly used, but for example my Dutch friends use square faced cross-peen hammers. Blacksmiths will often make their own hammers to suit their needs, for example my dad made more than one using the high-quality steel of vehicle half-shafts as a starting point. Hardening them is a specialist skill in its own right, and I remember quite a few experiments before he perfected it.
It may well be stating the obvious, but the weight of the hammer influences how much energy it can impart to the work, and in turn the size of work that can be done. Casting an eye over my dad’s hammers the three workaday weights were 2 pound, 3 pound, and 4 pound (roughly 1 kg, 1.5 kg, and 2 kg), allowing a variety from fine work to heavier hitting of larger pieces. In a recent project, making a mediaeval nail, I selected an unsubtle lump hammer to draw out the larger square stock, and a much smaller one to finish it up, create the fine point, and relatively thin head. These are only a subsection of the hammers at his disposal though, like most blacksmiths he has a variety for all tasks, up to sledgehammers. I have frequently taken my turn either holding a piece with tongs while he used a sledgehammer, or on the sledgehammer myself.
Tongs, for Hot Gripping Moments
A selection of tongs, including some designed for very specific tasks. Our thanks to [Igor Nikolic] for making this picture possible.The constant companion to a blacksmith’s hammer is a pair of tongs. These can be bought from blacksmith’s suppliers, but making a pair can be a task within the reach of most smiths. Two identical sides are made from pieces of stock, with long thin handles, a flat piece to form the hinge, and whatever jaw piece is required. It feels like cheating to form the hole for the hinge on a drill press rather than on the anvil with a punch, but riveting it with a short piece of bar is a straightforward enough process. Blacksmiths will have a huge array of tongs with different jaws for specific jobs, built up over years as jobs demand it. If you cast your mind back to the Finnish smith pictured halfway down the first installment of this series, you’ll find several racks of tongs. A later episode of this series will look at making a set of tongs, though we can’t promise in advance the quality of the finished article.
A final moment for today should be spent on the subject of protective equipment. The hazards of blacksmithing are relatively uncomplicated, but some basic protective clothing is still very much worth having. The most obvious hazard is heat, you will be working in a noisy environment with red hot metal and fire. Though you will generate fewer sparks than you’d expect, I have a blacksmith’s leather apron and a set of fire-resistant overalls. Both of these are readily available from blacksmith’s supply stores, and are well worth the investment. There are also a lot of heavy and sharp items involved, not to mention hot particles on the floor. For that reason I also have a set of steel-toecapped workboots rated for hot particles. They aren’t the most elegant of footwear, but they have saved me from a few nasty moments.
I do not have any face protection specifically for blacksmithing, but depending on the work in hand there may be some sparks created. A polycarbonate face shield rated for hot particles should be available from any safety equipment supplier, and shouldn’t cost too much, and is an essential thing to own if you are doing any grinding or rotary wire brushing. Beyond that, there are also leather gloves designed for handling hot metal. I don’t use them because I prefer the feel of the hammer directly and am happy to use a pair of tongs to hold hot pieces of steel.
We’ve taken you through the basic workshop equipment of a blacksmith over the last few episodes of this series, and you should now have a basic idea of the safety kit you would be well advised to own. From this foundation we’ll next take you into the forge and start looking at a few blacksmithing techniques and simple projects, and along the way we’ll see some of the materials involved, too.
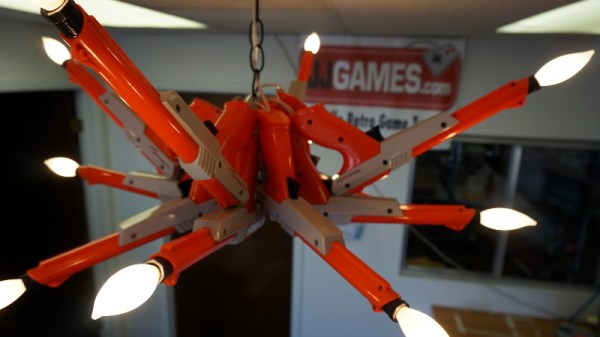
If there’s one thing our community is good at, it’s re-imagining redundant old hardware, particularly in the field of classic gaming consoles and their peripherals. Dead consoles have become new ones, Powergloves have ventured into virtual reality, and light guns, well, they’ve become novelty light fittings.
The [JJGames] Nintendo light gun chandelier will probably make collectors wince who prefer their retro hardware pristine, but it’s certainly an eye-catching conversation piece. The twelve guns are carefully disassembled and the Nintendo electronics removed, before a bulb holder and teardrop lamp is installed. Wiring is completed with twist caps, the guns are joined at the grip with some metal strips and glue, and a chain for ceiling attachment completes the ensemble. A dozen pieces of ireplacable retro hardware sacrificed for a novelty, or a masterpiece of interior decoration? You decide, though we’d opt for the latter in the context of the retro games based business in which it sits.
Our favourite NES lightgun hack ever has to be [Seb Lee-Delisle]’s one that fires a real laser. Meanwhile [JJGames] have made it here before in a similarly wanton use of classic Nintendo plastic, with their urinal made from SNES cartridges.
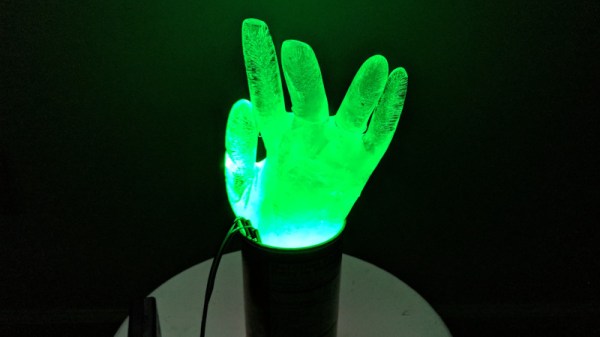
We see all manner of electronics enclosures pass through these hallowed pages. Lasercut wooden builds with fancy kerf bending, expertly prepared acrylic boxes, and even the occasional device cast in concrete. [Mike Kohn] decided that all of these were too permanent, however, and chose a different material – ice.
[Mike] shares the ups and downs of his experiments with electronics and frozen water. Initial tests with a circuit sealed in DAP Ultra Clear were largely successful. A tilt sensor was installed to allow the batteries to remain undrained during the freezing process, and once freed after a few hours of thawing, the circuit was operational. Later builds required some more work – the RC car in particular took a few attempts to avoid the mold leaking. The ice hands are a particular highlight, though – created with rubber gloves, these would be a remarkably spooky decoration come Halloween.
It’s a study in the techniques required to work with this ephemeral material, and there’s a few lessons to learn. Sealing electronics is good, and the best results are with simple circuits with a few LEDs that make everything glow nicely.
Ink! No matter the printer you’ve got, whether it be inkjet, laser or otherwise, it’s the consumables that will send you broke. At times, the cost of Hewlett-Packard black ink has exceeded the price per volume of human blood, and shareholders around the world have rejoiced.
As a retrocomputing reprobate, I have a personal dilection for printers of the vintage persuasion. My previous dalliances have involved fully fledged office copiers, but lately I’ve found myself tinkering with dot matrixes of a 1980s vintage. These workhorses are now reaching middle age, and as you’d expect, their ribbons are a little worse for wear after all this time.
Replacements are cheap enough for the most common printers, but shipping takes weeks and hackers are an impatient bunch. Plus, if you’ve got one of the more obscure models, it’s unlikely you’ll find a fresh cart just sitting on the shelf. It was these factors that spurred my good friend [Cosmos2000] and I into action.


![A selection of tongs, including some designed for very specific tasks. Our thanks to [Igor Nikolic] for making this picture possible.](https://hackaday.com/wp-content/uploads/2019/04/tong-selection.jpg)