[Sebastian and Karl-Johan] are two award-winning Danish Space Architects who are subjecting themselves to harsh, seemingly uninhabitable conditions, for science. The pair set out to build a lunar base that could land with the manned Moon missions in 2024. Like any good engineering problem, what good is a solution without testing? So the pair have placed their habitat in a Moon Analogue habitat and are staying in their habitat for two months. They want to really feel the remoteness, the bitter cold, and the fatigue of actually being on the moon. So far they are about halfway through their journey and expect to return home in December 2020.
When asking themselves where on Earth is it most like the Moon, they came up with Moriusaq, Greenland. It’s cold, remote, in constant sunlight this time of year, and it is a vast white monochrome landscape just like the moon. The first moon settlement missions are expected to be at the South Pole of the Moon, as known as the Peak of Eternal Light.
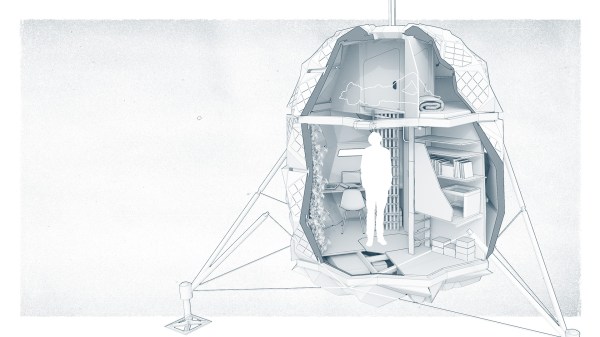
 The habitat itself is a testament to the duo’s ingenuity. The whole structure folds to fit the tight space and weight requirements of rockets. Taking 2.9m3 (102 ft3) when stored, it expands 560% in volume to 17.2m3 (607 ft3). In Greenland, the structure needs to withstand -30ºC (-22ºF) and 90 km/h winds.
Because the South Pole is in constant sunlight, the temperature varies much less there than on the rest of the Moon, which makes Greenland a very good analogue temperature-wise. The foldable skin is covered in solar panels, both on the top of the bottom. The highly reflective nature of the Moon’s surface makes it easy to capture the light bouncing up onto the bottom of the habitat.
Several other bits of technology have been included onboard, like a 3D printer, a circadian light stimulation system, an algae reactor, and a weather simulation. Since both the Moon and Greenland are in constant sunlight, the pod helps regulate the circadian rhythms of the occupants by changing the hue and brightness throughout the day. The weather simulation tries to break up the monotony of space by introducing weather like a stormy day or rainbow colours.
Their expedition is still ongoing and they post daily mission updates. While some might call their foray into the unknown madness, we call it bold. Currently, NASA is planning its Artemis mission in 2024 and we hope that the lessons learning from the Lunark and other experiments culminate in a better experience for all astronauts.