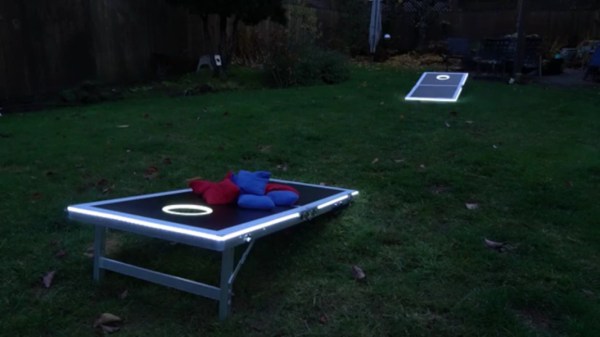
How do you instantly make any game better? By lighting it up and playing at night. We would normally say ‘drinking’, but we’re pretty sure that drinking is already a prerequisite for cornhole — that’s the game where you toss bean bags at holes in angled boards.
Players get a point and a song for landing a bag on top of the board, and three points and a different song for making it in the hole. We love the Easter egg — anyone who manages to trip both the vibration sensor and the break-beam detector at the same time will be treated to the sound of a flock of honking geese. Check out the build journey after the break.
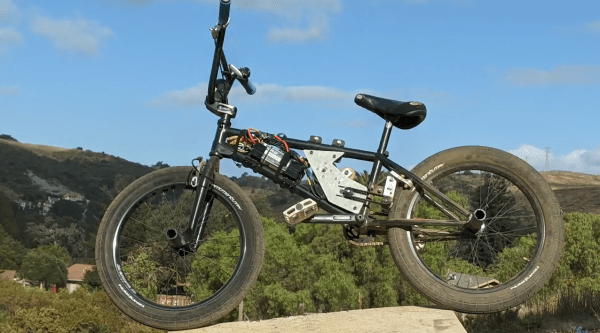
Electric bikes have increased in popularity dramatically over the past few years, and while you can easily buy one from a reputable bicycle manufacturer, most of us around here might be inclined to at least buy a kit and strap it to a bike we already have. There aren’t kits available for every bike geometry, though, so if you want an electric BMX bike you might want to try out something custom like [Shea Nyquist] did with his latest build. (Video, embedded below.)
BMX frames have a smaller front triangle than most bikes, so his build needed to be extremely compact. To that end, it uses two small-sized motors connected together with a belt, which together power a friction drive which clamps against the rear tire to spin it directly. This keeps the weight distribution of the bike more balanced as well when compared to a hub drive, where the motor is installed in the rear wheel. It also uses a more compact lithium polymer battery pack instead of the typical 18650 lithium ion packs most e-bikes use, and although it only has a range of around three miles it’s more than enough charge to propel it around a skate park.
The build boasts impressive numbers too, at 2.5 kW peak power per motor. This puts it in electric motorcycle territory, and it’s indeed fast despite its small stature. For a true high speed e-bike experience, though, you’ll need a slightly larger frame and motor even if it means tossing safety out of the window. Continue reading “Electric BMX With Friction Drive”→
The world of custom keyboards has over the years developed its work into an art form, as mechanical key switches meet USB-HID capable microcontrollers for a plethora of designs as individual as their creators. This was however not always the case, and from the days of 8-bit home computers onwards making a custom keyboard often meant taking a surplus one from elsewhere and adapting its matrix to suit whatever controller interface was at hand. [Julian Calaby]’s USB conversion of an Apple Extended keyboard may be unusual in this day and age and was probably a late example even 15 years ago when he made it, but it remains a glorious piece of bodge-wire hardware hacking at its finest.
The task at hand with this type of conversion is to cut the matrix PCB tracks and replace them with soldered wires to create the new matrix required. This can then be wired to the controller, which in [Julian]’s case came from a cheap USB keyboard. He added a small USB hub to allow for a pair of USB sockets where Apple had put an ADB socket, making for quite a decent older keyboard with an unexpected USB interface.
Now older and wiser, he has plans to revisit his old keyboard with a modern microcontroller board, and needs to revisit the matrix again and give the peripheral new life. We still like the original though, as it captures a moment in time when keyboard matrix hacking made sense, and reminds us of our own youthful hardware follies.
Lacking a DVD drive, [jg] was watching a TV series in the form of a bunch of .avi video files. Of course, when every episode contains a full intro, it is only a matter of time before that gets too annoying to sit through.
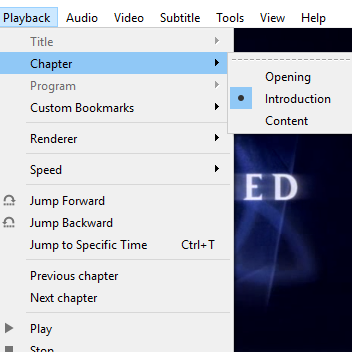
Chapter breaks reliably inserted around the intro, even when it doesn’t always occur in the same place.
The usual method of skipping the intro on a plain video file is a simple one:
Manually drag the playback forward past the intro.
Oops that’s too far, bring it back.
Ugh reversed it too much, nudge it forward.
Okay, that’s good.
[jg] was certain there was a better way, and the solution was using audio fingerprinting to insert chapter breaks. The plain video files now have a chapter breaks around the intro, allowing for easy skipping straight to content. The reason behind selecting this method is simple: the show intro is always 52 seconds long, but it isn’t always in the same place. The intro plays somewhere within the first two to five minutes of an episode, so just skipping to a specific timestamp won’t do the trick.
The first job is to extract the audio of an intro sequence, so that it can be used for fingerprinting. Exporting the first 15 minutes of audio with ffmpeg easily creates a wav file that can be trimmed down with an audio editor of choice. That clip gets fed into the open-source SoundFingerprinting library as a signature, then each video has its audio track exported and the signature gets identified within it. SoundFingerprinting therefore detects where (down to the second) the intro exists within each video file.
Marking out chapter breaks using that information is conceptually simple, but ends up being a bit roundabout because it seems .avi files don’t have a simple way to encode chapters. However, .mkv files are another matter. To get around this, [jg] first converts each .avi to .mkv using ffmpeg then splices in the chapter breaks with mkvmerge. One important element is that the reformatting between .avi and .mkv is done without completely re-encoding the video itself, so it’s a quick process. The result is a bunch of .mkv files with chapter breaks around the intro, wherever it may be!
The script is available here for anyone to play with, and the project page is a good learning reference because [jg] kindly provides all the command-line options used for each tool. Interested in using audio fingerprinting in your own projects? Remember to also check out Olaf, the Overly Lightweight Acoustic Fingerprinting method that can be implemented in embedded systems and web browsers.
Netherlands Defence MInister Ank Bijleveld’s Tweeted picture, with the access details blacked out by Daniël Verlaan.
Like any other video call, if you had the link you could enter the meeting. So when Netherlands Defence Minister Ank Bijleveld Tweeted a photo of a video call last Friday, the address bar of the browser gave away the secret to anyone with a keen eye. Dutch journalist Daniël Verlaan working for the broadcaster RTL saw the URL on the screen and deduced the login credentials for the meeting.
We say “deduced”, but in fact there were five of the six digits in the PIN in the clear in the URL, leaving him with the difficult task of performing a one-digit brute-force attack and joining with the username “admin”. He joined and revealed his presence, then was admonished for committing a criminal offence before he left.
On one level it’s an opportunity for a good laugh at the expense of the defence ministers, and we certainly wouldn’t want to be Ank Bijleveld or probably the EU’s online security people once the inevitable investigation into this gets under way. It seems scarcely credible that the secrecy on such a high-security meeting could have sat upon such a shaky foundation without for example some form of two-factor authentication using the kind of hardware available only to governments.
EU policy is decided not by individual ministries but by delicate round-table summits of all 27 countries. In a pandemic these have shifted to being half-online and half in-real-life, so this EU defence ministers’ meeting had the usual mosaic video feed of politicians and national flags. And one Zoom-bombing journalist.
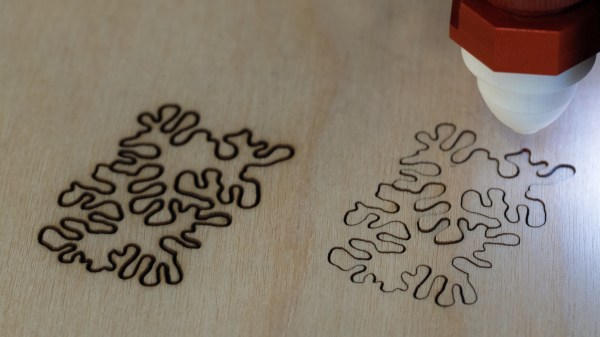
[Jesse]’s modification doesn’t affect the laser beam itself; it is an improvement on the air assist, which is the name for a constant stream of air that blows away smoke and debris as the laser burns and vaporizes material. An efficient air assist is one of the keys to getting nice clean laser cuts, but [Jesse] points out that a good quality air assist isn’t just about how hard the air blows, it’s also about how smoothly it does so. A turbulent air assist can make scorch marks worse, not better.
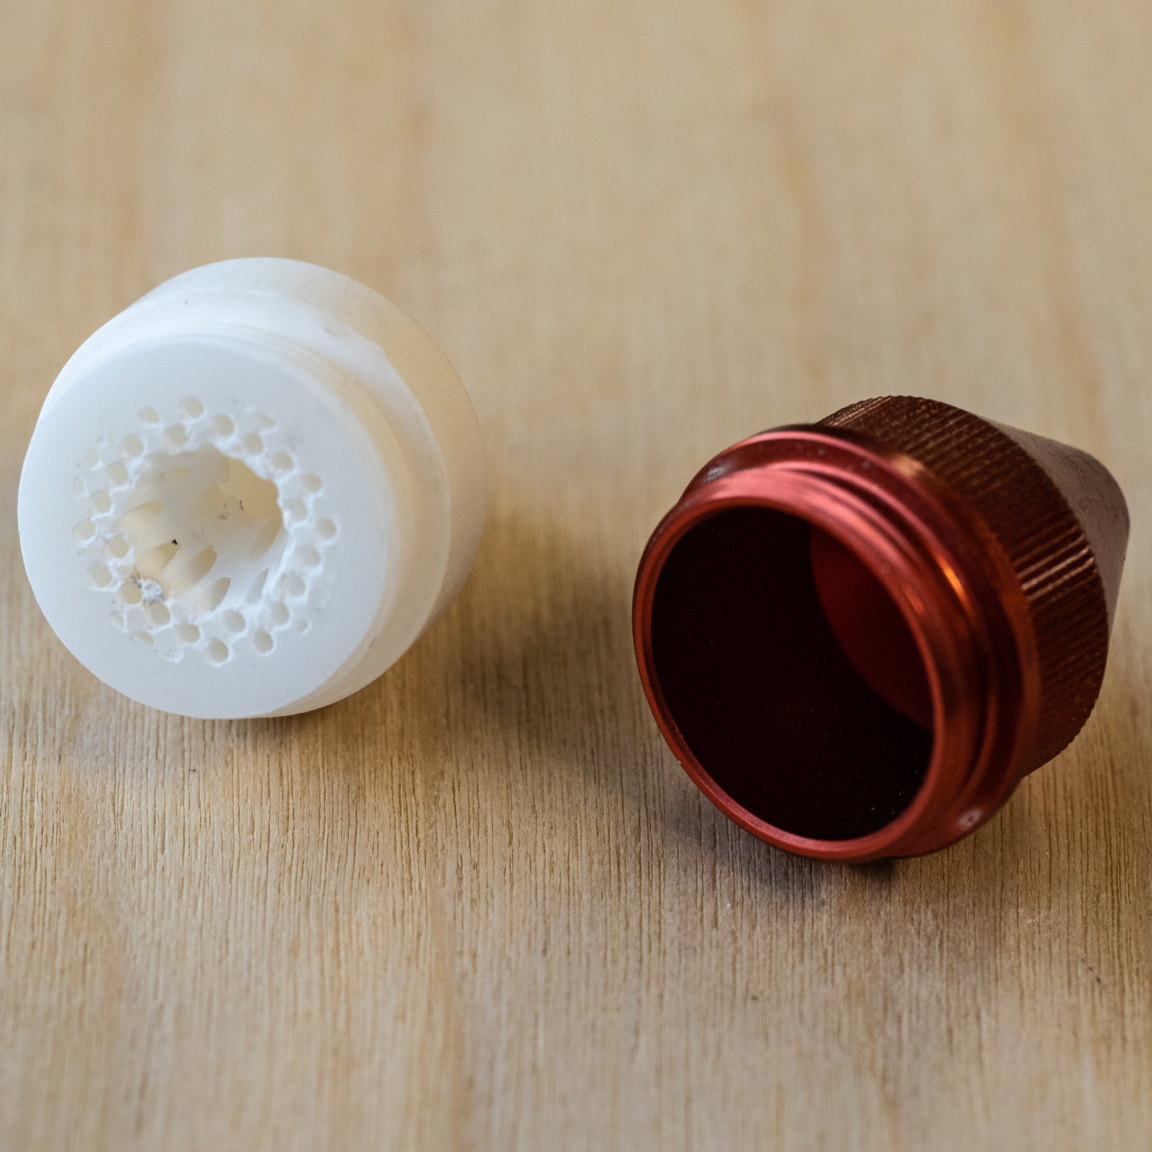
3D-printed nozzle to promote laminar air flow on the left, stock nozzle on the right.
As an experiment to improve the quality of the air flowing out the laser nozzle, [Jesse] researched ways to avoid turbulence by creating laminar flow. Laminar flow is the quality of a liquid having layers flowing past one another with little or no mixing. One way to do this is to force liquid through individual, parallel channels as it progresses towards a sharply-defined exit nozzle. While [Jesse] found no reference designs of laminar flow nozzles for air assists, there were definitely resources on making laminar flow nozzles for water. It turns out that interest in such a nozzle exists mainly as a means of modifying Lonnie Johnson’s brilliant invention, the Super Soaker.
Working from such a design, [Jesse] created a custom nozzle to help promote laminar flow. Sadly, a laser cutter head carries design constraints that make some compromises unavoidable; one is limited space, and another is the need to keep the laser’s path unobstructed. Still, after 3D printing it in rigid heat-resistant resin, [Jesse] found a dramatic improvement in the feel of the air exiting the nozzle. Some test cuts confirmed a difference in performance, which results in a noticeably cleaner kerf without scorching around the edges.
One of the things [Nervous System] does is make their own custom puzzles, so any improvement to laser cutting helps reliability and quality. When production is involved, just about everything matters; a lesson [Nervous System] shared when they discussed making the best plywood for creating their puzzles.
While SpaceX’s constellation of Starlink satellites is nowhere near its projected final size, the company has enough of the birds zipping around in low Earth orbit to start a limited testing period they call the Better Than Nothing Beta. If you’re lucky enough to get selected, you have to cough up $500 for the hardware and another $100 a month for the service. Despite the fairly high bar for getting your hands on one, [Kenneth Keiter] decided to sacrifice his Starlink dish to the teardown Gods.
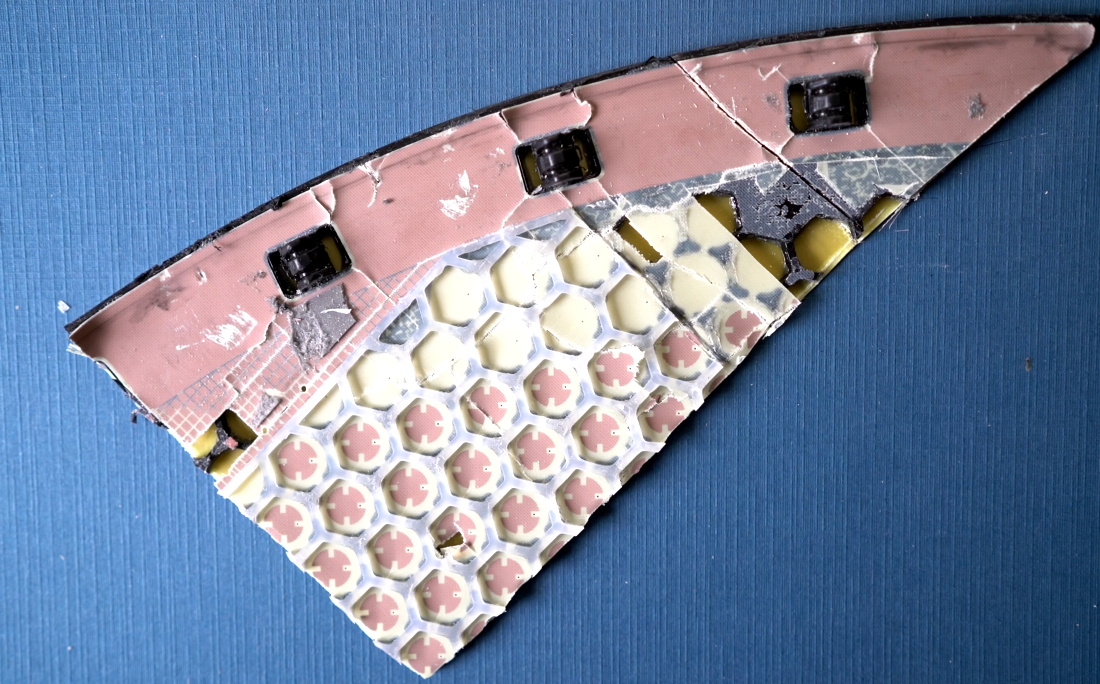
We say sacrifice because [Kenneth] had to literally destroy the dish to get a look inside. It doesn’t appear that you can realistically get into the exceptionally thin antenna array without pulling it all apart, thanks in part to preposterous amount of adhesive that holds the structural back plate onto the PCB. The sky-facing side of the phased array, the key element that allows the antenna to track the rapidly moving Starlink satellites as they pass overhead, is also laminated to a stack-up comprised of plastic hexagonal mesh layers, passive antenna elements, and the outer fiberglass skin. In short, there are definitely no user-serviceable parts inside.
The dish hides many secrets under its skin.
Beyond attempting to analyze the RF magic that’s happening inside the antenna, [Kenneth] also takes viewers through a tour of some of the more recognizable components of the PCB; picking out things like the Power over Ethernet magnetics, a GPS receiver, some flash storage, and the H-Bridge drivers used to control the pan and tilt motors in the base of the dish.
It also appears that the antenna is a self-contained computer of sorts, complete with ARM processor and RAM to run the software that aims the phased array. Speaking of which, it should come as no surprise to find that not only are the ICs that drive the dizzying array of antenna elements the most numerous components on the PCB, but that they appear to be some kind of custom silicon designed specifically for SpaceX.