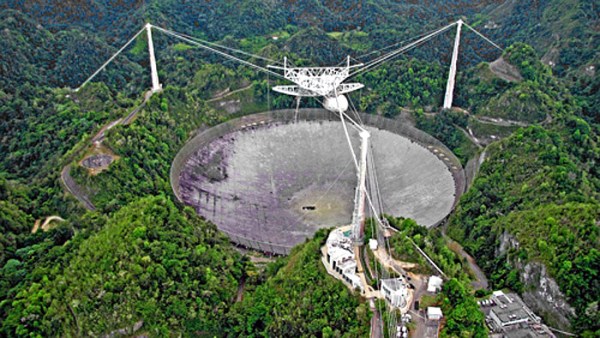
Making Music With A Go Board Step Sequencer

Ever wonder what your favorite board game sounds like? Neither did we. Thankfully [Sara Adkins] did, and created a step sequencer called Let’s Go that uses the classic board game Go as input.

In the game Go, two players place black and white tokens on a grid, vying for control of the board. As the game progresses, the configuration of game pieces gets more complex and coincidentally begins to resemble Conway’s Game of Life (or a weird QR Code). Sara saw music in the evolving arrangement of circles and transformed the ancient board game into a modern instrument so others could hear it too.

To an observer, [Sara’s] adaptation looks fairly indistinguishable from the version played in China 2,500 years ago — with the exception of an overhead webcam and nearby laptop, of course. The laptop uses OpenCV to digitize the board layout. It feeds that information via Open Sound Control (OSC) into popular music creation software Max MSP (though an open-source version could probably be implemented in Pure Data), where it’s used to control a step sequencer. Each row on the board represents an instrumental voice (melodic for white pieces, percussive for black ones), and each column corresponds to a beat.

Every new game is a new piece of music that starts out simple and gradually increases in complexity. The music evolves with the board, and adds a new dimension for players to interact with the game. If you want to try it out yourself, [Sara] has the project fully documented on her website, and all of the code is available on GitHub. Now we’re just left wondering what other games sound like — [tinkartank] already answered that question for chess, but what about Settlers of Catan?

Continue reading “Making Music With A Go Board Step Sequencer”

Minimal TinyAVR 0 Programming

When [Alain] wanted to use some of the new TinyAVR 0 chips — specifically, the Attiny406 — it seemed overkill to use the Windows IDE. There are plenty of sources of information on programming other AVR chips using simple command line tools, but not for these newer 0-series parts which use a new programming protocol known as UPDI. That led to a deep diving into how to program a TinyAVR 0 with a text editor, makefile, and USB-to-serial cable.

The Attiny406 has 4K of flash, 256 bytes of RAM and can run at 20 MHz with no external clock. You might think programming would be similar to a regular AVR part, but these tiny devices use UPDI (Unified Programming and Debug Interface) which uses 3 pins for programming. Older devices used different protocols.

It is very easy to create a UPDI programmer. A USB to logic-level serial cable and a 4.7K resistor is all it takes. There’s Python code that knows how to drive the protocol, too. You can also use the logic-level serial port on the Raspberry Pi with some device tree modifications explained in the code’s documentation.

[Alain] made a nice breakout board for the device. It fits a breadboard, allows for 5V or 3.3V operation, and has an LED and switch. Nothing fancy, but handy. Once you know how to ship a hex file to the chip, the rest is pretty standard. While the AVR version of gcc doesn’t cross-compile for the ATTiny out of the box, there is a device pack from Microchip that enables that feature.

The trend is to go to bigger processors, not smaller, but when you need to cram something in a small space, save a few pennies per unit, or draw very little power, these tiny processors can be just the ticket. The processors may be small, but if you work you can do some pretty big things with them.

This Tabletop Lighthouse Will Get Your Attention

If you wear headphones around the house with any regularity, you’re probably missing out on a lot of audio cues like knocks at the door, people calling your name, or maybe even the smoke alarm. What if you had a visual indicator of sound that was smart enough to point it out for you?

That is the point of [Jake Ammons’] attention-getting lighthouse, designed and built in two weeks’ time for Architectural Robotics class. It detects ambient noise and responds to it by focusing light in the direction of the sound and changing the color of the light to a significant shade to indicate different events. Up inside the lighthouse is a Teensy 4.0 to read in the sound and spin a motor in response.

[Jake]’s original directive was to make something sound-reactive, and then to turn it into an assistive device. In the future [Jake] would like to add more microphones to do sound localization. We love how sleek and professional this looks — just goes to show you what the right t-shirt stretched over 3D prints can do. Check out the demo after the break.

Seaside lighthouses once used gas lights giant Fresnel lenses, but now they use LEDs. A company in Florida is using CNC machines to crank out acrylic Fresnels.

Continue reading “This Tabletop Lighthouse Will Get Your Attention”

Vizy “AI Camera” Wants To Make Machine Vision Less Complex

Vizy, a new machine vision camera from Charmed Labs, has blown through their crowdfunding goal on the promise of making machine vision projects both easier and simpler to deploy. The camera, which starts around $250, integrates a Raspberry Pi 4 with built-in power and shutdown management, and comes with a variety of pre-installed applications so one can dive right in.

The Sony IMX477 camera sensor is the same one found in the Raspberry Pi high quality camera, and supports capture rates of up to 300 frames per second (under the right conditions, anyway.) Unlike the usual situation faced by most people when a Raspberry Pi is involved, there’s no need to worry about adding a real-time clock, enclosure, or ensuring shutdowns happen properly; it’s all taken care of.

‘Birdfeeder’ application can automatically identify and upload images of visitors.

Charmed Labs are the same folks behind the Pixy and Pixy 2 cameras, and Vizy goes further in the sense that everything required for a machine vision project has been put onboard and made easy to use and deploy, even the vision processing functions work locally and have no need for a wireless data connection (though one is needed for things like automatic uploading or sharing.) For outdoor or remote applications, there’s a weatherproof enclosure option, and wireless connectivity in areas with no WiFi can be obtained by plugging in a USB cellular modem.

A few of the more hacker-friendly hardware features are things like a high-current I/O header and support for both C/CS and M12 lenses for maximum flexibility. The IR filter can also be enabled or disabled via software, so no more swapping camera modules for ones with the IR filter removed. On the software side, applications are all written in Python and use open software like Tensorflow and OpenCV for processing.

The feature list looks good, but Vizy also seems to have a clear focus. It looks best aimed at enabling projects with the following structure:

Detect Things (people, animals, cars, text, insects, and more) and/or Measure Things (size, speed, duration, color, count, angle, brightness, etc.)

Perform an Action (for example, push a notification or enable a high-current I/O) and/or Record (save images, video, or other data locally or remotely.)

The Motionscope application tracking balls on a pool table. (Click to enlarge)

A good example of this structure is the Birdfeeder application which comes pre-installed. With the camera pointed toward a birdfeeder, animals coming for a snack are detected. If the visitor is a bird, Vizy identifies the species and uploads an image. If the animal is not a bird (for example, a squirrel) then Vizy can detect that as well and, using the I/O header, could briefly turn on a sprinkler to repel the hungry party-crasher. A sample Birdfeeder photo stream is here on Google Photos.

Motionscope is a more unusual but very interesting-looking application, and its purpose is to capture moving objects and measure the position, velocity, and acceleration of each. A picture does a far better job of explaining what Motionscope does, so here is a screenshot of the results of watching some billiard balls and showing what it can do.

Hackaday Links Column Banner

Hackaday Links: October 4, 2020

In case you hadn’t noticed, it was a bad week for system admins. Pennsylvania-based United Health Services, a company that owns and operates hospitals across the US and UK, was hit by a ransomware attack early in the week. The attack, which appears to be the Ryuk ransomware, shut down systems used by hospitals and health care providers to schedule patient visits, report lab results, and do the important job of charting. It’s not clear how much the ransomers want, but given that UHS is a Fortune 500 company, it’s likely a tidy sum.

And as if an entire hospital corporation’s IT infrastructure being taken down isn’t bad enough, how about the multi-state 911 outage that occurred around the same time? Most news reports seemed to blame the outage on an Office 365 outage happening at the same time, but Krebs on Security dug a little deeper and traced the issue back to two companies that provide 911 call routing services. Each of the companies is blaming the other, so nobody is talking about the root cause of the issue. There’s no indication that it was malware or ransomware, though, and the outage was mercifully brief. But it just goes to show how vulnerable our systems have become.

Our final “really bad day at work” story comes from Japan, where a single piece of failed hardware shut down a $6-trillion stock market. The Tokyo Stock Exchange, third-largest bourse in the world, had to be completely shut down early in the trading day Thursday when a shared disk array failed. The device was supposed to automatically failover to a backup unit, but apparently the handoff process failed. This led to cascading failures and blank terminals on the desks of thousands of traders. Exchange officials made the call to shut everything down for the day and bring everything back up carefully. We imagine there are some systems people sweating it out this weekend to figure out what went wrong and how to keep it from happening again.

With our systems apparently becoming increasingly brittle, it might be a good time to take a look at what goes into space-rated operating systems. Ars Technica has a fascinating overview of the real-time OSes used for space probes, where failure is not an option and a few milliseconds error can destroy billions of dollars of hardware. The article focuses on the RTOS VxWorks and goes into detail on the mysterious rebooting error that affected the Mars Pathfinder mission in 1997. Space travel isn’t the same as running a hospital or stock exchange, of course, but there are probably lessons to be learned here.

As if 2020 hasn’t dealt enough previews of various apocalyptic scenarios, here’s what surely must be a sign that the end is nigh: AI-generated PowerPoint slides. For anyone who has ever had to sit through an endless slide deck and wondered who the hell came up with such drivel, the answer may soon be: no one. DeckRobot, a startup company, is building an AI-powered extension to Microsoft Office to automate the production of “company compliant and visually appealing” slide decks. The extension will apparently be trained using “thousands and thousands of real PowerPoint slides”. So, great — AI no longer has to have the keys to the nukes to do us in. It’ll just bore us all to death.

And finally, if you need a bit of a palate-cleanser after all that, please do check out robotic curling. Yes, the sport that everyone loves to make fun of is actually way more complicated than it seems, and getting a robot to launch the stones on the icy playing field is a really complex and interesting problem. The robot — dubbed “Curly”, of course — looks like a souped-up Roomba. After sizing up the playing field with a camera on an extendable boom, it pushes the stone while giving it a gentle spin to ease it into exactly the right spot. Sadly, the wickedly energetic work of the sweepers and their trajectory-altering brooms has not yet been automated, but it’s still pretty cool to watch. But fair warning: you might soon find yourself with a curling habit to support.

Skylight In Any Room

Despite a glut of introvert memes, humans need sunlight. If vitamin D isn’t your concern, the sun is a powerful heater, and it helps plants grow. Sadly for [mime], their house is not positioned well to capture all those yummy sunbeams. Luckily for us, their entry into the 2020 Hackaday Prize is their sun-tracking apparatus that redirects those powerful rays throughout the house. It uses a couple of mirrors to redirect the light around their shed and into the house. For those who work in a dim office, no amount of work is too great for a peek of natural sunlight.

Movie spoiler alert: We saw this trick in the 1985 movie Legend and it was enough to vanquish the Lord of Darkness.

This project started in 2014 and sat on hiatus for more than five years, but it is back and prime for improvements fueled by half-a-decade of experience. The parts that aren’t likely to change are the threaded struts that adjust the positioning mirror’s angle, the driving motors, and power circuitry. Their first plan was to build a solar-powered controller with an Arduino, DC motors, and sun telemetry data, but now they’re leaning toward stepper motors and a computer in the house with a long cable. They are a finalist this year, so we will keep our eyes peeled for further development.

Porting QMK To A Cheap Mechanical Keyboard

Over the last couple of years, we’ve seen an incredible number of DIY keyboard builds come our way. Some have had their switches nestled into laser-cut aluminum and others 3D printed plastic. They may be soldered together on a custom PCB, or meticulously hand-wired. But however they were built, they almost all shared one thing in common: they ran some variant of the open source QMK keyboard firmware.

But what if you just want to run an open firmware on the keyboard you picked up for $50 bucks on Amazon? That’s exactly where [Stephen Peery] found himself nine months ago with this DK63 gaming keyboard. Since so many of these small RGB LED mechanical keyboards are very similar to existing open source designs, he wondered what it would take to blow out the original firmware and replace it with a build of QMK.

While [Stephen] doesn’t have everything working 100% yet, he’s nearly reached the end of his epic reverse engineering journey. The first step was tearing apart the keyboard and identifying all the components it used, then pulling the original firmware out of the updater. From there, between Ghidra and Serial Wire Debug, he was able to figure out most of what the stock firmware was doing so he could replicate it in QMK.

According to his README, the RGB LEDs and Bluetooth functionality don’t currently work, but other than that it seems QMK is up and running. If you’re OK with those concessions, he has information on the page about flashing his build of QMK to the stock DK63 with the ST-Link V2 so you can give it a shot. Though you do so at your own risk; we wouldn’t recommend doing this on your only keyboard.

We’ve seen commercially manufactured keyboards running QMK before, but it usually involves completely replacing the original controller with new electronics. That [Stephen] got this all working on stock hardware so other owners can follow in his footsteps is really a considerable accomplishment.

[Thanks to Baldpower for the tip.]