There is a romance to notions of a byegone age of DJing — driving a pair of Technics 1200s dwarfed on either side by the stacks, pumping techno bass through the laser-tinged darkness into a hungry crowd. Even if the reality of early evening Saturday wedding parties playing inoffensive crooners for the 50-somethings didn’t really live up to it.
The trouble with DJing old-style was that it required extensive logistics to shift all that equipment not to mention a record collection, so the modern DJ for whom everything has gone digital is truly lucky in the scale of their operation. For some people even that is too much to carry, and [Dennisdebel] has minimised a DJ rig to the next level, by running the popular Mixxx DJing software on a Raspberry Pi hooked up to his DJ controller. You can see the result in the video below the break.
This is more of a HOWTO for installing a set of software packages on the Pi to achieve an aim rather than a special hardware hack, but as he points out the interest lies in regaining control of the process. The DJ space is dominated by commercial offerings increasingly laden with DRM and proprietary cloud offerings, so this represents a means of taking back control of the process. If it’s not hacky enough, you can always add a home-made DJ mixing station.
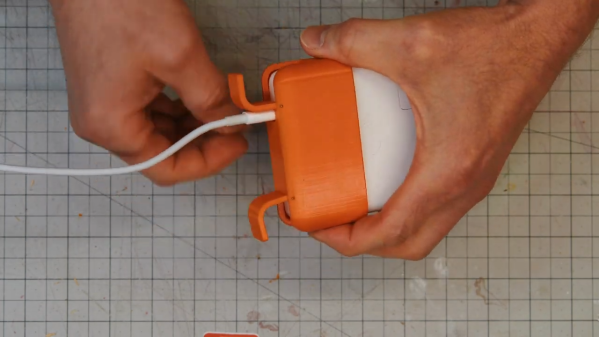
You might remember the old Apple MagSafe adaptor with the cute little fold out “wings” that served not only as a pragmatic cable management tool, but in our experience also expedited the inevitable and frayed end of your charger. Apple seems to have remedied the latter by opting for removable USB-C cables in latest designs, but the complete omission of a pop-out cable spooling contraption is problematic.
[Eric], an industrial designer, took it upon himself to design a 3D printed add on for the new generation of chargers. His video is certainty one of those satisfying accounts, where the whole process from conceptional sketch to a working Hack is neatly self-contained in a single video. The design is largely based off the original version, implemented in PLA together with piano wire serving as the hinge pin. We think this is a very good example of how 3D printers can be used to personalise and tweak commercial products to suite particular needs.
Robotics projects are always a favorite for hackers. Being able to almost literally bring your project to life evokes a special kind of joy that really drives our wildest imaginations. We imagine this is one of the inspirations for the boom in interactive technologies that are flooding the market these days. Well, [Technovation] had the same thought and decided to build a fully articulated robotic biped.
Each leg has pivot points at the foot, knee, and hip, mimicking the articulation of the human leg. To control the robot’s movements, [Technovation] uses inverse kinematics, a method of calculating join movements rather than explicitly programming them. The user inputs the end coordinates of each foot, as opposed to each individual joint angle, and a special function outputs the joint angles necessary to reach each end coordinate. This part of the software is well commented and worth your time to dig into.
In case you want to change the height of the robot or its stride length, [Technovation] provides a few global constants in the firmware that will automatically adjust the calculations to fit the new robot’s dimensions. Of all the various aspects of this project, the detailed write-up impressed us the most. The robot was designed in Fusion 360 and the parts were 3D printed allowing for maximum design flexibility for the next hacker.
Maybe [Technovation’s] biped will help resurrect the social robot craze. Until then, happy hacking.
When it comes to radio communications on the VHF bands and above, there’s no substitute for elevation. The higher you get your antenna, the farther your signal will get out. That’s why mountaintops are crowded with everything from public service radios to amateur repeaters, and it’s the reason behind the “big stick” antennas for TV and radio stations.
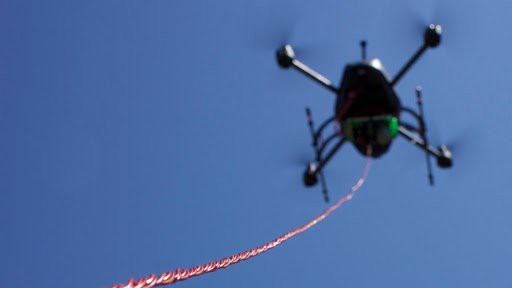
But getting space on a hilltop site is often difficult, and putting up a tower is always expensive. Those are the problems that the Sky Anchor, an antenna-carrying drone, aims to address. The project by [Josh Starnes] goes beyond what a typical drone can do. Rather than relying on GPS for station keeping, [Josh] plans a down-looking camera so that machine vision can keep the drone locked over its launch site. To achieve unlimited flight time, he’s planning to supply power over a tether. He predicts a 100′ to 200′ (30 m to 60 m) working range with a heavy-lift octocopter. A fiberoptic line will join the bundle and allow a MIMO access point to be taken aloft, to provide wide-area Internet access. Radio payloads could be anything from SDR-based transceivers to amateur repeaters; if the station-keeping is good enough, microwave links could even be feasible.
Sky Anchor sounds like a great idea that could have applications in disaster relief and humanitarian aid situations. We’re looking forward to seeing how [Josh] develops it. In the meantime, what’s your world-changing idea? If you’ve got one, we’d love to see it entered in the 2020 Hackaday Prize.
Another couple of weeks, and a fresh crop of space news to run through as a quick briefing of the latest in the skies above us.
OneWeb’s most recent launch, from Baikonur on the 21st of March 2020. (OneWeb)
The global positioning orbits are getting pretty crowded, with GPS, Russia’s GLONASS, the EU’s Galileo, Japan’s QZSS, and now with the launch of the final satellite in their constellation, China’s BeiDou. As if five were not enough the chance that they might be joined by a sixth constellation from the United Kingdom resurfaced this week, as the UK government is expressing interest in supporting a rescue package for the troubled satellite broadband provider OneWeb. The idea of an independent GPS competitor from a post-Brexit UK has been bouncing around for a couple of years now, and on the face of it until this opportune chance to purchase an “oven ready” satellite constellation might deliver a route to incorporating a positioning payload into their design. The Guardian has its doubts, lining up a bevvy of scientists to point out the rather obvious fact that a low-earth-orbit satellite broadband platform is a very different prospect to a much-higher-orbiting global positioning platform. Despite the country possessing the expertise through its work on Galileo then it remains to be seen whether a OneWeb purchase would be a stroke of genius or a white elephant. Readers with long memories will know that British government investment in space has had its upsets before.
Happily for Brits, not all space endeavours from their islands end in ignominious retreat. Skyrora have scored another milestone, launching the first ever rocket skywards from the Shetland Islands. The Skylark Nano is a relatively tiny craft at only 2m high, and gathered research data during its flight to an altitude of 6km. We’ve followed their work before, including their testing in May of a Skylark L rocket on the Scottish mainland with a view to achieving launch capability in 2023.
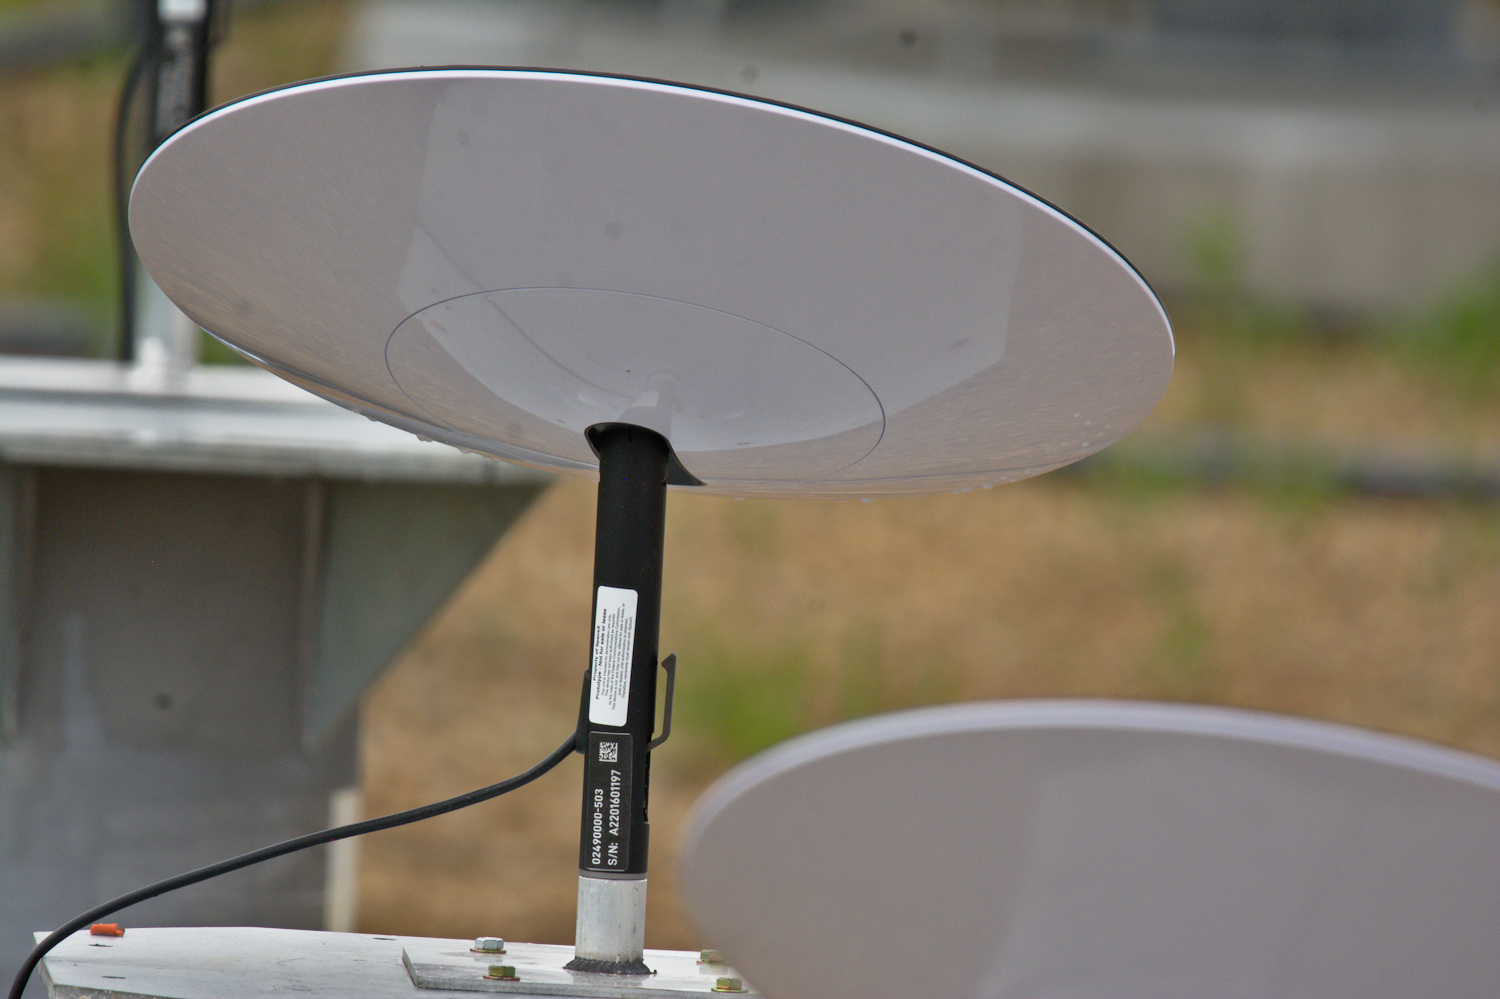
A Starlink phased array end user antenna, spotted in Winsconsin. (darkpenguin22)
SpaceX’s Starlink is never far away from the news, with a fresh set of launches delayed for extra pre-launch tests, and the prospect of signing up to be considered for the space broadband firm’s beta test. Of more interest for Hackaday readers though are a few shots of prototype Starlink ground stations and user terminals that have made it online, on the roof of a Tesla Gigafactory and at a SpaceX facility in Wisconsin. What can be seen are roughly 1.5m radomes for the ground stations and much smaller dinner-plate-sized enclosed arrays for the user terminals. The latter are particularly fascinating as they conceal computer-controlled phased arrays for tracking the constellation as it passes overhead. This is a technology more at home in billion-dollar military radars than consumer devices, so getting it to work on a budget that can put it on a roof anywhere in the world must be a challenge for the Starlink engineers. We can’t wait to see the inevitable eventual teardown when it comes.
Elsewhere, the Virgin Galactic SpaceShip Two completed its second glide test over its Mojave Spaceport home since being grounded in 2019 for extensive refitting, and is now said to be ready for powered tests leading to eventual commercial service giving the extremely well-heeled the chance to float in the zero gravity of suborbital spaceflight. And finally, comes the news that NASA are naming their Washington DC headquarters building for Mary W. Jackson, their first African American female engineer, whose story some of you may be familiar with from the book and film Hidden Figures. The previously unnamed building sits on a section of street named Hidden Figures Way.
Hackaday editors Elliot Williams and Mike Szczys recap a week of hacks. A telescope mirror that can change shape and a helicopter without a swashplate lead the charge for fascinating engineering. These are closely followed by a vibratory wind generator that has no blades to spin. The Open Source Hardware Association announced a new spec this week to remove “Master” and “Slave” terminology from SPI pin names. The Segway is no more. And a bit of bravery and rock solid soldering skills can resurrect that Macbook that has one dead GPU.
Take a look at the links below if you want to follow along, and as always, tell us what you think about this episode in the comments!
Take a look at the links below if you want to follow along, and as always, tell us what you think about this episode in the comments!
We’ve looked at many vulnerabilities over the years here on Hackaday, but it’s rather rare for a CVE to score a perfect 10 severity. This is reserved for the most severe and exploitable of problems. Palo Alto announced such a vulnerability, CVE-2020-2021, on the 29th. This vulnerability affects Palo Alto devices running PAN-OS that have SAML authentication enabled and a certain validation option disabled. The vulnerability is pre-authentication, but does require access to a service protected by SAML authentication. For example, a Palo Alto device providing a web-based VPN could be vulnerable. The good news is that the vulnerable settings aren’t default, but the bad news is that the official configuration guide recommends the vulnerable settings for certain scenarios, like using a third party authentication service.
The issue is in the Security Assertion Markup Language (SAML) implementation, which is an XML based open standard for authentication. One of the primary use cases for SAML is to provide a Single Sign On (SSO) scheme. The normal deployment of SAML SSO is that a central provider handles the authentication of users, and then asserts to individual services that the connecting user is actually who they claim to be.
The setting needed for this vulnerability to be exploitable is ‘Validate Identity Provider Certificate’ to be disabled. If this option is enabled, the SSO provider must use a CA signed SAML certificates. This doesn’t appear to mean that unsigned SSL certificates would be accepted, and only applies to certificates inside the SAML messages. It seems to be widely accepted that these certificates don’t need to be CA signed. In the official announcement, the vulnerability type is said to be “CWE-347 Improper Verification of Cryptographic Signature”. Continue reading “This Week In Security: Palo Alto Scores A 10, Cursed Images, VM Escapes, And Malicious Music”→