Dial In Your Multi-Headed 3D Printer With 2020 Machine Vision

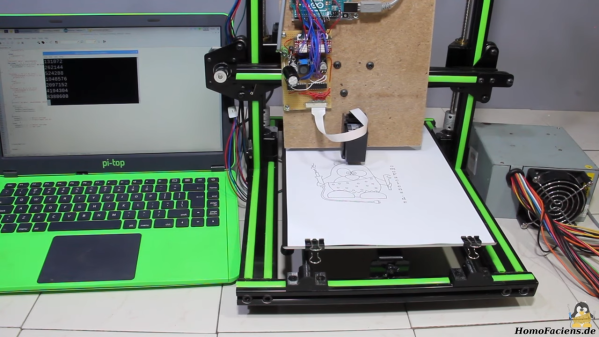
Most folks that have been poking around at multi-tool 3D printing know that lining up nozzles can be a gnarly, but necessary pain point. Existing methods either have us measure offsets with a vernier scale or with a series of pictures taken with an upwards-facing camera. And this step is not to be ignored! Any mismatch between nozzles, and your multicolor prints end up looking like Scotty really screwed up those sliders on that transporter beam console. Fear not, however! [Danal] took this problem as an opportunity to write something that’s completely automated and brought to you by some machine vision.

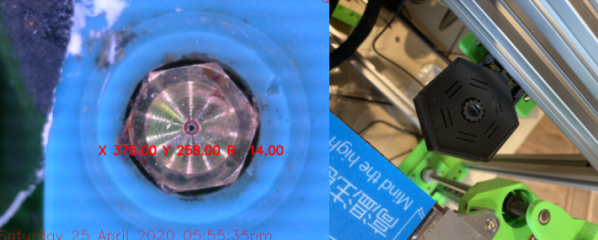
Dubbed TAMV, for Tool Align Machine Vision, [Danal] added a Raspberry Pi alongside his existing 3D printing motion controller in addition to an upwards facing camera. A few lines of code (and a few hours of compiling OpenCV) later, and he had himself a circle-detecting script that automatically cycles through each tool, detects the nozzle center, and calculates an offset for each tool that’s stored into the machine’s configuration file. If that’s not nifty enough, he’s made the entire setup open-source, and he included both an installation script for compiling OpenCV and a well-written set of step-by-step instructions.

In a world where most hobbyists approaches still solve this problem manually, this is leaps and bounds ahead of what we know, and it’s a great application of machine vision built on top of a stack of recognizable hardware and software. While this project was outfitted for a Jubilee running a Duet3 controller with a Raspberry Pi connected in “single-board computer” mode, the core features are readily adaptable to any other multi-tool machine with a similar control board stack. And for folks willing to poke under the hood, the project could even be extended to a standalone script that you can run on your PC locally to simply print the tool offsets separately.

Alongside TAMV, it’s refreshing that even a decade after 3D printers have been with us, we’re still finding ways to make these machines more capable. For more fresh hacks in this category, check out a new spin on using sharpie ink as a support material release agent.

Sadly, [Danal] has recently passed away in the last week, but we are grateful to capture a snapshot in the history of this person’s life.

Continue reading “Dial In Your Multi-Headed 3D Printer With 2020 Machine Vision”

Mini Computer Brings Starfleet To Your Desk

It could be said that there are two types of people: those for whom the actor LeVar Burton is the host of Reading Rainbow, and those for whom he is Geordi LaForge, Chief Engineer of Star Trek TNG‘s Enterprise NCC1701-D. For those of us engineers who lie in the second camp, we can at least feel a little closer to the action thanks to a project from [Darian Johnson], a Star Trek TNG mini-computer which functions as a desktop information display.

Inside the 3D-printed case is an ESP32 version of the Adafruit Feather, talking to cloud services to pull in and aggregate the information on the TFT screen. It combines weather data, environmental sensor readings, his fitness tracker readings, and his schedule, with two useful applications. There’s a resistor colour code chart, and an LED series resistor calculator. He’s made a video showing it in operation which we’ve placed below the break, and in it, he’s captured the aesthetic of the LCARS interface perfectly. We can’t speak for a fictional future spacecraft officer, but we suspect that Geordi would be right at home with it.

We may not be able to bring you Geordi LaForge, but we can bring you a real Starfleet officer. She even shares something with LeVar Burton, in that she’s (much more) famous for something else.

Continue reading “Mini Computer Brings Starfleet To Your Desk”

ESP32 Becomes Music Player In Under 40 Lines Of Code

The demo code for [XTronical]’s ESP32-based SD card music player is not even 40 lines long, though it will also require a few economical parts before it all works. Nevertheless, making a microcontroller play MP3s (and other formats) from an SD card is considerably simpler today than it was years ago.

Part of what makes this all work is I2S (Inter-IC Sound), a format for communicating PCM audio data between devices. Besides the ESP32, at the heart of it all is an SD card reader breakout board and the MAX98357A, which can be thought of as a combination I2S decoder and Class D amplifier. The ESP32 reads audio files from the SD card and uses an I2S audio library to send the I2S data stream to the MAX98357A (or two of them for stereo.) From there it is decoded automatically and audio gets pumped though attached speakers.

A few economical components, and only a handful of connections between them.

It’s amazing how much easier audio is to work with when one can take advantage of shuffling audio data around digitally, and the decoder handles multiple formats with an amplifier built in. You can see [XTronical]’s ESP32 player in action in the video embedded below.

Continue reading “ESP32 Becomes Music Player In Under 40 Lines Of Code”

No Need For Speed With This Arduino-Based Inkjet Printer

When it comes to computers, it seems like the only thing that matters is speed. The more the better, in general, and the same applies to peripherals. We want the fastest network adapters, the fastest video card, and the fastest printer. So why in the world would anyone intentionally build a really slow inkjet printer? For art, of course.

At least that’s the story [HomoFaciens] tells us in the video below. His efforts are in support of a friend’s art project, which seeks to print slowly but continuously on a roll of paper. [HomoFaciens]’s printer is based on an H-P C6602 inkjet cartridge, one of those high-priced consumables that make buying a new printer more attractive than replacing them once depleted. After figuring out how to drive the printhead — 5 to 6 μs pulses of 18 volts through a ULN2803 Darlington array driver chip seemed to do the trick — he mounted everything to the gantry of an old 3D printer. It’s interesting to watch the images slowly being built up — something that printers usually hide from prying eyes — and to see how the DPI count of the printer can be increased by interlacing each printed line.

Near the end of the video, we get a glimpse of his “tattoo gun printer”, which reminded us of all the other cool things he’s done over the years. From a CNC machine made from paperclips and cardboard to an encoder made from a wheel of resistors, [HomoFaciens] has some interesting designs that you really should check out.

Continue reading “No Need For Speed With This Arduino-Based Inkjet Printer”

Blow Dryers And Metal Shears: Hacks Of Early Falcon 9 Flights

Orbiting over our heads right now are two human beings who flew to the International Space Station in a SpaceX Crew Dragon vehicle on top of a Falcon 9. The majority of coverage focused on the years since human spaceflight last launched from Florida, but [Eric Berger] at Ars Technica reminds us it also makes for a grand ten-year celebration of the SpaceX workhorse rocket by sharing some stories from its early days.

Falcon 9 is a huge presence in the global space launch industry today, but ten years ago the future of a young aerospace company was far from certain. The recent uneventful launch is the result of many lessons learned in those ad-hoc days. Some early Falcon 9 flights were successful because the team decided some very unconventional hacks were worth the risk that paid off. A bit of water intrusion? Dry it out with a blow dryer and seal it back up. Small tear in a rocket nozzle? Send in someone to trim a few inches with shears (while the rocket was standing vertical on the launchpad).

Industry veterans appalled at “a cowboy attitude” pounced on every SpaceX failure with “I told you so.” But the disregard for convention is intentional, documented in many places like this old Wired piece from 2012. Existing enshrined aerospace conventions meant the “how” was preserved but the “why” was reduced to “we’ve always done it this way” rarely re-evaluated in light of advancements. Plus the risk-averse industry preferred staying with flight-proven designs, setting up a Catch-22 blocking innovation. SpaceX decided to go a different way, rapidly evolving the Falcon 9 and launching at a high cadence. Learning from all the failures along the way gave them their own set of “why” to back up their “how” growing far beyond blow dryers and metal shears. We’re happy to see the fail-learn-improve cycle at the heart of so many hacker projects have proven effective to send two astronauts to the space station and likely beyond.

[Photo: SpaceX Crew Demo-2 on the launch pad]

Flipdots, Without The Electronics

We are used to flipdots, single mechanical pixels that are brightly colored on one side and black on the other, flipped over by a magnetic field. Driving the little electromagnets that make them work is a regular challenge in our community. [Johan] however has a new take on the flipdot, and it’s one we’ve never seen before. Instead of making a magnetic field to flip his dots he’s doing without the electronics entirely, and just using a magnet.

The project is a level indicator for a water tank, which contains a magnet floating in a plastic bottle. This has previously been used to trigger a reed switch that controls the refill pump. To those reed switches he adds a row of flipdots, but these aren’t the commercial dots you might once have seen adorning the front of your local bus. Instead, they’re custom dots made from washers, suspended in pivots by means of a spot weld and mounted in a frame inside a clear tube to keep dirt at bay. As you can see in the video below the break, when the magnet floats past inside the tank it flips them over one way, and on its return journey if flips them back the other. The result is a fully serviceable flipdot display, completely lacking the normal electronics, and we rather like it.

(It may be the first electronic-free flipdot we’ve shown you, but it’s not the first homemade one.)

Continue reading “Flipdots, Without The Electronics”

Antique Army Surplus Receiver Restored

If you’ve ever been to a hamfest in the United States, you probably have at least seen an ARC 5 Command set. These were very rugged receivers and there were a ton of them made. Hams have been reworking them for years. In a recent video [Tom N3LLL] shared some of his tips for restoring them.

You might think these are just like a regular old radio, but there are some unique challenges, including capacitors filled with beeswax and strange threaded screws. [Tom] made several custom boards to replace the dynamotor with a solid-state inverter, replace odd capacitors, and provided a faceplate. He also 3D printed some replacement studs to replace the often decayed anti-vibration studs for the dynamotor.

The teardown at the end shows how rugged these things are. Tom’s restoration philosophy is to modernize the set while keeping the outward aesthetics. The receivers perform well, and as you might expect are built like tanks.

If you want to try your hand at restoration, these are not very expensive because there were so many of them made. Often the shipping is about the same price as the radio, but one in good shape can cost a bit more. We think the real fun is getting one that is not in such good shape and making it better.

Everyone has their own style and we know some restorers are more purists, but as a practical matter, [Tom’s] restorations look great, sound great, and preserve these great old radios so that someone might still be using them in another 75 years.

We’ve covered the ARC 5 before, unsurprisingly, and that restoration was a bit more traditional if you prefer it that way. If you need something to listen to on the AM band, try a matching transmitter.

Continue reading “Antique Army Surplus Receiver Restored”