We’re suckers for some retro electronics here at Hackaday, so we were fascinated when Daniel Valuch wrote to us with some pictures of his findings in his CERN lab’s archive. He works on Linear Accelerator 3, which has had an extended downtime after many decades of continuous operation, for major upgrades and overhauls. Part of the upgrade involves the removal of electronic assemblies dating back as far as the 1970s, and he’s shared his fascination with them as he trawls through dusty filing cabinets in the lab basement.
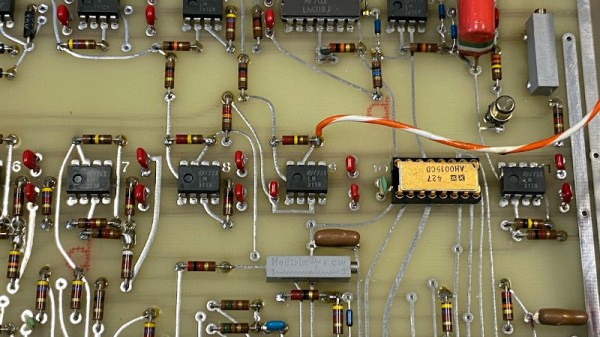
What it reveals is a world before the CAD and microcontrollers we know, instead here are circuits using the electronic building blocks of logic gates, discretes, and op-amps. PCBs are laid out not with the KiCad that CERN are famous in our community for today, but on acetate, with transfers and tape. A ground plane is even hand-carved from a red sheet. Oddly though it isn’t a world without CNC, because in the pouch with a design from 1974 is a roll of punched paper tape. If you have ever pondered the “Numerical” in “Computer Numerical Control”, here are the numbers in physical form.
For those of us who were trained in this type of electronic design, the convenience of a PCB CAD package and a professionally-made PCB at the click of a mouse is nothing short of miraculous. But seeing personally laid boards of this quality reminds us that seeing the hand of the designer in them is something few engineers today (with the possible exception of Boldport) manage to recreate.