A Homebrew AC Upgrade For The Fluke 8840A

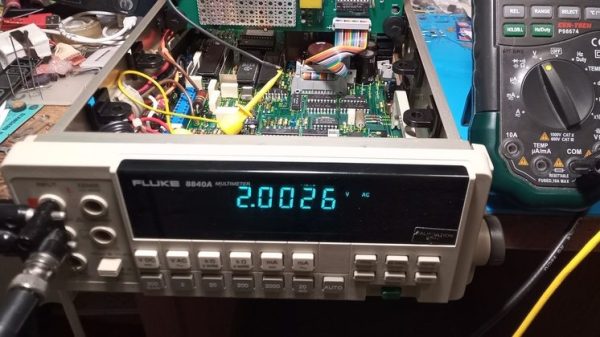
[William Dudley] picked up a Fluke 8840A bench multimeter at an auction, but was sad to find out that it was reading resistances inaccurately. It was also missing the optional board to enable AC measurements. Desiring to use the otherwise lovely meter, he set about repairing and upgrading the device.

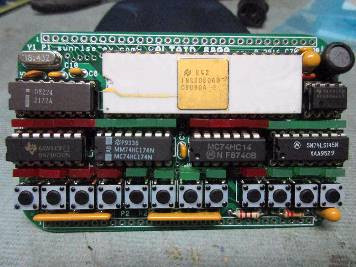
Thankfully, the 8840A was from a time when Fluke used to openly publish schematics in its manuals. Thus, combined with taking a look at some photos online, it was straightforward for [William] to recreate the original AC “Option 09” board to enable the desired functionality. As is usually the way, his efforts didn’t work first time, but after some bodge wires were installed, all was well. [William] reports the measurements are “reasonable, maybe even sufficient” with no calibration undertaken.

Repairing the resistance issue was easy. It turned out to be corrosion on the selector switches, revealed when high-resistance measurements were accurate, but low-resistance measurements weren’t. A bit of flick-flacker with some contact cleaner sprayed into the switches got things working again nicely.

It’s nice to see old hardware restored to full functionality, particularly when it’s as attractive and well-built as an old Fluke meter. Bringing back old tools from the dead? You know we wanna hear about it!

Hackaday Podcast 188: Zapping Cockroaches, Tricking AIs, Antique 3D Scanning, And Grinding Chips To QFN

It’s déjà vu all over again as Hackaday Editor-in-Chief Elliot Williams gets together with Staff Writer Dan Maloney to look over the best hacks from the past week. If you’ve got a fear of giant cockroaches, don’t worry; we’ll only mention the regular ones when we talk about zapping them with lasers. What do you need to shrinkify an NES? Just a little sandpaper and a lot of finesse.

Did you know that 3D scanning is (sort of) over a century old? Or that the first real microcomputer dates all the way back to 1972 — and isn’t one of those blinkenlight deals? And watch out for what you tell GPT-3 to ignore — it might just take you very seriously. We’ll touch on solar-powered cameras, a compressor of compressors, and talk about all the unusual places to find lithium batteries for your projects. It’s an episode so good you might just want to listen to it twice!

(In case you’re wondering about all this “twice” stuff — Elliot forgot to hit record on the first take and we had to do the entire podcast over again. Oh, the humanity!)

Check out the links below if you want to follow along, and as always, tell us what you think about this episode in the comments!

Direct download here!

Continue reading “Hackaday Podcast 188: Zapping Cockroaches, Tricking AIs, Antique 3D Scanning, And Grinding Chips To QFN”

Back To The Future Prop Can Tell When It Hits 88 MPH

Obviously, the most iconic piece of fictional hardware from the Back to the Future films is Doc Brown’s DeLorean DMC-12 time machine. But we’d have to agree with [Jason Altice] of CodeMakesItGo that the second-most memorable gadget is the modified Futaba remote control used to control the DeLorean from a distance. Now, thanks to his detailed build guide, you can build your own version of the time machine’s controller — complete with working speed readout.

Now to be clear, [Jason] isn’t claiming that his build is particularly screen accurate. It turns out that the actual transmitter used for the prop in the film, the Futaba PCM FP-T8SGA-P, has become difficult to find and expensive. But he argues that to the casual observer, most vintage Futaba transmitters are a close enough match visually. The more important part is recreating the extra gear Doc Brown bolted onto his version. Continue reading “Back To The Future Prop Can Tell When It Hits 88 MPH”

a full gaming rig built into a LCD-386

A Portable Computer Living In 1988 But Also In The Future

Every once in a while, there will be a project that is light on details but inundated with glorious, drool-worthy pictures. [Nexaner7] recently showed off his cyberdeck he built over a year inside an old LCD-386. So what’s special about it? This isn’t just a Raspberry Pi or some SBC inside but a complete AMD Ryzen 5600, Nvidia RTX 3060, screen, and keyboard in a 19.5-liter space (0.68 cubic feet). Since there wouldn’t be enough space inside for decent airflow, he decided to water-cool everything, which added to the build.

the back of the sleeper LCD-386 cyberdeck

While [Nexaner7] doesn’t have a video walkthrough, he does have a build log with dozens of pictures in two parts: part 1 and part 2. As you can imagine, there were copious amounts of 3d printing for brackets and holders, trying various screens and GPUs to see what fit and what didn’t. He tried to use the original keyboard, even with a 5-pin DIN to PS2 to USB adapter, but the keyboard was flakey, likely due to rust. He dropped in a CM Quickfire TK PCB with a few modifications as it was close to the same size. He swapped the display for a 1440p portable monitor with a thin ribbon HDMI cable to route from the GPU to the screen.

We’re happy to report that the parts inside were sold to someone who restores old PC, so a somewhat rare LCD-386 wasn’t destroyed. With a gorgeous build like this, perhaps he should enter the Cyberdeck contest. Eagle-eyed readers might notice that recently we covered an LCD-386 with its contents retrieved via a hacked-together serial bus.

Building Your Own 8088 XT Motherboard

There was a time when an XT-class motherboard — like the old IBM PC with an 8088 CPU — was a high-tech accomplishment. Now, something like that is easily within reach of the average hobby lab. [Homebrew8088] did it, and it looks surprisingly simple, especially compared to what passes for a motherboard these days.

The board will take an 8088 or one of the NEC chips and by default sports 512 K of RAM, a few ISA slots, a PC speaker, a USB hard drive, and a PS/2 keyboard connector. The board will fit in an ATX case. Not bad. You can see a video of the board below.

In fact, the channel has a lot of related videos and the main site has many interesting topics, like driving an 8088 or 8086 from a Raspberry Pi. The GitHub site has design files for KiCad along with a lot of other information. Some of this will be interesting even if you are just trying to repair an old motherboard or would like to design a new ISA card.

If you want to know why the PC used an 8088 instead of an 8086, we just covered that. What are you going to do with an old XT computer? How about IRC?

Continue reading “Building Your Own 8088 XT Motherboard”

Altaid 8800 Puts A Front Panel In Your Pocket

It’s safe to say that the Altair 8800 is one of the most iconic, and important, computers ever created. The kit-built machine is widely regarded as the first commercially successful personal computer, and as such, intact specimens are bona fide historical artifacts when and if they ever come up on the second-hand market. Accordingly there’s a cottage industry out there dedicated to making affordable replicas, which more often than not, leverage modern hardware to emulate the original hardware.

But that’s not what the Altaid 8800 is. For one thing, it looks nothing like the original Altair. More to the point however, it’s not using modern components to emulate an Intel 8080 computer…it actually is an Intel 8080 computer — complete with fully functional front panel for manually entering in programs. It just happens to be small enough to fit into an Altoids tin, hence the name.

Creator [Lee Hart] didn’t just stop at building a miniature 8080 machine, either. He’s also gone through the trouble of producing a sixteen page faux-vintage magazine to describe the project and its operation. Normally we’d call such a document a “manual”, but somehow in this case that seems to downplay the incredible effort and attention to detail that went into it.

Schematics and firmware are available should you wish to build your own version of the Altaid 8800, but we think the prices for the bare PCBs and complete kits that [Lee] is offering are more than fair for what you get. In fact, if you’ve always wanted to play around with front panel programming and the associated blinkenlights, this might be one of the most affordable options available. Though to be clear, you can also hook the Altaid up to your computer with a USB-to-serial cable if you’re not up to punching in programs on those tiny buttons.

You might think this is one of the most creative and unique retrocomputing projects we’ve ever seen, and you’d be right…if it wasn’t for [Lee]’s own Z80 Membership Card. In some ways the precursor to the Altaid 8800, this diminutive triumph also fits in an Altoids tin and features its own era appropriate magazine-style documentation. We’re detecting something of a theme with these projects…but we certainly aren’t complaining.

Save Money And Have Fun Using IEEE-488

A few months ago, I was discussing the control of GPIB equipment with a colleague. Based on only on my gut feeling and the briefest of research, I told him that the pricey and proprietary GPIB controller solutions could easily be replaced by open-source tools and Linux. In the many weeks that followed, I almost abandoned my stance several times out of frustration. With some perseverance, breaking the problems into bite-sized chunks, and lots of online searching to learn from other people’s experiences, my plan eventually succeeded. I haven’t abandoned my original stance entirely, I’ve taken a few steps back and added some qualifiers.

What is GPIB?

Example of HP-IB block diagram from the 1970s, from hp9845.net

Back in the 1960s, if test equipment was interconnected at all, there weren’t any agreed-upon methods for doing so. By the late 60s, the situation was made somewhat better by card-cage controller systems. These held a number of interface cards, one per instrument, presenting a common interface on the backplane. Although this approach was workable, the HP engineers realized they could significantly improve the concept to include these “bridging circuit boards” within the instruments and replacing the card cage backplane with passive cables. Thus began the development of what became the Hewlett-Packard Interface Bus (HP-IB). The October 1972 issue of the HP Journal introduced HP-IB with two main articles: A Practical Interface System for Electronic Instruments and A Common Digital Interface for Programmable Instruments: The Evolution of a System. Continue reading “Save Money And Have Fun Using IEEE-488”