Building Your Own 8088 XT Motherboard

There was a time when an XT-class motherboard — like the old IBM PC with an 8088 CPU — was a high-tech accomplishment. Now, something like that is easily within reach of the average hobby lab. [Homebrew8088] did it, and it looks surprisingly simple, especially compared to what passes for a motherboard these days.

The board will take an 8088 or one of the NEC chips and by default sports 512 K of RAM, a few ISA slots, a PC speaker, a USB hard drive, and a PS/2 keyboard connector. The board will fit in an ATX case. Not bad. You can see a video of the board below.

In fact, the channel has a lot of related videos and the main site has many interesting topics, like driving an 8088 or 8086 from a Raspberry Pi. The GitHub site has design files for KiCad along with a lot of other information. Some of this will be interesting even if you are just trying to repair an old motherboard or would like to design a new ISA card.

If you want to know why the PC used an 8088 instead of an 8086, we just covered that. What are you going to do with an old XT computer? How about IRC?

Continue reading “Building Your Own 8088 XT Motherboard”

Altaid 8800 Puts A Front Panel In Your Pocket

It’s safe to say that the Altair 8800 is one of the most iconic, and important, computers ever created. The kit-built machine is widely regarded as the first commercially successful personal computer, and as such, intact specimens are bona fide historical artifacts when and if they ever come up on the second-hand market. Accordingly there’s a cottage industry out there dedicated to making affordable replicas, which more often than not, leverage modern hardware to emulate the original hardware.

But that’s not what the Altaid 8800 is. For one thing, it looks nothing like the original Altair. More to the point however, it’s not using modern components to emulate an Intel 8080 computer…it actually is an Intel 8080 computer — complete with fully functional front panel for manually entering in programs. It just happens to be small enough to fit into an Altoids tin, hence the name.

Creator [Lee Hart] didn’t just stop at building a miniature 8080 machine, either. He’s also gone through the trouble of producing a sixteen page faux-vintage magazine to describe the project and its operation. Normally we’d call such a document a “manual”, but somehow in this case that seems to downplay the incredible effort and attention to detail that went into it.

Schematics and firmware are available should you wish to build your own version of the Altaid 8800, but we think the prices for the bare PCBs and complete kits that [Lee] is offering are more than fair for what you get. In fact, if you’ve always wanted to play around with front panel programming and the associated blinkenlights, this might be one of the most affordable options available. Though to be clear, you can also hook the Altaid up to your computer with a USB-to-serial cable if you’re not up to punching in programs on those tiny buttons.

You might think this is one of the most creative and unique retrocomputing projects we’ve ever seen, and you’d be right…if it wasn’t for [Lee]’s own Z80 Membership Card. In some ways the precursor to the Altaid 8800, this diminutive triumph also fits in an Altoids tin and features its own era appropriate magazine-style documentation. We’re detecting something of a theme with these projects…but we certainly aren’t complaining.

Save Money And Have Fun Using IEEE-488

A few months ago, I was discussing the control of GPIB equipment with a colleague. Based on only on my gut feeling and the briefest of research, I told him that the pricey and proprietary GPIB controller solutions could easily be replaced by open-source tools and Linux. In the many weeks that followed, I almost abandoned my stance several times out of frustration. With some perseverance, breaking the problems into bite-sized chunks, and lots of online searching to learn from other people’s experiences, my plan eventually succeeded. I haven’t abandoned my original stance entirely, I’ve taken a few steps back and added some qualifiers.

What is GPIB?

Example of HP-IB block diagram from the 1970s, from hp9845.net

Back in the 1960s, if test equipment was interconnected at all, there weren’t any agreed-upon methods for doing so. By the late 60s, the situation was made somewhat better by card-cage controller systems. These held a number of interface cards, one per instrument, presenting a common interface on the backplane. Although this approach was workable, the HP engineers realized they could significantly improve the concept to include these “bridging circuit boards” within the instruments and replacing the card cage backplane with passive cables. Thus began the development of what became the Hewlett-Packard Interface Bus (HP-IB). The October 1972 issue of the HP Journal introduced HP-IB with two main articles: A Practical Interface System for Electronic Instruments and A Common Digital Interface for Programmable Instruments: The Evolution of a System. Continue reading “Save Money And Have Fun Using IEEE-488”

Raspberry Pi Real-Time HAT

New Part Day: Raspberry Pi HAT For IEEE1588 Precision Time Protocol

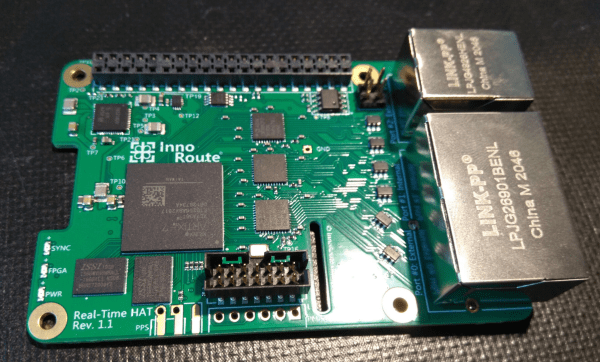
The new Real-Time HAT by InnoRoute adds IEEE1588 PTP support in hardware to a Raspberry Pi 4 nestled beneath. Based around a Xilinx Artix-7 FPGA and a handful of gigabit Ethernet PHY devices, the HAT acts as network-passthrough, adding accurate time-stamps to egress (outgoing) packets and stripping time-stamps from the ingress (incoming) side.

This hardware time-stamping involves re-writing Ethernet packets on-the-fly using specialised network hardware which the Raspberry Pi does not have. Yes, there are software-only 1588 stacks, but they can only get down to 10s of microsecond resolutions, unlike a hardware approach which can get down to 10s of nanoseconds.

1588 is used heavily for applications such as telecoms infrastructure, factory equipment control and anything requiring synchronisation of data-consuming or data-producing devices. CERN makes very heavy use of 1588 for its enormous arrays of sensors and control equipment, for all the LHC experiments. This is the WhiteRabbit System, presumably named after the time-obsessed white rabbit of Alice In Wonderland fame. So, if you have a large installation and a need for precisely controlling when stuff happens across it, this may be just the thing you’re looking for.

IEEE1588 PTP Synchronisation

The PTP client and master device ping a few messages back and forth between themselves, with the network time-stamper recording the precise moment a packet crosses the interface. These time-stamps are recorded with the local clock. This is important. From these measurements, the time-of-flight of the packet and offset of the local clock from the remote clock may be calculated and corrected for. In this way each client node (the hat) in the network will have the same idea of current time, and hence all network packets flowing through the whole network can be synchronised.

The beauty of the system is that the network switches, wiring and all that common infrastructure don’t need to speak 1588 nor have any other special features, they just need to pass along the packets, ideally with a consistent delay.

The Real-Time HAT configures its FPGA via SPI, straight from Raspberry Pi OS, with multiple applications possible, just by a change on the command line. It is possible to upload custom bitstreams, allowing the HAT to be used as a general purpose FPGA dev board should you wish to do so. It even stacks with the official PoE HAT, which makes it even more useful for hanging sensors on the end of a single wire.

Of course, if your needs are somewhat simpler and smaller in scale than a Swiss city, you could just hack a GPS clock source into a Raspberry Pi with a little soldering and call it a day.

Review: Mini AMG8833 Thermal Camera

In our ceaseless quest to bring you the best from the cheaper end of the global electronics markets, there are sometimes gadgets that we keep an eye on for a while because when they appear they’re just a little bit too pricey to consider cheap.

Today’s subject is just such a device, it’s a minimalist infra-red camera using the 8 pixel by 8 pixel Panasonic AMG8833 thermal sensor. This part has been around for a while, but even though any camera using it has orders of magnitude less performance than more accomplished models it has remained a little too expensive for a casual purchase. Indeed, these mini cameras were somewhere above £50 ($70) when they first came to our attention, but have now dropped to the point at which they can be found for somewhere over £30 ($42). Thirty quid is cheap enough for a punt on a thermal camera, so off went the order to China and the expected grey parcel duly arrived.

The interface on this camera is about as simple as it gets.

It’s a little unit, 40 mm x 35 mm x 18 mm, constructed of two laser-cut pieces of black plastic held together by brass stand-offs that hold a PCB between them, and on the front is a cut-out for the sensor while on the rear is one for the 35mm OLED display.At the side on the PCB is a micro USB socket which serves only as a power supply. It’s fair to say that this is a tiny unit.

Applying power from a USB battery bank, the screen comes up with a square colour thermal picture and a colour to temperature calibration stripe to its left. The colours adapt to the range of temperatures visible to the sensor, and there is a crosshair in the centre of the picture for which the temperature in Celsius is displayed below the picture. It’s a very straightforward and intuitive interface that requires no instruction, which is handy because the device has none. Continue reading “Review: Mini AMG8833 Thermal Camera”

Hackaday Podcast 088: Flywheel Trebuchet, Thieving Magpies, Hero Engines, And Hypermiling

Hackaday editors Elliot Williams and Mike Szczys riff on the hardware hacks that took the Internet by storm this week. Machining siege weapons out of aluminum? If they can throw a tennis ball at 180 mph, yes please! Welding aficionados will love to see the Hero Engine come together. We dive into the high-efficiency game of hypermiling, and spin up the polarizing topic of the Sun Cycle. The episode wouldn’t be complete without hearing what the game of Go sounds like as a loop sequencer, and how a variable speed cassette player can be abused for the benefit of MIDI lovers the world over.

Take a look at the links below if you want to follow along, and as always, tell us what you think about this episode in the comments!

Take a look at the links below if you want to follow along, and as always, tell us what you think about this episode in the comments!

Direct download (60 MB or so.)

Continue reading “Hackaday Podcast 088: Flywheel Trebuchet, Thieving Magpies, Hero Engines, And Hypermiling”

Teleconferencing Like It’s 1988: Connecting Vintage Hardware To Zoom

Hang up your car phone and toss that fax machine in the garbage. Even back in the late 80s it was possible to do away with these primitive technologies in favor of video conferencing, even though this technology didn’t catch on en masse until recently. In fact, Mitsubishi released a piece of video conferencing equipment called the VisiTel that can be put to use today, provided you can do a bit of work to get it to play along nicely with modern technology.

[Alex] was lucky enough to have one of these on hand, as soon as it was powered up he was able to get to work deciphering the messaging protocol of the device. To do this he showed the camera certain pictures with known properties and measured the output waveforms coming from the device, which were AM modulated over an RJ9 connection which he had changed to a 3.5 mm headphone jack.

It communicates in a series of pictures instead of sending an actual video signal, so [Alex] had a lot of work to do to properly encode and decode the stream. He goes into incredible detail on his project page about this process and is worth a read for anyone interested in signal processing. Ultimately, [Alex] was able to patch this classic piece of technology into a Zoom call and the picture quality is excellent when viewed through the lens of $399 80s technology.

We have been seeing a lot of other hacks around video conferencing in the past six months as well, such as physical mute buttons and a mirror that improves eye contact through the webcam.