RGB Minecraft Sign Isn’t Just For Looks

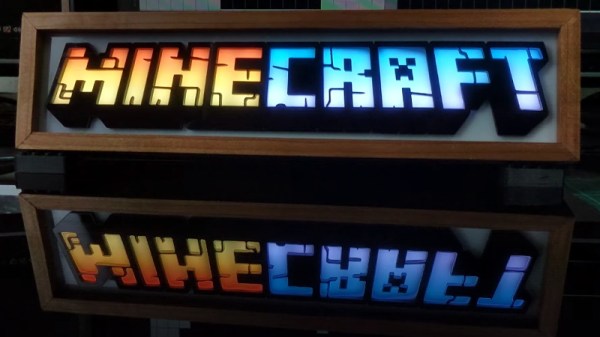
This laser cut and LED illuminated version of the Minecraft logo created by [Geeksmithing] looks good enough to occupy a place of honor on any gamer’s shelf. But it’s not just decoration: it can also notify you about your Minecraft’s server status and tell you when players are online by way of its addressable LEDs.

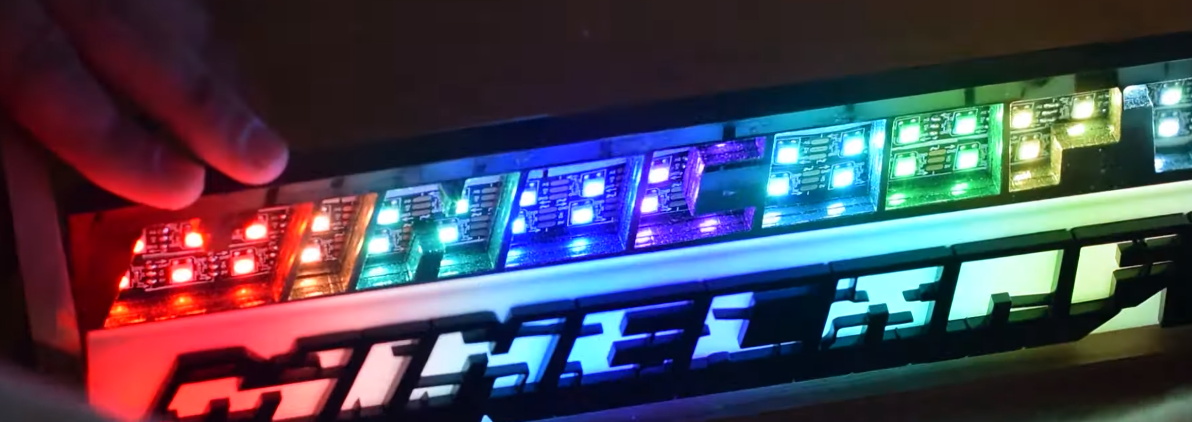
In the first half of the video after the break, [Geeksmithing] shows how the logo itself was built by cutting out pieces of white and black acrylic on his laser cutter. When stacked up together, it creates an impressive 3D effect but also isolates each letter. With carefully aligned rows of RGB LEDs behind the stack, each individual letter can be lit in its own color (or not at all) without the light bleeding into either side.

Once he had a way of lighting up each letter individually, it was just a matter of writing some code for the Raspberry Pi that can do something useful with them. Notifying him when the server goes down is easy enough, just blink them all red. But the code [Geeksmithing] came up with also associates each letter with one of the friends he plays with, and lights them up when they go online. So at a glance he can not only tell how many friends are already in the game, but which ones they are. Naturally this means the display can only show the status of nine friends…but hey, that’s more than we have anyway.

We’ve been seeing people connect the real world to Minecraft in weird and wonderful ways for years now, and it doesn’t seem like there’s any sign of things slowing down. While we recognize the game isn’t for everyone, but you’ve got to respect the incredible creativity it’s inspired in young and old players alike.

Continue reading “RGB Minecraft Sign Isn’t Just For Looks”

Reverse Engineering An RGB Keyboard Under Linux

Hardware support under Linux is far better than it ever has been in the past. These days, most things “just work” out of the box, and you probably won’t have to compile any custom kernel modules. Certainly a far cry from where things were a decade ago. But that doesn’t mean everything will work to 100% of its abilities. Take for example, the Duck keyboard that [Cynthia Revström] has. Sure it works as a basic keyboard under any OS, but getting those fancy RGB LEDs working is another story entirely.

Don’t get the wrong idea here, [Cynthia] isn’t just trying to get the keyboard to flash along to music; the goal was to use the RGB lighting of the Ducky keyboard for notifications that the user can’t possibly ignore. Even the most laser-focused among us would have a hard time not noticing that the entire keyboard is blinking red. But the “DuckyRGB” software that you need to do something like that is Windows-only and apparently distributed via a sketchy Google Drive link. Yikes.

The first step to creating an alternative was to spin up a Windows VM and install DuckyRGB. From there, Wireshark could listen in between the virtual computer and the Ducky keyboard to see what the software was sending over the wire. After identifying a version number being sent in the clear, [Cynthia] was able to isolate the LED commands by searching for the hex color codes. From there, it was a relatively simple matter of writing some glue code to connect it up to an alert service and get notifications going.

There was only one problem; the keyboard didn’t work anymore. Turns out the tool that [Cynthia] wrote to control the keyboard’s LEDs was claiming the device so the kernel couldn’t access it for normal input. It took a detour with HIDAPI to get everyone playing together nicely, and now changing the color of your Ducky keyboard on Linux doesn’t turn it into a paperweight.

Even if you don’t have a Ducky keyboard, or aren’t particularly interested in having its LEDs blinked at you if you do, this project is a phenomenal example of practical USB reverse engineering. [Cynthia] says the inspiration for this project came from friend [Ben Cox], who’s write-up on creating USB userspace drivers we covered last year. If you’ve got and old USB gadget with Windows-only drivers, maybe it’s time you take a crack at unlocking it.

Word Clock Does The Job With Laser-Etched Acrylic

As far as telling the time, word clocks go out of their way to spell it out for you. As long as you know the language, they’re a stylish and effective way to get the message across. [Simon] built an elegant, stripped-back word clock of his own, with a laser cutter helping to get the job done.

The core of the build is an Arduino Nano, hooked up to a string of 22 WS2812B LEDs, driven via the FastLED library. An NXP PCF8563T serves as the real-time clock, to ensure stable and accurate timekeeping. The electronics are all housed inside an enclosure that appears to be constructed from PCBs, with instructions on operating the clock printed on the base.

The actual display is via laser-cut and laser-etched acrylic. The display piece slides into the top of the clock, with the LEDs edge lighting various segments to display the relevant words that make up the current time. The clock is designed in such a way that these display slides can be easily switched out to change the look of the clock, with different fonts and designs.

It’s a quick and clean take on the popular word clock design, and one any makerspace could whip up in a weekend. As far as word clocks go, however, the sky really is the limit when it comes to complexity. Video after the break.

Continue reading “Word Clock Does The Job With Laser-Etched Acrylic”

Giant LEDs, Ruby Lasers, Hologram Displays, And Other Cool Stuff Seen At Maker Faire Rome

Hackers from all over Europe descended upon Rome last weekend for the Maker Faire that calls itself the “European Edition”. This three-day event is one of the largest Maker Faires in the world — they had 27,000 school students from all over Italy and Europe attend on Friday alone.

This was held at Fiera Roma, a gigantic conference complex two train stops south of the Rome airport — kind of in the middle of nowhere. I was told anecdotally that this is the largest event the complex hosts but have no data to back up that claim. One thing’s for certain, three days just wasn’t enough for me to enjoy everything at the show. There was a huge concentration of really talented hardware hackers on hand, many who you’ll recognize as creators of awesome projects regularly seen around Hackaday.

Here’s a whirlwind tour of some of my favorites. On that list are a POV holographic display, giant cast-resin LEDs, an optical-pump ruby laser built out of parts from AliExpress, blinky goodness in cube-form, and the Italian audience’s appreciation for science lectures (in this case space-related). Let’s take a look.

Continue reading “Giant LEDs, Ruby Lasers, Hologram Displays, And Other Cool Stuff Seen At Maker Faire Rome”

RGB Lamp With Micro:Bit Powered Gesture Control

The Micro:bit is a very neat piece of hardware that, frankly, we don’t see enough of. Which made us all the more interested when [Manoj Nathwani] wrote in to tell us about the gorgeous 3D printed RGB LED lamp he created that uses the BBC-endorsed microcontroller to perform basic gesture detection. Purists will likely point out that an Arduino Pro Mini is tagging along to handle interfacing with the LEDs, but it’s still a good example of how quick you can get a project up and running with MicroPython on the Micro:bit.

[Manoj] used eight NeoPixel Sticks, a NeoPixel Ring, and a few scraps of perfboard to construct a three dimensional “bulb” to fill the void inside the printed diffuser. They’re chained together so all the elements appear as a single addressable strip, which made the rest of the project a bit easier to implement. It might not be pretty, but it gets the job done and it’s not like you’ll ever see it again once installed in the lamp anyway.

The Micro:bit and Arduino co-pilot live in the base of the lamp, and the single USB cable to provide power (and the ability to update the device’s firmware) is run out the bottom to give the whole thing a clean and professional look. For those wondering why the Arduino has tagged along, [Manoj] says he couldn’t get the NeoPixel libraries to play nicely with the Micro:bit so he’s using the Arduino essentially as a mediator.

Right now the only gesture that’s detected on the Micro:bit is a simple shake, which tells the Arduino to toggle the light show on and off. But in the future, [Manoj] plans to implement more complex gestures which will trigger different animations. As he explains in the blog post, gesture recognition with the Micro:bit is incredibly simple, so it should be easy to come up with a bunch of unique ways to interface with the lamp.

Color changing LED lamps are a favorite project of hackers, and we’ve seen examples built with everything from glass and copper to laser-cut pieces of wood and veneer. While you might prefer to skip the gesture control for an ESP8266 and UDP, we think this project is another strong entry into this popular genre.

A Laser Cut Gingerbread Cathedral

One of the more disappointing news stories of 2019 was the fire at the Notre Dame cathedral. Widely considered a building of great historical importance and architectural merit, it was heavily damaged and will take significant time and resources to repair. Fundamentally though, if you’re reading this, that’s probably someone else’s job. Instead, why not just build your own Notre Dame out of gingerbread at home? [Scott Hasse] did just that.

The stained glass windows are the real party piece of the build.

The project began by using an existing papercraft model. This had to be heavily modified to account for the thickness of gingerbread and the fact that it can’t easily be folded around corners. The modified geometry was then lasercut at the Sector 67 hackerspace, as they’re experienced with the material.

With parts cut out, royal frosting was used as a mortar to help stick parts together during assembly. Significant development time was also spent in perfecting the stained glass windows, made from colored sugar. After much experimentation, a process involving melting the sugar on silicone sheets proved to be most successful. To complete the look, a series of RGB LEDs were also installed during the construction process.

The final results are nothing short of stunning. The build is instantly recognisable as the famous French cathedral, and the back-lit stained glass is absolutely breathtaking. We wouldn’t want to be going up against [Scott]’s family at the county fair baking contest, that’s for sure!

Continue reading “A Laser Cut Gingerbread Cathedral”

RGB Word Clock Doesn’t Skimp On The Features

Like most pieces of technology, word clocks seem to be getting better and better every year. As hackers get their hands on better microcontrollers and more capable LED controllers, these builds not only look more polished, but get improved features and functions. Luckily for us, the rise of these advanced modular components means they’re getting easier to build too. For an example of these parallel traits, look no further than VERBIS by [Andrei Erdei].

This colorful word clock is powered by an ESP8266, a 8×8 RGB LED matrix, and a WS2812 RGB LED controller module. [Andrei] used the diminutive ESP-01 which can plug right into the LED controller, and just needs a 3.3 VDC regulator board to complete the very compact electronics package.

To keep the LEDs from interfering with each other, [Andrei] has designed a 3D printed grid which fits over the matrix board. On top of that goes a piece of paper that has the letters printed on it. He mentions that he was able to get good results printing this “stencil” out on an inkjet printer by simply running the same piece of paper through a few times; picking up more black ink each time it went through. Judging by the sharp characters seen in the video after the break, the trick worked well.

With his hardware put together, [Andrei] turned his attention to the software. We really think the project shines here, as his clock not only supports NTP for automatically setting the time over the Internet, but offers a full web interface to control various functions such as the LED colors. You can even change the NTP server and network configuration right from the UI, which is a nice touch compared to just hard coding the values into the code. Even if you don’t use the same hardware, the open source control software is definitely something you should look into if you’re building your own word clock.

We recently covered another easy to build word clock that used an LED matrix and not a whole lot else, but it was quite tiny. This build is a much more reasonable size for a desk, but you’ll probably need to break out the laser cutter if you want to get much bigger.

Continue reading “RGB Word Clock Doesn’t Skimp On The Features”