The Drone That Flies In Any Orientation

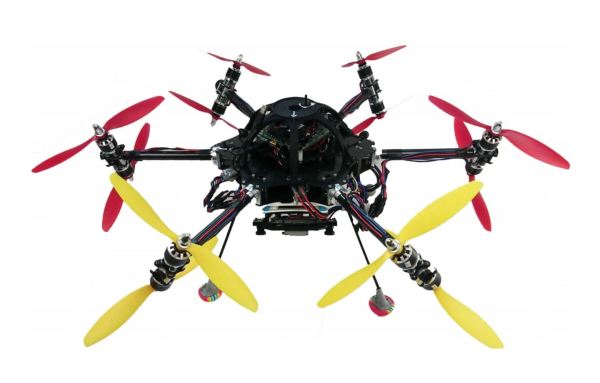
Modern radio-controlled multi-rotor drone can be incredibly agile, but can only make orientation changes around the yaw axis while remaining in approximately the same position. Researchers at ETH Zurich have again built and tested multirotor with controllable motion six degrees of freedom, this time dramatically improving efficiency.

We covered a similar design from ETH Zurich previously which was hexacopter with arms with limited rotation. This new design is also a hexacopter, but with 2 coaxial motors on each rotating arm. Each arm has an increased range of rotation over the previous design, beyond 360 degrees. With the range of rotation and the very complex control system, the drone can efficiently fly in any orientation, while still being able to apply effective torque or linear force in any direction. This opens up a lot of possibilities for tasks that drones can perform, like close-up industrial inspection, using tools or pulling cables while keeping the rotors clear.

The arms do have a limited amount of rotation before winding the motor cable tight, but the control system keeps track of this and can unwind during or after movement. See the video after the break to see it in action. The complete scientific paper is not light reading, but definitely interesting. We’re looking forward to seeing if and when these type designs get used in real-world applications.

There are without a doubt a lot of drones in our future, and probably the most successful project to date is the Zipline fixed-wing drones in Rwanda and Ghana, which have made over 35000 deliveries of emergency medical supplies since 2016.

Thanks [Qes] for the tip!

Continue reading “The Drone That Flies In Any Orientation”

Printed Brain Implants Give New Meaning To Neuroplasticity

3D printing has opened up a world of possibilities in plastic, food, concrete, and other materials. Now, MIT engineers have found a way to add brain implants to the list. This technology has the potential to replace electrodes used for monitoring and implants that stimulate brain tissue in order to ease the effects of epilepsy, Parkinson’s disease, and severe depression.

Existing brain implants are rigid and abrade the grey matter, which creates scar tissue over time. This new material is soft and flexible, so it hugs the wrinkles and curves. It’s a conductive polymer that’s been thickened into a viscous, printable paste.

The team took a conductive liquid polymer (water plus nanofibers of a polystyrene sulfonate) and combined it with a solvent they made for a previous project to form a conductive, printable hydrogel.

In addition to printing out a sheet of micro blinky circuits, they tested out the material by printing a flexible electrode, which they implanted into a mouse. Amazingly, the electrode was able to detect the signal coming from a single neuron. They also printed arrays of electrodes topped with little wells for holding neurons so they can study the neurons’ signals using the electrode net underneath.

This particular medical printing hack is pretty far out of reach for most of us, but not all of them are. Fire up that printer and check out this NIH-approved face shield design.

Robot Arm Sucks In A Good Way

Building a robot arm is fun, but no longer the challenge it once was. You can find lots of plans and kits, and driving the motors is a solved problem. However, there is always one decision you have to make that can be a challenge: what effector to put on the end of it. If you are [MertArduino] the answer is to put suction at the end. If you need to grab the right things, this could be just the ticket for reliably lifting and letting go. You can see a video of the arm in action, below.

The arm itself is steel with four servo motors and comes in a kit. The video shows the arm making a sandwich under manual control. We suspect he might have put it under Arduino control but there’s no sudo for making sandwiches.

Continue reading “Robot Arm Sucks In A Good Way”

Capture Device Firmware Hack Unlocks All The Pixels

According to [Mike Walters], the Elgato Cam Link 4K is a great choice if you’re looking for a HDMI capture device that works under Linux. But the bad news is, it wouldn’t work with any of the video conferencing software he tried to use it with because they expect the video stream to be in a different pixel format. For most people, that would probably have been the end of the story. But you’re reading this on Hackaday, so obviously he didn’t give up without a fight.

Early on, [Mike] found there was a software workaround for this exact issue. The problem isn’t that the Elgato can’t generate the desired format, it’s that the video conferencing programs just don’t know how to ask it to switch modes. The software fix is to create a dummy Video4Linux device and use that to change the format in real-time using ffmpeg. It’s a clever trick if you’ve got a conference call coming up in a few minutes, but it does waste CPU resources and adds some unnecessary hoop jumping.

Putting the device into bootloader mode.

Inspired by the software fix, [Mike] wondered if there was a way he could simply force the Elgato to output video in the desire format by default. He found a firmware dump for the device online, and found where the pixel formats were referenced by searching for their names in ASCII with hexdump. Looking through the source for the Linux USB Video Class (UVC) driver, he was then able to determine what the full 16 byte sequence should be for each video mode was so he could zero out the unwanted ones. Then it was just a matter of flashing his modified firmware back to the hardware.

But there was a problem: with the modified firmware installed, the device stopped working. After investigating the obvious culprits, [Mike] broke out the oscilloscope and hooked it up to the Elgato’s flash chip. It turns out that due to a bug in the program he was using, the SPI erase commands weren’t getting sent during the flash. This lead to corrupted firmware which was keeping the Elgato from booting. After making a pull request with his fixes, the firmware flashed without incident and the capture device now does double-duty as a webcam when necessary.

We could certainly think of easier and quicker was to roll your own webcam, but we’re glad that [Mike] took the time to modify his Elgato Cam Link 4K and document it. It’s a fantastic example of practical firmware hacking, even if you’re not in the market for a new high-definition video conferencing rig.

Reverse Engineering An RGB Keyboard Under Linux

Hardware support under Linux is far better than it ever has been in the past. These days, most things “just work” out of the box, and you probably won’t have to compile any custom kernel modules. Certainly a far cry from where things were a decade ago. But that doesn’t mean everything will work to 100% of its abilities. Take for example, the Duck keyboard that [Cynthia Revström] has. Sure it works as a basic keyboard under any OS, but getting those fancy RGB LEDs working is another story entirely.

Don’t get the wrong idea here, [Cynthia] isn’t just trying to get the keyboard to flash along to music; the goal was to use the RGB lighting of the Ducky keyboard for notifications that the user can’t possibly ignore. Even the most laser-focused among us would have a hard time not noticing that the entire keyboard is blinking red. But the “DuckyRGB” software that you need to do something like that is Windows-only and apparently distributed via a sketchy Google Drive link. Yikes.

The first step to creating an alternative was to spin up a Windows VM and install DuckyRGB. From there, Wireshark could listen in between the virtual computer and the Ducky keyboard to see what the software was sending over the wire. After identifying a version number being sent in the clear, [Cynthia] was able to isolate the LED commands by searching for the hex color codes. From there, it was a relatively simple matter of writing some glue code to connect it up to an alert service and get notifications going.

There was only one problem; the keyboard didn’t work anymore. Turns out the tool that [Cynthia] wrote to control the keyboard’s LEDs was claiming the device so the kernel couldn’t access it for normal input. It took a detour with HIDAPI to get everyone playing together nicely, and now changing the color of your Ducky keyboard on Linux doesn’t turn it into a paperweight.

Even if you don’t have a Ducky keyboard, or aren’t particularly interested in having its LEDs blinked at you if you do, this project is a phenomenal example of practical USB reverse engineering. [Cynthia] says the inspiration for this project came from friend [Ben Cox], who’s write-up on creating USB userspace drivers we covered last year. If you’ve got and old USB gadget with Windows-only drivers, maybe it’s time you take a crack at unlocking it.

Pluto Might Not Be A Planet, But It Is An SDR Transceiver

Many of the SDR projects we see use a cheap USB dongle. They are great, but sometimes you want more and — especially — sometimes you want to transmit. The Analog Devices ADALM-Pluto SDR is easily available for $200 and sometimes as low as $100 and it both transmits and receives using an Analog AD9363 and a Zynq FPGA. Although you normally use the device to pipe IQ signals to a host computer, you can run SDR applications on the device itself. That requires you to dig into the Zynq tools, which is fun but a topic for another time. In this post, I’m going to show you how you can use GNU Radio to make a simple Morse code beacon in the 2m ham band.

I’ve had one on my bench for quite a while and I’ve played with it a bit. There are several ways to use it with GNU Radio and it seems to work very well. You have to hack it to get the frequency range down a bit. Sure, it might not be “to spec” once you broaden the frequency range, but it seems to work fine. Instead of working from 325 MHz to 3,800 MHz with a 20 MHz bandwidth, the hacked device transceives 70 MHz to 6,000 MHz with 56 MHz bandwidth. It is a simple hack you only have to do once. It tells the device that it has a slightly better chip onboard and our guess is the chips are the same but sorted by performance. So while the specs might be a little off, you probably won’t notice.

Continue reading “Pluto Might Not Be A Planet, But It Is An SDR Transceiver”

PCB Bring-Up Hack Chat

Join us on Wednesday, April 15 at noon Pacific for the PCB Bring-Up Hack Chat with Mihir Shah and Liam Cadigan!

The printed circuit design process is pretty unique among manufacturing processes. Chances are pretty good that except for possibly a breadboard prototype, the circuit that sits before you after coming back from assembly has only ever existed in EDA software or perhaps a circuit simulator. Sure, it’s supposed to work, but will it?

You can — and should — do some power-off testing of new boards, but at some point you’re going to have to flip the switch and see what happens. The PCB bring-up process needs to be approached carefully, lest debugging any problems that crop up become more difficult than need be. Mihir and Liam from inspectAR will discuss the bring-up process in depth, offering tips and tricks to make things go as smoothly as possible, as well as demonstrating how the inspectAR platform can fit into that process, especially with teams that are distributed across remote sites. If your board releases the Magic Smoke, you’ll want to know if it’s your design or an assembly issue, and an organized bring-up plan can be a big help.

Note: Liam will be doing a simulcast web demo of inspectAR via Zoom. ​

join-hack-chatOur Hack Chats are live community events in the Hackaday.io Hack Chat group messaging. This week we’ll be sitting down on Wednesday, April 15 at 12:00 PM Pacific time. If time zones have got you down, we have a handy time zone converter.

Click that speech bubble to the right, and you’ll be taken directly to the Hack Chat group on Hackaday.io. You don’t have to wait until Wednesday; join whenever you want and you can see what the community is talking about.

Continue reading “PCB Bring-Up Hack Chat”